I’m having So Much Fun embroidering the leaves on the Secret Garden project!!
The small and medium-small leaves work up really quickly if you’re using fishbone stitch and fly stitch, which we talked about the other day.
And with hopes of spring springing eternal, the green is a mood lifter right now, too. Winter’s loosening up its hold here in Kansas – the sun is shining, the temperature is creeping upwards, almost all the snow is gone, the birds are singing cheerily of a morning. And stitching green leaves makes me ever-hopeful that spring is just around the corner.
Today, we’ll look at a full shot of all the vines finished and a good amount of the small leaves finished, and we’ll discuss some more tips for working the small and medium sized leaves on the project.
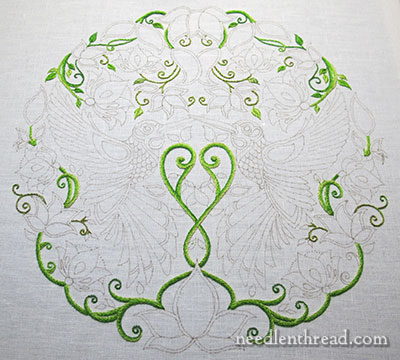
This is what the piece looks like stepping back from it, with all the vines embroidered and all the small leaves in the top half (above the hummingbirds) embroidered as well.
It looks sparse, doesn’t it? I don’t think it’s going to look vibrant and really full until those large leaves start going in! But we’re getting there, we’re getting there…
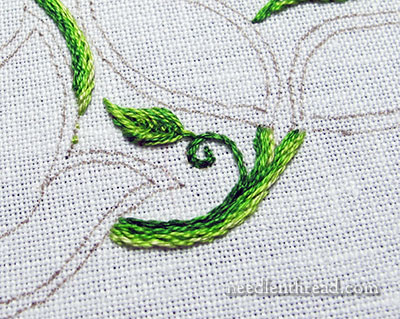
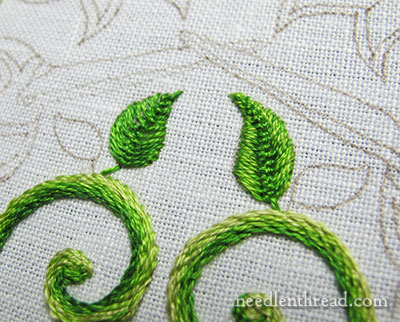
When stitching the leaves (the one above is a fly stitch leaf, started with a twisted chain stitch), it makes a big difference having two shades of green in the needle.
Notice that the leaf looks a little shaded. But I didn’t shade it – that’s just the way the two shades of green worked themselves out as I stitched.
That’s a very easy way to add “shading” to a leaf. It’s almost cheating!
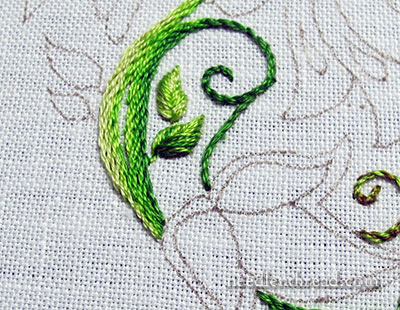
Here are another two leaves worked with two shades of green in the needle, this time in fishbone stitch.
For the lower leaf, I skipped a shade of green in the line-up of the greens. So I used 905 (medium-dark) and 907 (medium-light) and skipped 906.
For the upper leaf, I used 907 and 472, the two lightest shades of green.
The moral of the story: you can skip around with your greens, using different combinations, to add a little variety to the leaves.
On these leaves which branch off the brown-and-green twiggy vines, I used predominantly lighter greens, because the darkest shades in the selection of greens looked too blue next to the brown and light green vines.
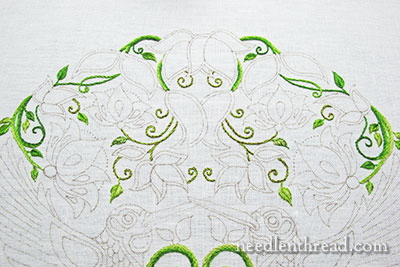
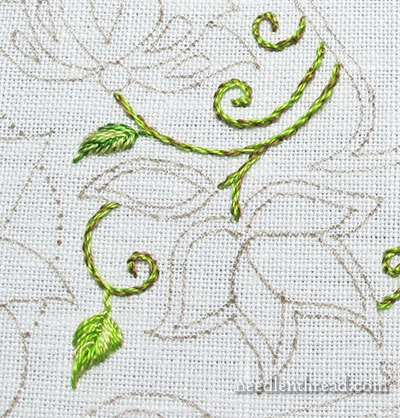
This is the top half of the design, with all the small leaves finished.
Here you can see the two larger leaves just below the hummingbirds’ beaks. They’re not “large” leaves – I’d classify them as medium-small, compared to the rest of the project.
These are worked in closed cretan stitch. Initially, I worked them with two threads in the needle (906 – the medium shade of green – and 905, the next darker shade).
The leaf on the left is the initial result of the closed cretan stitch with those two shades. And it’s ok, but… I really wanted something a little thicker. The larger the leaf, the less coverage and fill you get with two strands of floss.
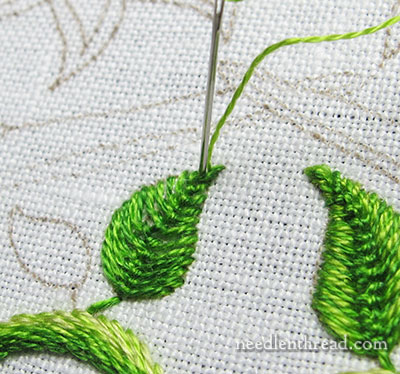
So, to thicken the leaf up and lighten it up a little bit, I took the 907 (the medium-light green) in one strand is a size 10 crewel needle, and I worked light green straight stitches between the cretan stitches, working from the edge to the middle.
This really filled out the leaf (you can see the finished one on the right) and brightened it up quite a bit.
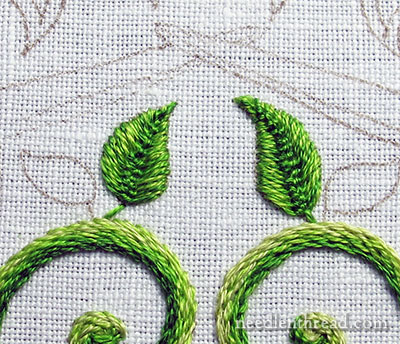
Here they both are, “enhanced” with the lighter green.
The light green is worked only just up to the braided center area created by the cretan stitch – it doesn’t go into that area. This way, the braid stays intact, creating the vein down the center of the leaf, but the edges get filled out quite a bit.
I plan to use this enhancement method on many of the medium leaves, but not necessarily with the cretan stitch only. There are other stitches that work well to fill leaves and make a broad center vein, so I’ll test out some other stitches along the way, too.
So, at this point, I have all the vines finished, the small leaves on the top half finished, and a few small leaves and medium-small leaves on the lower half finished.
My next milestone will be finishing all the small and medium-small leaves on the whole piece. Then, I’ll do one of two things: I’ll either give the green a rest for a bit and move on to the flowers before tackling the large leaves, or I’ll just tackle the large leaves.
Filling Larger Spaces
Keep is mind, as the leaves get larger, we have to think of other ways to fill them. Fishbone stitch, satin stitch, cretan stitch – these won’t really work on the large leaves on this piece, because the stitches would be too long.
Another thing to keep in mind as the leaves get larger (and we have to use different techniques to fill them): the embroidery will slow down quite a bit. While it’s fairly easy to stitch five little fishbones leaves in twenty minutes, it’ll take twenty minutes (or significantly longer, depending on the technique) just to fill one large leaf.
Working at Your Own Pace
If you’re following along with the Secret Garden project or some variation thereof, don’t let me rush you! Work at your own pace. That’s what the Project Index is for. You can go back to it and read the articles again as your project develops.
On the other hand, if you’re way ahead of me, don’t rush me! I’ve gotten a few emails asking what to do on the flowers. If you’re finished with the leaves, or you just want to stitch the flowers, feel free to stitch them however you want to stitch them. I can’t instruct individuals via email, and then write the same information again on the blog. Don’t feel like you have to wait for me, though – you are most welcome to move ahead and interpret your version of the project however you wish!
Sharing Photos
I’ve had a couple requests about setting up a place to share photos for this project. I’m working on some options and will let you know when I have something set up.
Questions, comments, suggestions? Feel free to have your say below!
If you’d like to follow along with the Secret Garden Hummingbirds project, which features a design from “Secret Garden: an Inky Treasure Hunt & Coloring Book” by Johanna Basford, you can find all the articles relating to this project arranged in chronological order in the Secret Garden Project Index. Among the articles, you’ll find plenty of tips and techniques that will help you with your own embroidery projects.

