Remember last week when we looked at my first sorry attempt at embroidering the hummingbird beak? So many of you chimed in, echoing my misgivings about the outcome with the split stitched beak in dull browns.
I’m ever grateful for the feedback and the suggestions! I’ve said it before, and I’m sure I’ll say it again: you’re the best! What would Needle ‘n Thread be without you?
Following that first Beak Blunder, I undertook the battle for a better beak right away, and this is what I’ve come up with so far. Let’s see how you like it!
The first step: get rid of the split stitch in the dull browns. Every battle begins with a little reconnoitering, and, with embroidery, battles often include reverse stitching.
This was probably the Most Fun I’ve ever had, picking out embroidery stitches on a project. I had no qualms at all, snipping up those split stitches and pulling them out with tweezers. I went at it with lusty gusto!
And as always, when finished, I was ever grateful for the good linen ground fabric for this embroidery piece. There are very few fabrics that hold up to “frogging” (that’s picking out – rip it, rip it!) like linen does.

(You can click on the photos for larger versions!)
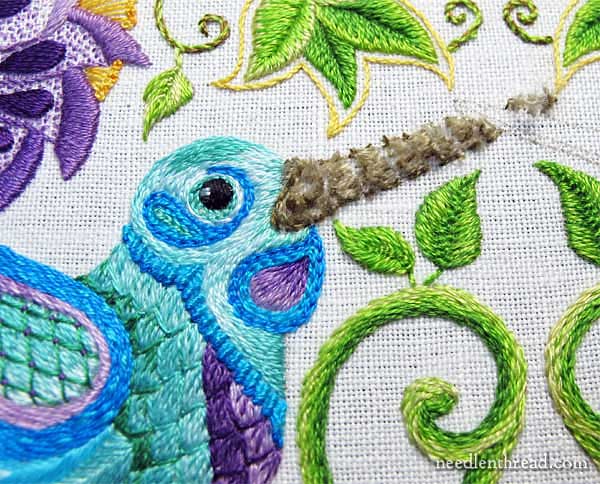
Then, using long and short stitch and working with shades of gray and the reds and corals on the flowers, I stitched in a new beak.
I know the beak is heavy – much heavier than what you’d expect on a hummingbird – but since the design is already drawn, I’m not going to re-draw this area and work in different beaks.
The grays worked out well, I think. There are a couple little areas I will touch up still, once I have the second beak in.
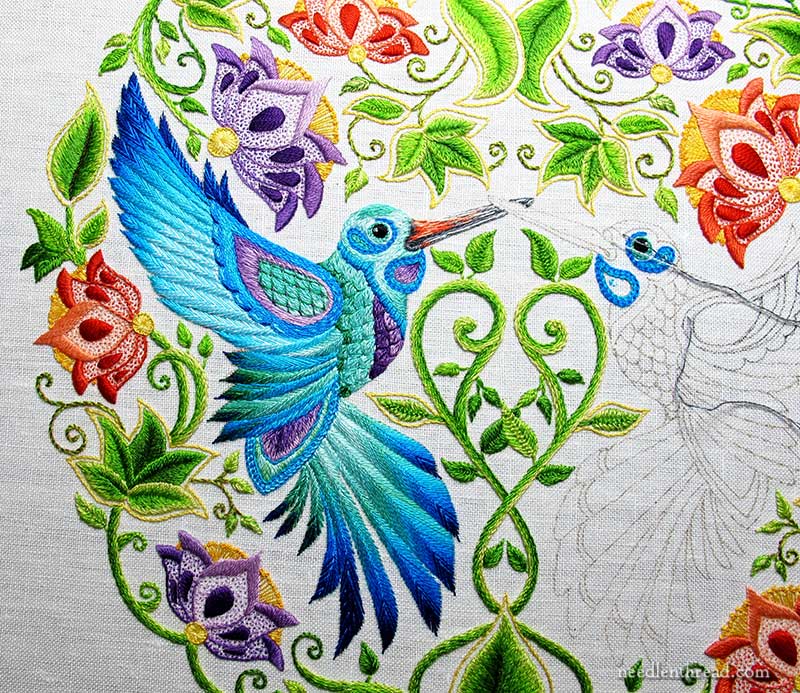
Here’s the beak in context with the whole bird and more of the whole piece, so you can get an idea of how it works with the colors in the rest of the embroidery.
And finally:
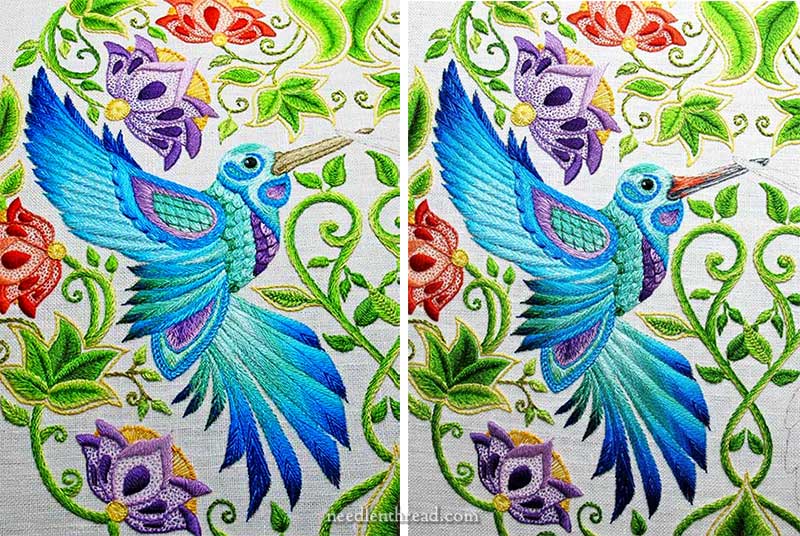
Here are the two attempts, side by side.
One of the areas on the new beak that I want to touch up is where the red graduates to a very light gray towards the top of the beak. The light color there is hard to see, and it makes the beak look as if it bulges out further down, so I’ll try to improve that with a well-placed sneaky stitch or two.
Overall, I like the beak much better. I think I’ll keep it!
My next step on the project is to embroider the beak and head on Bird Two. I’m embroidering the second bird in the same colors as the first and pretty much the same techniques, in hopes that Bird Two will work up much faster, since I already know where I’m going.
What do you reckon? Does beak two work better? Did you still have some other idea in mind for the color? What’s your take on it? Feel free to use the comment form below to weigh in!
If you’d like to follow along with the Secret Garden Hummingbirds project, you can find all the articles relating to it in this Secret Garden Embroidery Project index. The articles are arranged chronologically, so that you can follow the development from start to finish.

