Last week, we began Part 1 of this mini series on how to embroider and finish a Christmas ornament using materials, threads, and embellishments from your own stash.
Today, we’ll look at Part 2, which is essentially finishing the front of the ornament (even though, when I took the photos, I hadn’t finished the front of the ornament yet!). No excuse except (cue up the music): “It’s that time of year…”
(Is anyone else trying to figure out how we arrived at 8 days before Christmas, without warning?)
But see, that’s the nice thing about this project. It’s relaxing. It’s fun. It’s easy. And it should produce a nice finished ornament to either give as a gift or add to your own tree. Above all, this should be a no-stress project. And that’s exactly how I’m approaching it.

In the last several days, I’ve added a couple tutorials here on Needle ‘n Thread for the techniques I’ve used on this ornament, specifically a tutorial on how to use DMC Memory Thread and a tutorial on how to ruche a ribbon.
The reason I wrote these tutorials separately is because you can use those techniques for other surface embroidery projects, and I didn’t want to limit them to “Christmas Ornaments” – even though that’s what I’m making.
The idea with this type of ornament, though – what I would call “free style” embroidery – is that you can do whatever you want to do with the embroidery on it. You don’t have to do what I do! You can pick your own stitches, your own supplies, your own techniques to piddle about with.
The Stitch Fun series here on Needle ‘n Thread would be a great place to find fun stitches that you can put to use on your own ornament.
So, the front of my ornament is almost finished, but I have some correcting to do, and I have to finish some beading.
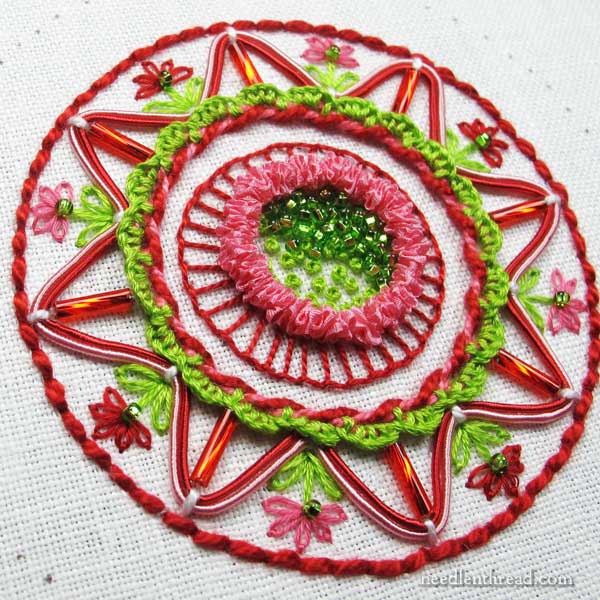
This is what I did on my ornament, from the outside in, so far, picking up from where we left off in Part 1:
Between the backstitched outer line and the buttonholed cable chain stitch, I couched DMC Memory Thread in waves. I used two pieces of Memory Thread in pink and red and couched them with #5 white perle cotton.
Between the waves of the Memory Thread, in the outer spaces, I worked some flowers. Using three strands of DMC floss in bright green, I worked a straight stitch for the stem and two daisy stitches for the leaves. The flowers, which alternate red and pink around the circle, are worked in daisy stitch, using DMC cotton floche. I placed a little green seed bead in the center of each flower.

On the inside of the waves, I added long, red, twisted bugle beads.
Around the inner ring, I added a ruched ribbon outline in pink.
Around the ruched ribbon outline, I worked a buttonhole stitch ring in red – but it’s coming out. I have another idea for there, and the buttonhole ring came out a little lopsided.
On the inside of the ruched ribbon ring, I worked some scattered French knots in green (with three strands of floss) as a foundation, and over those and between them, I’m working little tiny green seed beads.

Why the French knots? Well, I didn’t want my seed beads to sit inside the circle at the same level. I want to pile them in, kind of like gravel, some higher and some lower then the others.
To do that, I worked the French knots first, so that I can work beads on top of them and in between them. This gives the beaded area a kind of gravely, sparkly, random, really textured appearance, without stitching beads on top of beads.
The beads are not quite finished.
So, to finish the front of the ornament, I need to re-work the buttonhole around the ruched ribbon, and I need to finish the seed beads.
Once the front of the ornament is finished, I’ll transfer the design again (I covered how I transferred the design here) and I’ll start the back of the ornament.
While I’ve been working on the front of the ornament, my mind was constantly working on ideas for the back of the ornament, which will be the same color scheme, but with other techniques and stitching approaches.
Then, we’ll put the two sides together, add a cord, and finish the edge. We’ll cover all of that in parts 3 and 4, and yes – before Christmas!
Over to You…
Do you have any questions or need any clarifications? You’re welcome to leave a comment below!

