Seems rather shoddy of me to pretend this is something special for St. Patrick’s Day. After all, I’ve been working with green thread for the past several weeks, and it really has nothing to do with March 17th. But happy St. Patrick’s Day, anyway!
The Secret Garden Project, in my mind, is awash with green. My plan for the piece has always been very green and lush. And with all those leaves in the design, it’s no wonder. The leaves beg for green.
Now, I know there are so very many shades of green out there, but I’m quite taken with these bright greens I’ve been working with so far on the project. I think it’s the springy green-ness of them that gets me. They’re just chipper, and they make me happy.
Green is a color that tends to put people in a good mood. That’s one of the reasons grocery stores put vegetables and flowers right near the front of the store, so you see them when you enter. It lifts the spirits.
On that note, here’s some green to lift your spirits, and a couple mistakes, too, to keep us all from getting too green-giddy.
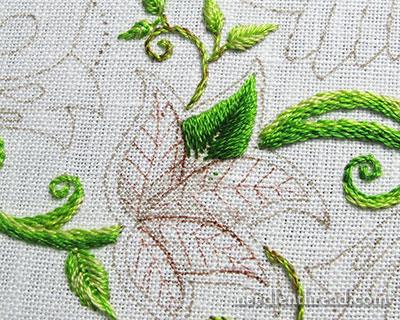
On the middle outer edges of the design, on both sides, there’s a little triple-cluster of leaves with an outline.
I thought, Why not try something different with this outline area?
I fiddled with the idea of a contrasting color around the leaves, because several readers suggested that approach, and I wanted to make sure that it wasn’t just a pre-conceived notion that encouraged me to avoid that route.
Alas, I took no photos of that attempt – and I didn’t get far with it, anyway. Maybe ten stitches, and I knew it was a mistake. For me, for the piece to come out according to my notion of it, the outlines need to be green.
It’s not that I’m going for an absolutely realistic look for this project. I’m not – I can’t. The hummingbirds, while they are obviously hummingbirds, are quite stylized, and so are the flowers and the vines. So it’s not realism I’m after. Even so, a contrasting color in the outline area wasn’t going to do it for me.
This doesn’t mean it won’t work for you – try it and see if you like it. Go wild and crazy! Have fun trying different ways of tackling the outlines. Don’t be inhibited! You might like it! I just know I didn’t like it on my version.
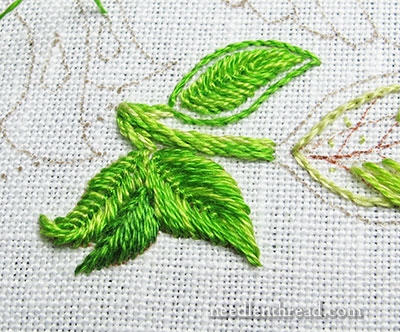
Then I thought maybe the stitch could be addressed. Maybe something a little less solid, but still green, would do it. And so I attempted the buttonhole stitch around the cluster, which is what you see in the photo above.
And I concluded:
Ick.
It could be the lack of contrast.
It could be the choice of the buttonhole stitch.
It could be the fact that it’s sloppy, quick stitching, because I knew it was just a test.
But whatever the case, I didn’t like it.
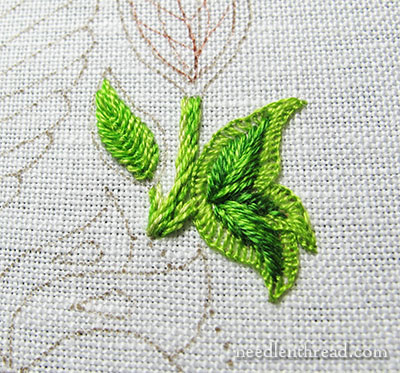
So I discarded the outline on the triple cluster of leaves altogether, and I extended the leaves out to the outline. I worked them in fly stitch in the medium and medium-light greens, except for the middle one, which is fishbone stitch, in the medium and medium-dark green.
I liked that better.
I outlined the other leaf on the other side of the stalk in the medium (bright) green, using one strand of floss and stem stitch. And I liked it, too – at least for now. So I left that outline…

Then, I stitched the big single leaf on the center side of the design in long & short stitch, following the same approach with the long & short stitch that I used on the large leaf that we talked about last week.
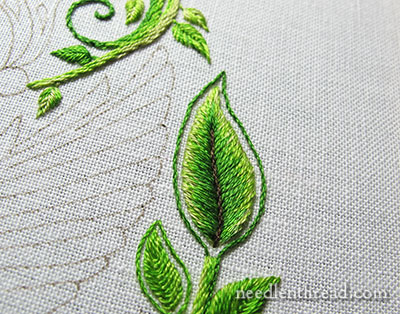
I decided to outline that leaf in the medium dark green.
Guess what?
I didn’t like that, either.
At this point, I concluded that I seem to have a problem with the outlines.
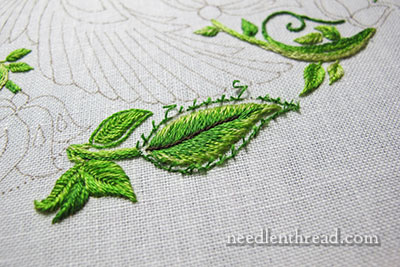
So I left the outline and moved on to a different cluster of leaves, the five-leaf cluster on the lower outsides of the design. And I started that in long & short stitch, too.
The more leaves I do in long & short stitch, the more I see the project unfolding as I pictured it, with lush, brilliant greens.
But after a bit of sporadic stitching, I decided it was time for a new perspective.
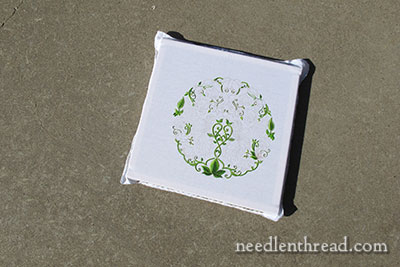
So I took the frame outside on the patio and dropped it on the ground in the sunlight. I wanted a bird’s eye view from far away (or at least 5 feet away, up at my eye).
The photo above is pretty much what I saw.
When I’m working up on top of the piece and taking photos close up, it looks very full – as if I’ve done a lot of stitching on it. I also see little piddly things that bug me.
When I look at the frame from farther away (just standing over it on the patio), it doesn’t look very full. And the little piddly things that bug me? In the scheme of the whole piece, they aren’t noticeable.
That doesn’t mean I won’t change the piddly things that bug me.
But I think it’s a good idea to step back and take the whole into perspective now and then. Working right on top of it every day, it’s hard to see the whole picture.
There are many more leaves to go. And that means more green to work through. So even when the calendar changes and green loses its yearly St. Paddy’s Day popularity, brace yourself for a lot more of it on this project!
Good thing I like green, eh?
If you’d like to follow along with the Secret Garden Hummingbirds project, which features a design from “Secret Garden: an Inky Treasure Hunt & Coloring Book” by Johanna Basford, you can find all the articles relating to this project arranged in chronological order in the Secret Garden Project Index. Among the articles, you’ll find plenty of tips and techniques that will help you with your own embroidery projects.

