Last time we visited the Secret Garden project, I was reveling in Yellow. I still haven’t gotten over the excitement of the yellow – I want to outline every element on the project in yellow now!
But I’ll refrain…
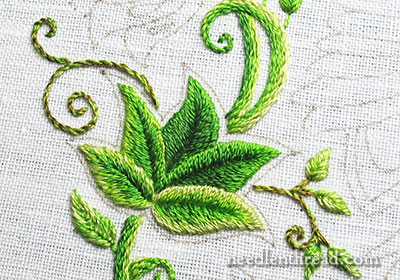
Today, let’s look at some leaf clusters. There are quite a few clusters of leaves on the Secret Garden project. Some could certainly be translated into flowers. The three-leaf clusters, for example, could be worked as some kind of stylized flower, in colors other than green.
But, as I explained earlier, my color vision for this particular project is predominantly lush and vibrant green – lots of green. Very leafy and springy green. And so my clusters are all going to be leaves.
Before I tackled the leaf clusters, I looked at them long and hard and thought about how to arrange the leaves in the clusters. On the original design, these particular leaves already have lines on them, but when I transferred my pattern, I didn’t include the lines. I wanted to make a clear distinction between the leaves in each cluster, and I figured I could do that better, working directly on the fabric.
So, just before tackling any particular leaf, I mark out, directly on the fabric, where I want my lines separating the leaves in the cluster.
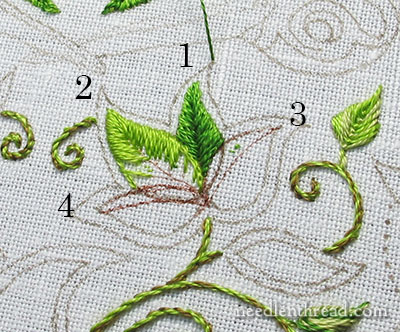
My five-leaf clusters ended up like the one in the photo above – one leaf farthest back, overlapped by two leaves, which are overlapped by two more leaves.
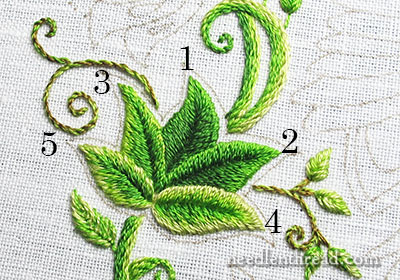
The leaves are embroidered in long & short stitch, as explained in this article.
The order of stitching is marked above. The darkest leaf that’s farthest back is stitched first. Leaf #2 overlaps #1, so it is stitched next, and leaf #3 overlaps #1, so it is stitched next. And then #4 and #5 are independent of each other, so those two can be stitched in any order, last.
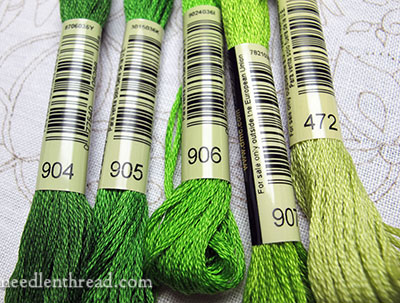
These are the DMC greens I’m using. Starting from lightest green to the darkest, let’s letter them from A to E.
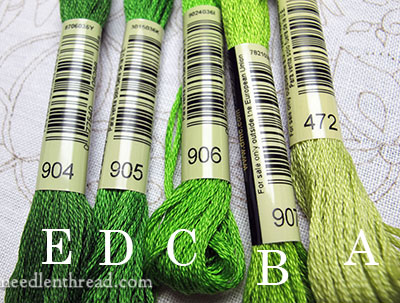
Ok, the lettering’s running a little backwards in the photo, but with the greens lettered from A-E, it’s easier to explain the color layout on the leaves.
Leaf 1 (farthest back) is worked in C, D & E. C is worked first (the lighter of the three colors), just on the tip of the leaf and a little bit down the sides. I switched to D for the majority of the sides, and E (the darker of the three) is worked on the inside of the leaf and right at the base, near where the other leaves overlap. This gave me the darkest of the five leaves.
Leaf 2 is C, D, and E. The outside of the leaf, all around – up both sides and the tip – is worked in C. The next layer towards the middle of the leaf is D, and the inside of the leaf and the lower base (towards leaf #4) is worked in E.
Leaf 3 is worked in B, C, and D, and the arrangement is the same as leaf 2 – the lightest on the outside, the darkest towards the inside, though some of the darker green is worked at the lower left base, where leaf 5 overlaps.
Leaves 4 and 5 are worked in A, B, and C, with the lightest green (A) on the outside, and the darker greens towards the middle. You might not be able to fit three shades of green in the top half of Leaves 4 and 5, if they ended up shaped like mine. And you might be able to fit four shades of green in the lower half – it just depends on the layout of your leaf.
Order of Stitching, in a Nutshell
The leaves farther back in the cluster are darker, gradually getting lighter towards the front.
Always start with the lighter of the greens on the outside of the leaf.
Where there is an overlapping leaf, work some darker green next to the overlap. Make sure that the overlapping green leaf is always much lighter than the one behind it, so that the distinction between the two leaves is clear.
Four Leaf Clusters
Some of the clusters on the Secret Garden Hummingbirds have four leaves in them.
These four leaf clusters are located just above the hummingbirds, but I’m working with my frame upside-down, for two reasons: 1. it’s easier to reach, and 2. because the leaves are hanging upside-down. With the frame upside-down, the leaves are now right-side-up. This makes them a little easier to stitch.
With these four leaf clusters, you can decide for yourself how you want them to overlap.
I decided to overlap them as shown in the photo above. Leaf 1 is overlapped by 2 and 3, and leaf 2 is overlapped by leaf 4.
They’re stitched in the same manner as the five-leaf clusters: darkest in the back, overlapped by gradually lighter leaves.
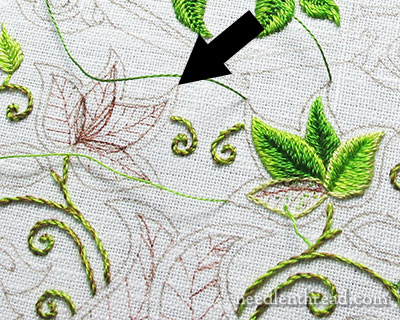
The arrow above points to the second four-leaf cluster, which more or less mirrors the one on the right.
You can see that I’ve marked this one up quite a bit. Don’t hesitate to draw stitch direction lines inside your leaves. You can mark up the leaves however you need to (within reason), because the stitching is pretty dense with the long & short stitch and the markings will be covered.

If I follow the stitching order of the previous four-leaf cluster, this would be the stitching order on the second four-leaf cluster (see the numbers in the photo above).
But I think on the mirrored version, to keep it from being too mirrored, I’m going to overlap the leaves a little differently.
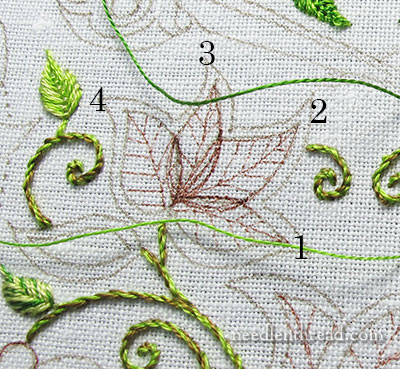
If I change the stitch order to follow the numbers in the photo above, the leaf cluster will look like it’s fanning out a bit. Although the markings on the leaf obscure it a little, what you’d have is 2 overlapping 1, 3 overlapping 2, and 4 overlapping 3.
I’ll try it this way, and then we can compare the two clusters.
Why not try it, right? What’s the worst that could happen?
(…she said, right before she started picking the mess out…)
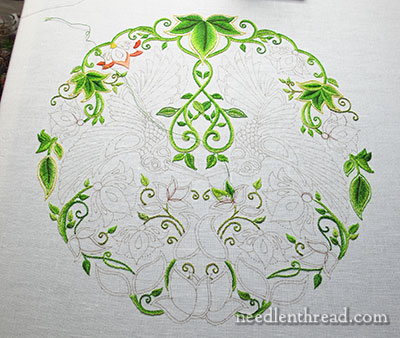
Here’s the last whole-project photo I took. It’s upside down. I’ve gotten a little farther along since I took this. But it gives you an idea of the greens filling in.
I still have some outlines to fix that were worked earlier in the darker greens.
So, that’s where I am on this version of the Secret Garden Project. More soon!
Any questions, comments, suggestions? Have your say below!
If you’d like to follow along with the Secret Garden Hummingbirds project, which features a design from “Secret Garden: an Inky Treasure Hunt & Coloring Book” by Johanna Basford, you can find all the articles relating to this project arranged in chronological order in the Secret Garden Project Index. Among the articles, you’ll find plenty of tips and techniques that will help you with your own embroidery projects.

