The other day, we took a general glance at the embroidery on the flowers on the Secret Garden project, with an overview of the thread colors and embroidery stitches I’m using on the flowers.
Today, we’ll cover some stitching tips for the flowers. Even if you’re not stitching along with this project, these are the types of tips you can apply to your own embroidery projects. We’ll be looking primarily at satin stitch here, since it’s the only stitch on the flowers that might be a little challenging.
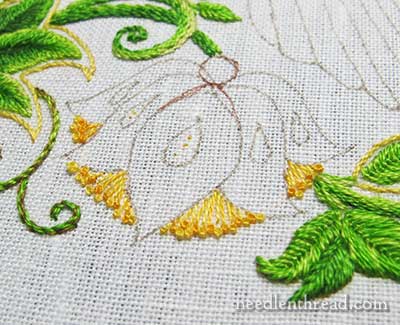
When working the first flower (in the corals, which you can see in this article), I stitched the little pistils after doing the satin stitch on the petals. With the second flower, I wanted to see if working the yellow pistils first would be a good idea or a bad idea.
I used a combination of elongated French knots, straight stitches, and regular French knots in the darker yellow (742) and the middle yellow (743).
So, on the purple flower, these went in first. In retrospect, I was right the first time. Do your petals first, and add these last. Especially if you’re doing satin stitch on the edge of the petals, these little guys get in the way.
For the petals, I drew in extra lines so that they would be “tipped” with satin stitch.
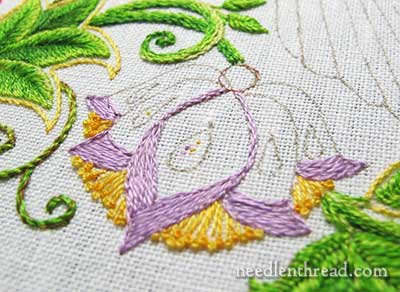
On the flower petals, my color arrangement is light for the large center petal, medium for the two on each side of center, and darker for the next two out from the center.
Using the lighter purple from the purple color range, I did all the outlining and filling. You can (and probably should!) outline and fill with the color you’ll be satin stitching with, but I’m lazy. I didn’t want to keep switching colors. If you’re not super confident with padded satin stitch, outline and fill with the same color you plan for the satin stitch. The padding can help hide separations between stitches.
First, outline the satin stitch area with split stitch. Some people prefer split backstitch, and some people prefer backstitch, but you’ll get the best results with regular split stitch. You can read about the difference between split stitch and backstitch in outlining here. And you can read about the difference between split stitch and split backstitch here. They’re all three different stitches, and they produce different results with the finish, so it’s worth reading up on them.
After working the split stitch outline, work long split stitches inside the satin stitch area, horizontal to the petal. These are your padding stitches, and you want them to be perpendicular to the top layer of satin stitch that will go over them.
When you work your satin stitch, start in the middle of the shape, and work to one side. Then go back to the middle on the other side, and work to the other side of the shape. This establishes the slant of your satin stitch, and it’s important to do it this way, for the best end results.
You can read my previous article “Satin Stitch: Why Start in the Middle?” to better understand why it’s important to start in the middle of a shape.
Concerning the order of stitching here, it’s actually easier to work the center petal first, and work out to the sides. I started with the dark outer petals first, because I wasn’t quite sure about the center petal yet, and I was holding off on stitching it until last.
But on the other flowers so far, I’ve worked the center petal first, and it does work out better. You can see that, when I work the center petal on this flower above, I’ll need to be very careful not to interfere with the satin stitching on the petal just to the left of center. If I had started with the center petal, it wouldn’t be a concern.
So, start with the middle petal and work outwards. Do as I say, not as I do! (Which is the worst way to teach anything! Still, you get the point!)
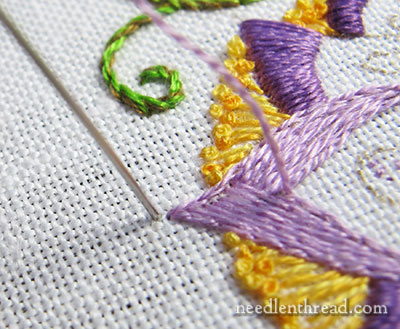
When you embroider the center petal, with the first satin stitch in the center over the tip, extend the end of the stitch a good thread space or so beyond the outline. This helps bring the petal to a nice sharp tip.
In fact, I’ve already covered this subject before, too, in this article on satin stitching to a sharp point. The leaves in question are tiny, but the same exact principle applies.
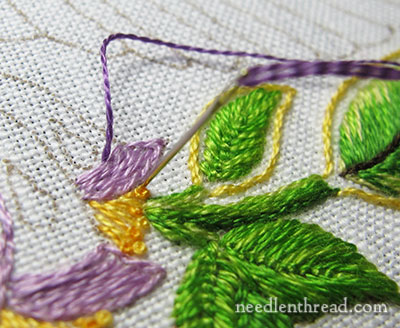
To keep the stitches over this area straight up and down on the petal, come up on the inside of the petal (outside the split stitch outline) and go down on the outside of the petal (outside the split stitch outline).
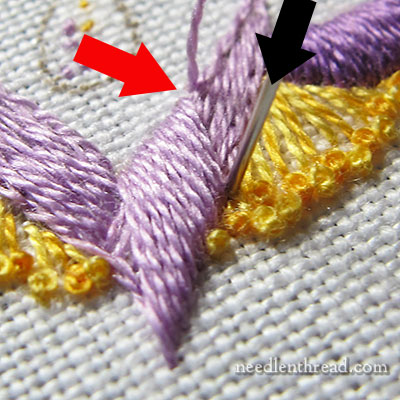
The stitch needs to start (inside the petal) a little distance away from the previous stitch. See the red arrow above? There’s a good sized space between the thread that’s coming out of the fabric and the previous stitch.
The satin stitch ends outside the petal right up next to the previous satin stitch, with no space between them. (The needle in the photo above is where the stitch is going down to end it.)
If you try to work the satin stitches so that they are right next to each other on both ends of the stitch, your stitches will end up shifting direction along the curve of the shape and crowding towards the lower parts of the shape, which will make the shape bulge where it gets narrower.
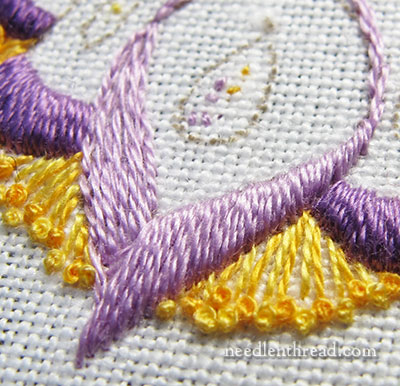
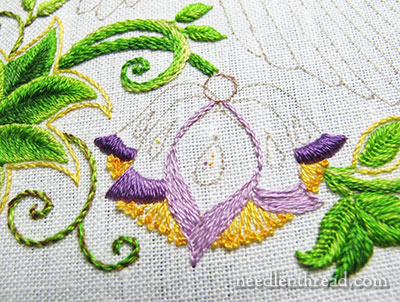
Here, you can see one side of the satin stitching on the center petal finished. Notice that the stitches are pretty much straight up and down, aligned with that first center stitch over the tip.
Switching flowers here, let’s talk about the middle of the petals. I used seed stitch to give a sketchy, softly colored, textured filling. You can definitely substitute any stitch you think will work in there, if you don’t want to use seed stitch.
To contrast with the padded satin stitching, though, I’d use a stitch that is relative flat and close to the fabric. I wouldn’t use a bulky filling in there. So, long and short stitch could work. If you go with something like long and short stitch, do it before doing the satin stitch.
In fact, even if you’re doing the seed stitch, you might want to do it before doing the satin stitch. That’s up to you, really. Technically, in the order of stitching an element, the seed stitch would normally come first here, and then the satin stitch. But I like to get those satin stitched tips onto the petals, because they define the flower, and I want them perfectly smooth, with no interference from other stitches around them.
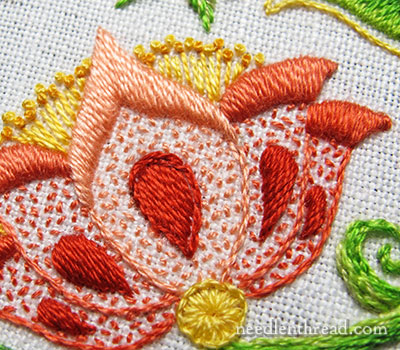
In any case, once you finish your petal fillings, the last part of the petal you’ll work is the tear drop shape on the inside.
On the larger tear drops on the large petals, I super-padded them, because I wanted them to stand up pretty high and round.
You can read this article on satin stitching a raised dot, for a clear step-by-step on this type of padding.
The tear drop shapes are first outlined with split stitch. The side smaller tear drops only have one layer of padding stitches in them.
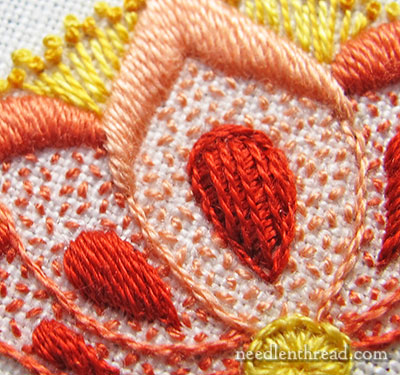
On the large tear drop, though, I have three layers of padding. Remember that the last layer of padding cannot lie in the same direction as your satin stitching. Since the satin stitch layer will work diagonally across the drop, the last layer of padding here is worked vertically inside the drop.
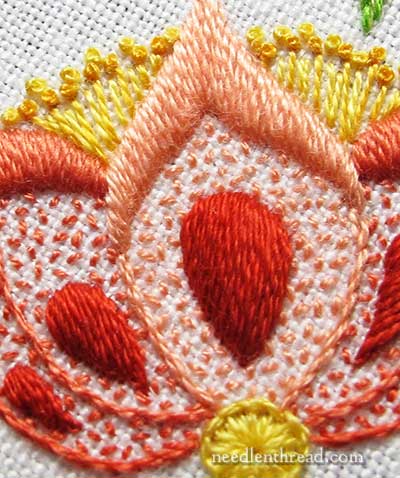
Here’s the satin stitching. It almost looks as if it is stitched from tip to top, but it’s not.
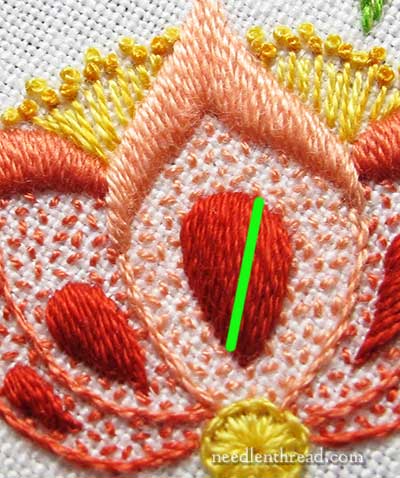
The green line indicates the direction of the stitching across the drop, and also indicates where you’d start the satin stitching, moving to one side, then going back to the starting point and moving to the other side.
So, those are the stitching tips for the flowers! Feel free to ask questions, or leave comments or suggestions below!
Of course, along the way, I’ve made a mistake or two on the flowers. I’ll share one of those jolly mistakes later on, show you the fix, and discuss an aspect of stitching that we don’t always think about.
If you’d like to follow along with the Secret Garden Hummingbirds project, you can find all the articles relating to this project arranged in chronological order in the Secret Garden Project Index.

