Here’s a quick update on the Secret Garden embroidery project, wherein you will see that six embroidered flowers are complete, and I’ve made one stitch alteration.
I’d also like to share a some embroidery advice for those who have expressed some concern about their embroidery. It’s just a tiny bit of advice for any embroiderer – beginner and beyond – whether working on this project or not.
So, first up:
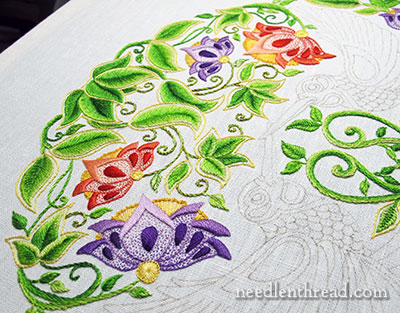
The large purple flower is embroidered and I’m ready to finish embroidering the last two small flowers on the lower left of the design.
I prefer this large purple flower to its opposite, the large red / coral flower, because of the shape of the flower. It doesn’t seem as swooshy.
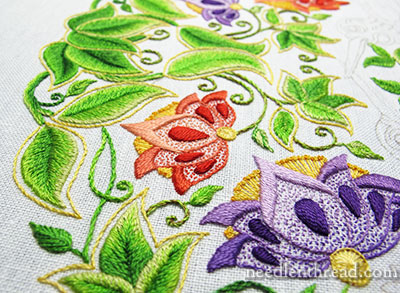
The purple, however, is more inclined to show stitching flaws up close, because it’s a darker thread on a light background.
Hand Embroidery Advice
And that brings me to a little embroidery advice that I need to share with you. But, like all free advice, you can take it or leave it. You may find it worth exactly what you pay for it…
To set the stage, here’s part of an email I received, and a couple similar ones have come in as well:
Mary, my satin stitches look like crap up close. When I see your pictures, and then I look at my satin stitching in photos and enlarge them, I want to tear it all out! From far away they look ok. Then I start examining up close in photos and get depressed. Help!
First: Understand that my satin stitches are not always precision-perfect up close, either. And this purple flower above is a really good example of that. In any case, are you blogging about your project? Are you sharing close up photos of it with others, and trying to help them through the project? If you’re not, don’t worry about what your embroidery looks like in close-ups!
Second: Make sure your lighting is good, and if you need magnification to see, invest in some kind of magnifying lamp. Sometimes, we don’t realize we can’t see the work well. At least test a magnifier somewhere, if you’re wondering if you’re not seeing all you could be seeing. Needlework shops and hobby shops usually have floor models you can test.
When I do use magnification – and it isn’t all the time, but on tricky sections of work, or anything that’s exceptionally fine, I do – I use this Dublin Craftlite Magnifier, which I reviewed a while ago.
Usually, if my lighting is good (I use Blue Max floor and table lights in my workroom, which I’ve reviewed, too), then I don’t need magnification. But if your eyes have gotten to That Point, you might need at least slight magnification.
If you wear specs – and specifically glasses for reading or handwork – make sure that they are the right prescription for your needs. When you get your eyes tested, show your eye doctor where you normally hold your needlework, so that any adjustments can be made in your prescription.
Third, and Most Important: Look at your work from about arm’s length away. If it looks good, then all is well. A zoomed-in photo where you can see every tiny stitch placement is not the way your embroidery will ever be viewed (chances are). And if it is ever viewed that way, you want it to look like embroidery, right? Not like some print-out made with computer graphic precision.
Strive to embroider as well as you can – always moving towards little improvements in your stitching here and there – but don’t stress over flaws in your embroidery that can only be seen with magnification or in an enlarged photos. That’s not how your embroidery will be seen.
Relax. Enjoy the process…
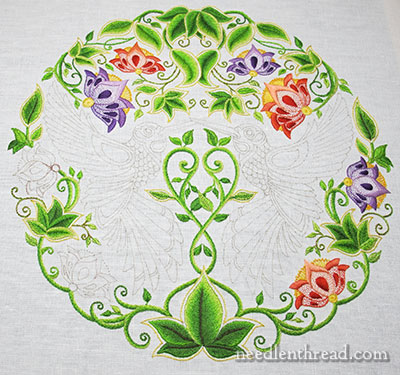
Here’s the whole piece so far.
Actually, that’s a fib. I’ve got the next small flower almost finished. I just haven’t photographed it since then.
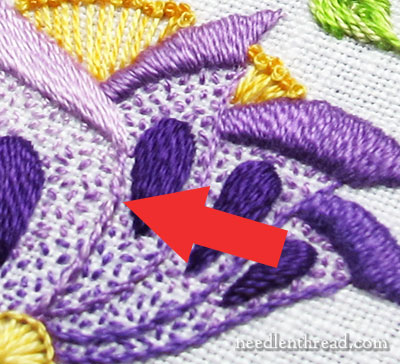
And here’s the stitch alteration. Follow the red arrow.
What I’ve done is whipped the stem stitch outline on the center petal.
Originally, the center petals on all the flowers were outlined with stem stitch (except where the satin stitching is) in the lightest color in the range. But I don’t like the way the center petal ends up losing its definition. To help fix this, I’m going to go back and whip stitch the lighter stem stitch outlines with a medium shade, to darken up those lines and give them more definition.
The way I see it, whip stitching the stem stitch is a decent alternative to picking out the lines and re-stitching them with another color. To keep things consistent on the flowers, I might whip stitch all the stem stitch outlines. I’ll play with it a bit before making a decision, though.
See What Other Stitchers Are Doing
There are a few new photos over in the Secret Garden Embroidery flickr group, where other stitchers are sharing their own progress and approaches to the Secret Garden Hummingbirds project and other Secret Garden embroidery projects. There’s a fantastic peacock on display, stitched, as well as some completely different approaches to the stitching – some really fun alternatives that will inspire you!
Questions?
Any questions, comments, suggestions regarding this project so far? Feel free to have your say below!
If you’d like to follow along with the Secret Garden Hummingbirds project, you can find all the articles relating to this project arranged in chronological order in the Secret Garden Project Index.

