Last week, we discussed using old embroidery threads on hand embroidery projects. I proposed that using very old threads that have not enjoyed decent storage conditions and that are showing serious signs of age (brittle, thin, victims of Thread Rot) are not worth using on embroidery project.
Today, I’ll explain what I do to wash old cotton embroidery threads to see if they can be returned to The State of Usability. It’s really just common sense – but for those who are shy about handling threads, maybe this will encourage you!
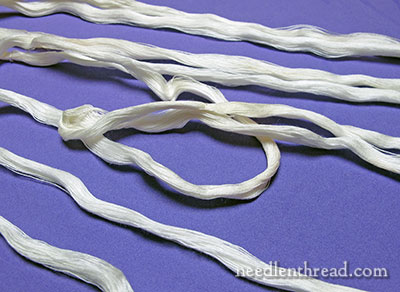
The first step is to take apart the embroidery thread skein so that it lies in a long open loop. On some types of skeins, this is an easy proposition. If the manufacturer already puts the thread up in folded loops, either twisted or untwisted (like large skeins of floche, coton a broder, perle cotton, and the like), then it’s just a matter of removing the skein tabs and untwisting then unfolding the skeins into their large loops.
If, however, the thread is put up as a pull skein (like regular stranded cotton embroidery floss), then it’s a slightly different story. However, using a little care, you should be able to undo the skein completely. It might take a little more work, and you may end up having to re-wind the thread into one large loop, though.
Once you have your threads in large loops, take a piece of white thread (it can be embroidery thread or any kind of white thread, really) and loosely tie some small pieces at regular intervals around the large loop of dirty embroidery thread. I usually put a small, loose tie in four spots equally distributed around the large loop.
You don’t want to tie these little bits of thread really tightly, so that they choke the skein, but you don’t want them so loose that they slide around the skein and shift. Just tie them so that they touch the bundle of thread without choking it.
The ties will keep the loop of thread in its loop, so it doesn’t fall into a heap of a mess while washing.
Now, the fun part – water sports!
Using Detergents to Clean Threads
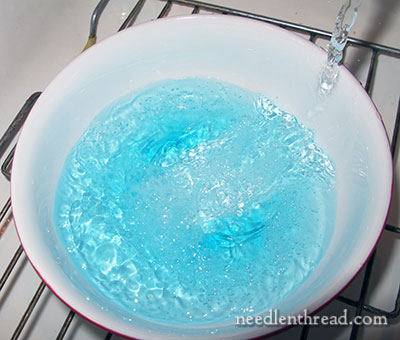
Place a clean bowl in the sink and pour in a few tablespoons of liquid washing detergent. Clear Ivory liquid soap is a good starting place, because it’s a fairly mild soap.
But, since I’ve done some of the white threads I’m working with in Ivory with no really noticeable results, I skipped ahead straight to liquid Biz, which is a much stronger detergent with “stain removing capabilities.”
Now, some people may say, “Should I really be using a detergent? Aren’t these detergents harsh on threads?” Or something of the sort.
Don’t be frightened of using liquid detergents! The point here is that the threads are currently in a completely unusable condition. If you don’t clean them well and get them back to a usable condition, you’re going to have to pitch them, anyway. So start mild, but if you need to, work up to stronger detergents.
And by the way, if you’re washing silk (here I’m really talking only about cotton threads), do not use Oxi-type cleaners, like “Oxiclean” or other spin-offs.
So, put a few tablespoons of your chosen liquid detergent into a bowl and run some lukewarm / room temperature water into the bowl. Fill the bowl before putting your threads in. Don’t run water into the bowl with your skeins already in there. The running water will churn up your skeins – you want to avoid that, if possible!
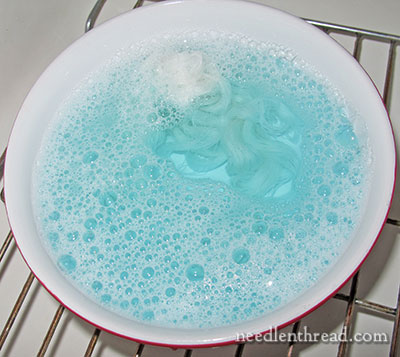
Lay your threads in the bowl.
If you’re working with colored floss, wash one color at a time – don’t combine colors in one washing.
If you’re working with white threads, you can do a couple skeins at once, but don’t load too many skeins into the bowl. They have a funny way of finding each other and mixing together, even if you don’t stir them up.
So, with the threads in the water, you can “pat” the threads a little bit, or gently shift the skeins a little bit, to make sure that the water and detergent are soaking into all the threads. Just don’t stir, agitate, or do anything too violent with the water.
Let the threads soak for at least 10 minutes or so.
If the threads are super soiled and you don’t think 10 minutes will quite do it, change the threads to a new bowl of clean water and detergent and let them soak another 10 minutes or so.
Finally, when you think they’ve soaked long enough and they look like they may be clean, fish the threads out of the water, empty and rinse the bowl and put the empty bowl in the bottom of the sink.
Then, holding the threads over the clean bowl without wadding the threads up (you want to hold them as much as possible in their long loop formation, folding the loop if necessary, but not bunching the threads up), rinse the thread in gently running water (room temperature) by moving the loop back and forth under the faucet until they run completely clear of suds.
Keep an eye on the bowl in the bottom of the sink. If suds are accumulating in the bowl or floating on the water that’s catching in the bowl, the threads are not completely rinsed.
Sometimes, this rinsing takes a while.
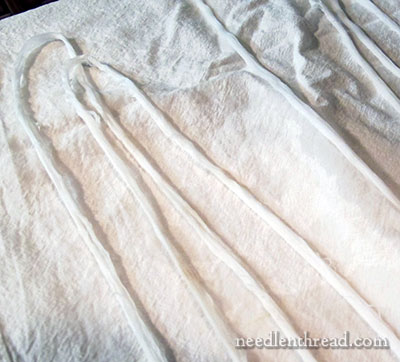
Once you’re sure the threads are rinsed, lay them out on a clean towel in their long loops. I find flour sack towels work well for this. Lay another towel on top of them. Roll up the two towels with the long loops between them, and apply pressure to the towel roll to squeeze out extra water. Do not wring the towels. Just push on them.
And then unroll the towels and lay the threads out on a dry, clean towel in a room with good circulation, and let them air dry. You can remove the little thread ties you placed around the skein earlier, too, and spread out the threads slightly, to help them dry. Leave them 12-24 hours, depending on the drying conditions in your house.
That’s it for cleaning!
If the threads are cleaned to your satisfaction, once they are completely dry, you can stitch with them to test them. Give them a real work out. Tug them. Pull on them. Make sure that they are still durable.
And if they stitch up fine, if they withstand some aggression (reasonable aggression, anyway), then you should be good to go!
If they show signs of weakness, if they snap easily, if they fray quickly as you stitch, if they are still stained (and you’ve done your best to remove the stains), don’t embroider with them. Pitch them, or find some other use for them.
Your embroidery is too precious to use shoddy, rotten threads on your embroidery. If you’ve done your best to bring them back to life with a good cleaning and they still aren’t going to work for you, just say good-bye to them.
Treating Dry Embroidery Threads
If your threads are just feeling dry and a little brittle but are clean, you can do a quick moisturizing job on dry threads. Here are two ways to add moisture to them:
1. Put them in the vegetable compartment in your refrigerator (assuming you have a clean fridge) overnight. You can lay them on a clean towel in the drawer, preferably not in contact with vegetables!
2. Put the kettle on. When it starts to emit steam, hold the skeins briefly in the cloud of steam to drink up some moisture. Alternately, you can simmer a little water in a pot, then turn the heat off, place a clean sieve or similar over the top of the pot, place your threads in the sieve, put the lid on the pot and leave the threads there for a little while. This warm steam method is not the best method for threads that might run, but with white threads, it works.
In both cases, let the threads dry all the way before using them. This will often add enough moisture to regenerate dry-feeling threads. Again, test for weakness before committing to using them on a project!

