Oh, oh! Finally!! I’ve made some progress on the Secret Garden embroidery project – specifically, on the hummingbirds.
But, as is usually the case with this work-it-out-as-you-go process of completing an embroidery project, there’s been a little un-stitching along the way, too.
So, today, I’ll show you where I am and discuss the circuitous route that got me here.

This is where I was, when last I walked away from my embroidery frame. It doesn’t seem all that far, does it?
And, if you’re familiar with the design, you probably realize that the heads of the hummingbirds are not very big at all, so this doesn’t look like very much stitching.
But, when you’re working two steps forward and one step back, any progress is good progress!
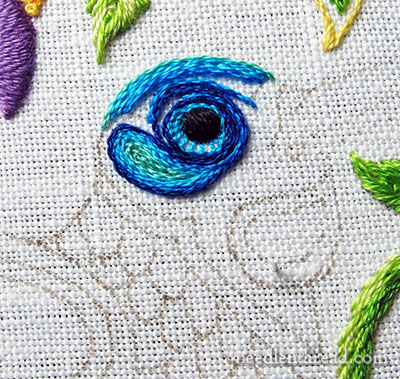
Last time we visited the hummingbirds, I had embroidered just the black eye and the small swash on the cheek. The eye was stitched as a satin stitch dot, and the cheek swash was worked in stem stitch.
Shortly after showing you that, I began stitching the rest of the face, working mostly in a deep, dark, vibrant blue.
I liked the color of blue (and it may show up later), but I was oscillating between a dark head on the bird and light head.
The more of the dark blue I worked in (and the more I worked on that helmet area on the top of the bird’s head), the less I liked it, especially from far away. Besides the fact that there wasn’t enough separation in color between the eye itself and the dark blue around it, the bird was looking somewhat angry.
I didn’t want an angry bird!
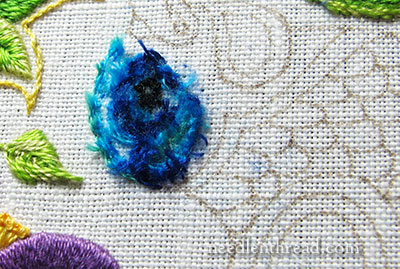
There was nothing for it. Out came the scissors, the seam ripper, the tweezers, the tape – the four tools I use to un-stitch an area, especially one this densely packed with stitches.
Even the eye came out.
Ahhhhhhh. Linen! How I love thee!
What other fabric can come through such an ordeal looking so darned good? This is why I don’t use cotton or cotton blends or synthetics for major projects. A good linen can handle the stress of concentrated stitch removal like no other fabric can!
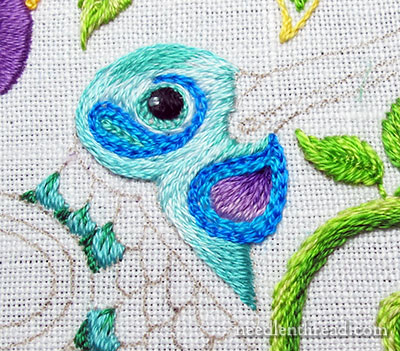
With the stitches out, I worked the eye again in satin stitch.
The head is long and short stitch, beginning at the edge of the beak and following the curve of the head.
I used lighter colors this time – I’ll share all the color numbers in the next update, when we discuss the scallops on the breast – and I avoided anything too dark at the top of the head that might make the bird look angry.
The eye has two little straight stitch glints in it, and directly around it, following the design, I embroidered a buttonhole stitch outline in a medium greenish blue – something that blends with the surrounding colors. I didn’t want a larger dark spot there, just a little deeper color and a different texture.
The neck swash is outlined in chain stitch in two colors of bright blue, and the inside is worked in long and short stitch in the same shades of purple used on the flowers.
There was a point when I considered working the background of the head in a light seed stitch (like the seed stitch filling on the flowers), because I knew I wanted the head to be light. But I also wanted it to be smooth and solid, without the speckled texture of the seed stitch.
I’m working on the scallops now. They’re simply unpadded satin stitch, with a few straight stitches over them to add some color blending as each layer builds.
But we’ll discuss that process next time!
So far, I like him fairly well. What do you think? Have your say below!

