No, I didn’t finish the little line sampler I showed you on Friday.
I came close – about 1/2″ more to embroider – but the weekend was busy with graduation and family and the like. I just couldn’t eek out that last 1/2-inch bit, which meant I couldn’t finish the project into a made thing, either.
*Sigh*
I’m not all that disappointed that I didn’t finish, because it gives me something to look forward to today. It’s a good incentive to get Needful Things finished so I can concentrate on the Fun Stuff. Sometimes, embroidery makes the best carrot!
Lots of emails this weekend, asking if I could name the stitches in my sampler so far, for folks who want to stitch something similar.
Here’s part of one email that sums up the majority of requests:
Mary, I love your sampler you showed today. I want to do one like it or stitch-along with you but what stitches should I use? I have the worst time deciding on stitches and I don’t know which ones by looking at them. I can’t pull stitches out of my head either, because I don’t know very many but I would like to learn more and do a sampler like this. Also to show my daughter how to stitch. Help!…
You know, I’m really happy to help with requests like this!
When I conceived the idea (not that a sampler of stitches is original – I mean the idea to do this), I figured it would be the type of project where you could wing it with any stitches you wanted. But I realized after hearing from many of you that deciding on stitches is sometimes a real road block.
And you know what? It can be a road block for me, too! As I was stitching some of the later rows of this particular sampler, the stitch ideas weren’t popping into my head that fast – I was having a hard time coming up with “what next.”
The Stitch Line-Up
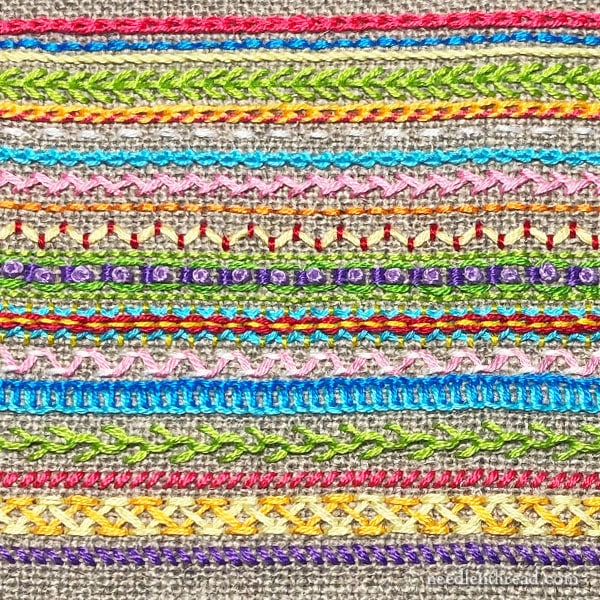
So, for those who want to follow along, here are the stitches I used so far, working from the dark pink line at the top to the bottom of the photo above. I’ve linked to tutorials here on Needle ‘n Thread.
I’ve used three strands of floss for all the stitches, except where noted.
1. (Dark Pink): Chain Stitch (This is the border, which I stitched first, all around the rectangle, which is 6″ x 4″)
2. (Dark Blue): Back Stitch
3. (Light Yellow): Stem Stitch
4: (Bright Green): Vertical Fly Stitch
5. (Dark Yellow & Dark Pink): Chain Stitch, with one side whipped.
6. (White): Running Stitch
7. (Light Blue): Palestrina Stitch
8. (Light Pink): Herringbone Stitch
9. (Orange): Back Stitch
10. (Red & Light Yellow): Straight vertical stitches in red (2 strands), with light yellow (6 strands) laced through. Alternately, this could be couched, but it was faster and easier to work the vertical stitches and then just run the 6-strand piece underneath them.
11. (Light Green, Dark Green, Light Purple, Dark Purple): Guilloche Stitch – a combination stitch. I substituted back stitch lines on the outside (worked with two strands of floss) for the stem stitch lines in the regular instructions for Guilloche Stitch.
12. (Red, Dark Yellow, Bright Blue): Interlaced Chain Stitch Band.
13. (White & Light Pink): Two running stitch rows, offset, then laced with light pink.
14. (Dark Blue & Light Blue): Buttonhole Stitch worked in two directions, and off-set so that the stitches fit inside each other. The first row (dark blue) is worked with the twisted edge on the top and the “teeth” of the stitch pointing downwards. The second row is worked with the twisted edge on the bottom and the teeth pointing upwards, fitting between the first row of stitches.
15. (Bright Green): Feather Stitch.
16. (Dark Pink): Tent Stitch or Half Cross Stitch – just a slanted straight stitch, slanting from lower left to upper right.
17. (Light Yellow & Dark Yellow): Chevron Stitch – one row worked on top of another, creating two layers, and interlocking the top layer with the bottom layer by passing every other diagonal stitch underneath the stitches on the first (bottom) layer.
18. (Dark Purple): Tent Stitch or Half Cross Stitch, slanting from top left to lower right.
More to Come!
So if you want to take up a little stitch sampler, that list will get you started! I only have about 1/2″ more to fill on my sampler, and then I’ll share the finish with you.
I’ve got a few other fun things coming up. Wednesday, we’ll be looking at some drop-dead gorgeous embroidery. You know, the kind of embroidery that makes you sigh…
Happy Monday all around!
