Good morning! Just so you know, there’s a little news at the end of today’s article.
In the meantime, though – a project update and a chat about lighting differences when taking photos of embroidery.
Have you ever photographed your own stitching projects and wondered what’s the best lighting to use? Well, I have, too. And I can’t give you a definitive answer on that!
I do know that a “daylight” light gives me truer color when I take photos. And the higher the lumens, the better, with my lamp. But when it comes to the camera, I can’t really tell you “use this setting for this kind of light” and so forth. I’m just not that technically inclined when it comes to cameras.
I often go outside to take pictures of my embroidery, because I like to see the difference between the embroidery photographed in natural sunlight compared to embroidery photographed in indoor studio light. There’s a huge difference between taking photos of embroidery in direct sunlight and taking photos of embroidery in artificial light. And when you’re taking photos outside, there’s a huge difference between pictures taken on an overcast day, pictures taken in direct sun on a clear day, and pictures taken in the shade on a sunny day.
All of this is probably obvious, especially if you’ve been wielding a camera for any period of time.
At my last stopping point with my Jacobean styled embroidery project, I took photos in different circumstances. I’ll tell you what circumstances as I show you my progress on the project so far.
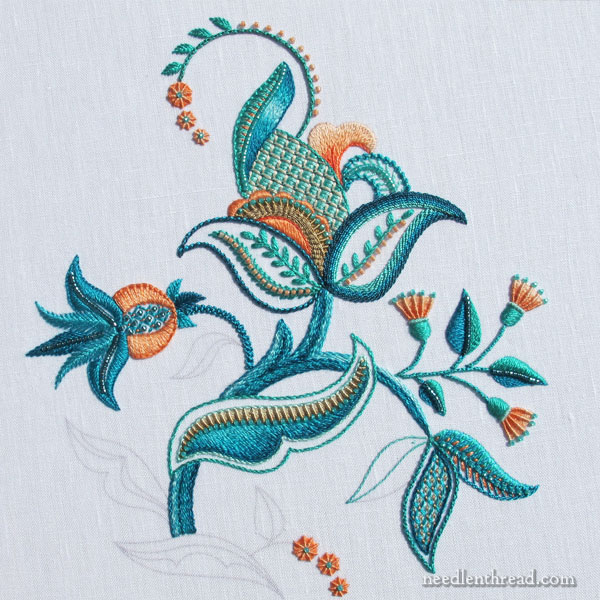
It seems like forever since my last update on this project!
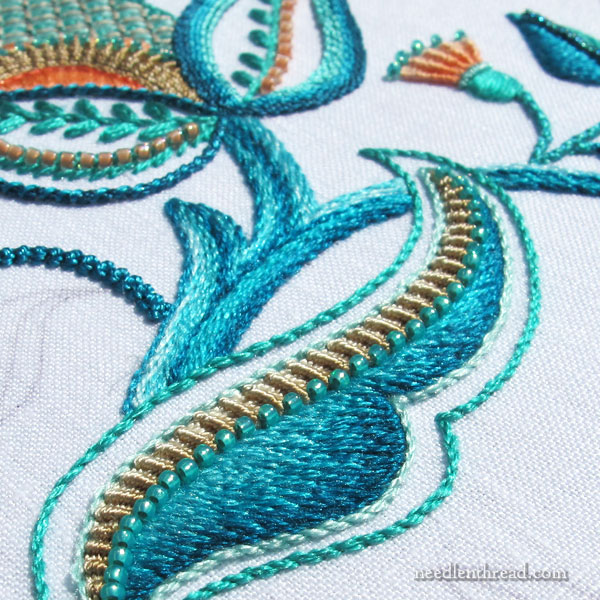
This is the main swashy leafy that crosses the front of the design. I took this photo on a sunny day in the shade. There was even more of a blue tint to it, so I had to color correct it in post production to get it to show more accurately the colors on the piece. The sun managed to bring out a bit of sparkle in the silk, but not too much, since I was predominantly in the shade.
The techniques on this element are fairly straightforward: long & short stitch on the main filled area; ribbed stitch in the sandy colors; some beads; and stem stitch for outlines.
So far, this is my favorite element on this design!
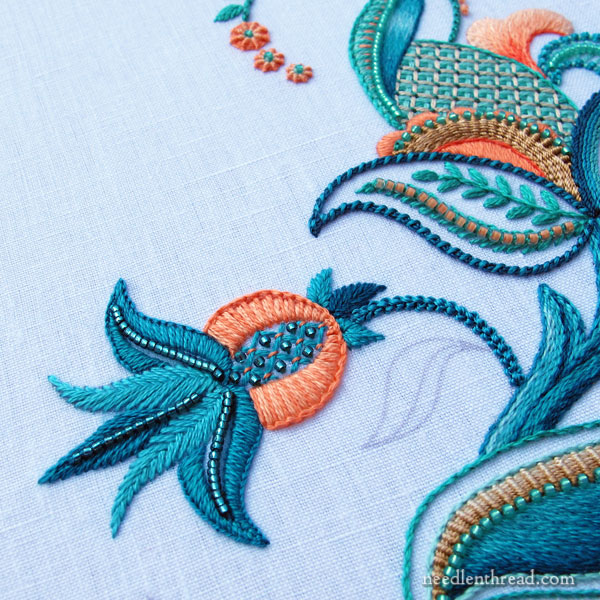
This is an outdoor photo, in shade, on an overcast day. It’s very blue in overall tint, and there was not much I could do with color correction without the thread colors looking somewhat garish. There’s no sparkle picked up by the silk threads, either.
This little pomegranate bit gave me a headache! I had to re-work the leaves a few times to find a combination that I like. There’s not a lot of contrast in the larger leaves, though. I like them ok, but I don’t love them just yet. I have to keep thinking about them. The color choice here could have been different, I suppose, but I really needed to bring in these darker blue-greens to balance with the other side of the design.
How do you like the stem on the pomegranate? I’m inordinately fond of that. I didn’t think it would work out, and then I realized I wish I had used the stitch everywhere. I’ll give you three guesses what stitch it is.
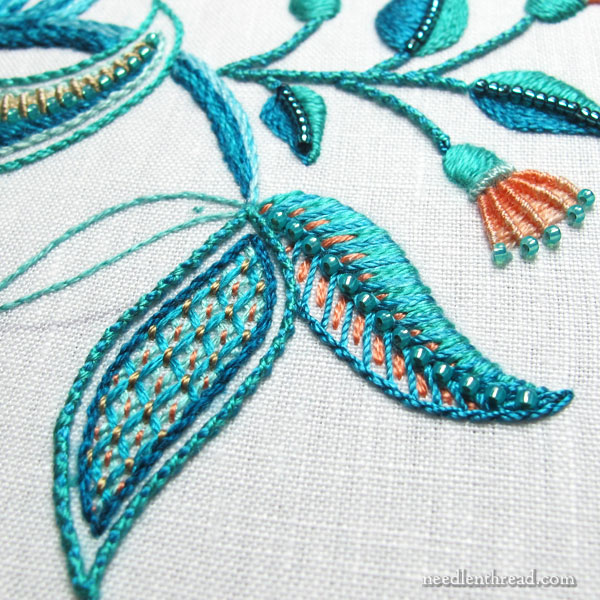
This is indoors, under my stitching lamp, which is supposed to be giving off “daylight” color and brightness equivalent to the noonday sun – around 6,000K if turned all the way up, but I rarely keep it that high. There’s also an overhead light on in the room, giving off a warmer glow. This is pretty much how I see the embroidery and colors while I’m working. I think it’s a decent representation – at least on my monitor.
On the top side of the right leaf, I built up some padding and worked a kind of satin stitch, in a sense. I wanted to mix some colors of blues / green – blues in that area, rather than using one flat color.
So after I worked the padding for what I thought was just going to be plain old satin stitch, I ended up working a wheatear stitch down the middle vein of the leaf, using Soie Perlee (which is like a fine buttonhole silk). I took the arms of the wheatear over the padding on the top half of the leaf. Between the arms of the wheatear, I worked in satin stitches using Soie d’Alger (a decidedly different thread), but they all ended up kind of blending and melding together. I don’t know if you can distinguish the two types of threads or not.
Down the middle of the wheatear chain, I added some beads. Then I outlined the lower part of the leaf in stem using Soie Perlee and added in some highlights on the top part of the leaf in coral, by just splitting the satin stitches, and on the lower half of the leaf, I added some coral straight stitches, too.
I wanted to keep the leaves from being too heavy by including unfilled areas, too.
The center leaf is simple lattice in the middle, two layers, each layer couched with a different color. The inside area is outlined in stem; the outside of the leaf is outlined in a chain with a series of whipped stitches around it to make a nice, rounded, raised edge.
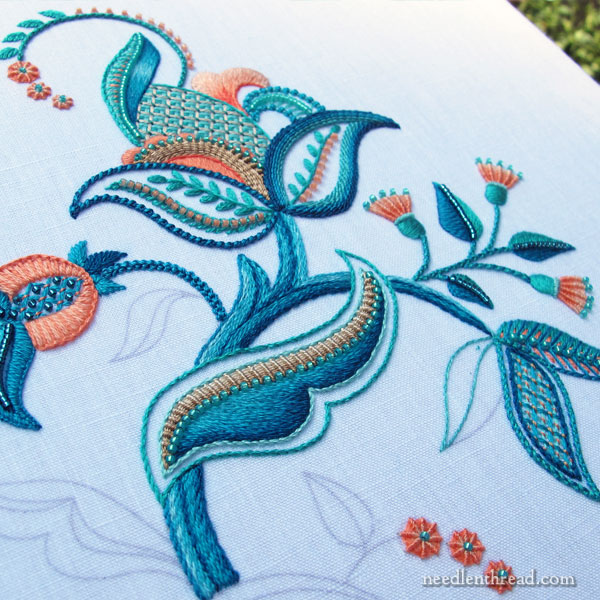
This is an outside photo again – morning shade with the sun just coming up. The color is a bit too blue, but not too bad.
Did you notice anything different about this, from previous versions I’ve shown you?
I got rid of the overstitching on the stem, which was done in a lighter sand color using Soie Perlee – you can see it in this article.
I found the overstitching to be far too busy. It added interest enough, before everything else was embroidered. But once I got in most of the elements, it just didn’t work. It was too much. So I picked it out, and I touched up the center of the stem so that the darker blue up the center was more evident. I like it better.
Sunshine! This photo was taken in direct sunlight. You can tell by the harshness of the shadows. But the colors are much truer, even though there’s some definite highlighting from the reflection on the silk.
I just have a few more leaves to do and this piece is finished. Besides the thread removal on the stem, I made a few other very slight changes in the design. I brought some coral highlight into the top of the swash above the main element. I added some darker edges of coral on the small shaded coral swash on the right side of the main element, and I touched up a few other little bits, too.
When I planned today’s article, the title included the word “Finished.” Ha ha ha. So much for that deadline! Next week? That’s the new plan!
Questions, comments, suggestions? Feel free to join in the conversation below!
Needle ‘n Thread News
I’ve been restocking my ready-to-stitch flour sack towel sets and you can find several of the designs available right now. If you’re wanting to get ahead on autumn stitching or Christmas stitching, you’ll find Festive Fall and Holly & Evergreen both in stock right now, as well as a few of the other designs.
Floral Corners & Folky Flakes are not stocked at the moment, but I plan to have some of both of those available by the end of the day Saturday. Also, Tulips & Tweets is running low, but I’ll try to top those up, too, by the end of the day Saturday. Once I’m out of these, there will be a small pause before I can get going on them again, just so you know!
Any purchases made today before 1:30 pm Central will ship today, so you’ll have them early next week.
