Once upon a time here on Needle ‘n Thread, I distinguished between “bead embroidery” and “embroidery with beads.” I’m not really sure if there’s an official distinction, but if there isn’t, I think there should be (just for the sake of clarity).
And just for the sake of clarity, when I’m writing about beads and embroidery, I tend to think of “bead embroidery” as embroidery that is done entirely with beads. Take, for example, these beautiful bead embroidery kits by Mary Alice Sinton at Blue Bonnet Studio. Exquisite! And entirely beaded.
When I think of “embroidery with beads,” on the other hand, I think of work that is predominantly thread-executed embroidery, accented with beads.
I like both. (Who am I kidding? I love both!) There’s just something that appeals to me about the sparkle of beads.
But most frequently, when I’m playing with beads, I indulge in the latter – embroidery with beads.
Incidentally, neither of these should be confused with beading – creating jewelry or other structures, usually devoid of fabric and relying only on thread or wire as the structure, entirely from beads. Nor should either be confused with weaving with beads. Both of these are entirely different from embroidery, or the embellishment of fabric, with beads (even if some beading can involve fabric and weaving results in a kind of fabric…)
Confusing enough? Well, for today’s topic, let’s just stick with the notion of embellishing fabric with embroidery that is accented with beads.
For those who would like to use beads to accent embroidery, I thought it would be nice to chat about thread.
Thread plays a big part in embroidery with beads – but there are different schools of thought on the types of threads that should be used to sew the beads onto embroidery.
Personally, I don’t adhere to any one school of thought on the subject, just as I don’t adhere to any one school of thought on the “right way” to form this stitch or that stitch. I tend to hold to the notion that there are many ways to accomplish the same results in embroidery, and that no one way is necessarily the only way or the right way.
Sure, some ways might be more efficient. And some might yield better results. But if efficiency isn’t your goal, and if your results are good, then what does it matter if you used one method or the other for forming a stitch?
That said, I like to know why I do things the way I do them, I like to be able to explain why I do them the way I do, and I like to experiment and try different ways, so that I know what I prefer and what works best for me.
It’s the same with choosing threads to sew beads onto embroidery projects. I’ve tried many different threads and many different ways, but I’ve pretty settled into the threads mentioned below. I’ll explain what they are and why I like them.

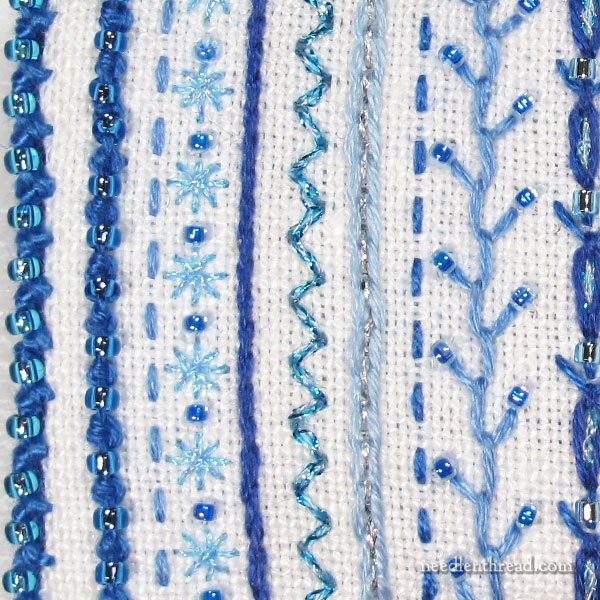
If you look at the close-ups of what are actually very small sampler-like pieces, you’ll see that there are two situations for the beads: either they are isolated in a sense, or they are part of a stitch.
When a bead is part of a stitch, it’s pretty obvious that the thread that’s fixing the bead to the fabric has to be the same thread used to embroider that particular stitch.
But when a bead is more isolated – when it isn’t part of an actual stitch – this is where you have room to decide what thread to use to fix the bead in place.

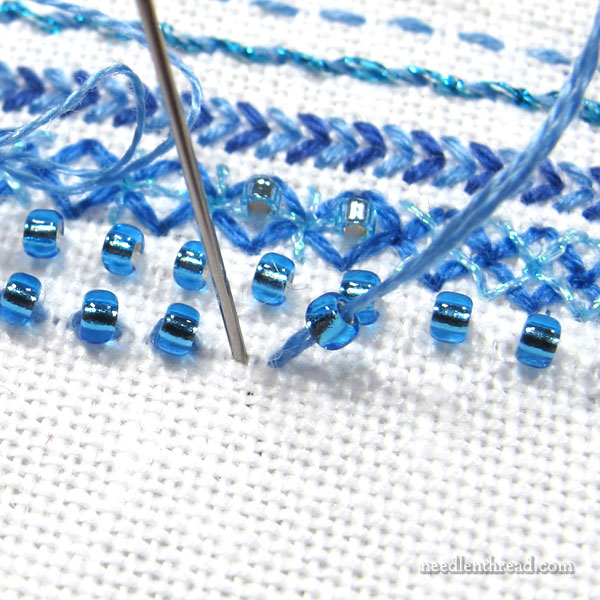
In the photo above, you’ll notice that the beads I’m sewing on are spaced apart from each other.
The thread I’m using isn’t really thread as we normally know it in embroidery. It looks a bit like plastic or something, doesn’t it?
In fact, it’s fishing line.
I like to use fishing line when I sew isolated beads onto an embroidery piece, and there are a few reasons for this.
1. Fishing line is, for all practical purposes, very difficult to see. It’s made to be difficult to see. When you’re fishing, after all, you need to be sneaky about it. You don’t want the fish to wonder why that delectable worm is hanging from that thread. They’d be on to you in no time.
If I’m working on white fabric, a white (or in this case, “clear mist”) colored line is practically invisible from a distance, once the bead is in place. It allows the bead to really show off its full color and finish.
2. Fishing line has a certain stiffness to it, that helps the beads stay put once they’re sewn on. For example, if your beads are meant to sit upright on the fabric (like a tire), fishing line helps that happen, and it helps them really stay in place.
3. It is completely invisible from the front, when it crosses the back of the fabric between the isolated beads.
4. It doesn’t stretch.
When sewing on isolated beads to accent embroidery, you can use a corresponding colored embroidery floss. There’s nothing wrong with this approach! But the colored threads show up a bit more, and they change the finished look of the bead. Often, the bead will look darker, especially if it has a transparent or crystal finish.
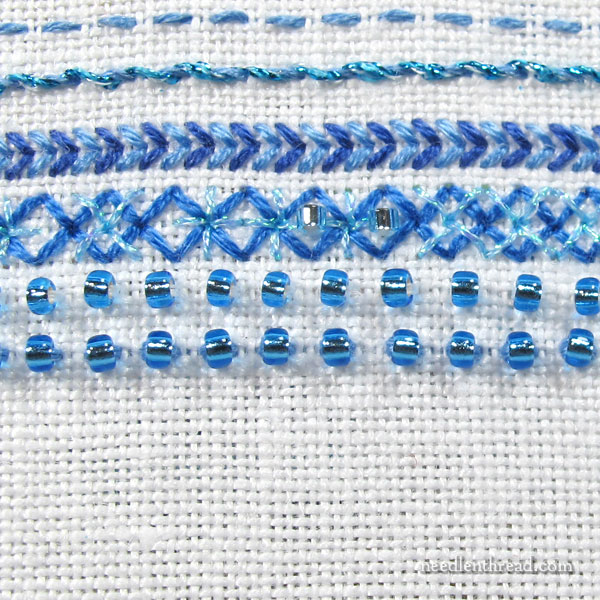
Embroidery floss can also make the bead look a little fatter, due to the little wings of floss sticking out on each side of the hole, where the floss passes through the bead and into the fabric.
In the photo above on the last two rows, the same beads are sewn down in parallel lines, but with different threads. The top row is sewn down with fishing line; the bottom row is sewn with floss. Notice that the bottom row of beads looks slightly darker and slightly fatter.
For the top row, using the fishing line, I passed through each bead three times. I use what is pretty much just a backstitch to sew beads into place in a separated row like this.
I passed through the beads in the bottom row twice, because my thread was doubled in the needle (that’s four strands passing through the middle of each bead).
I prefer the look of the top row over the bottom row.
Especially when I am sewing isolated beads, it’s important to me that the thread is as invisible as possible. I get the best invisibility from fishing line.
When I’m embroidering beads close together in rows, or when the beads are part of the embroidery stitches, or when I need colored thread to peep out of the beads for some reason or another, I’ll use the floss that goes with the project I’m stitching.
But for isolated beads, I really like fishing line!
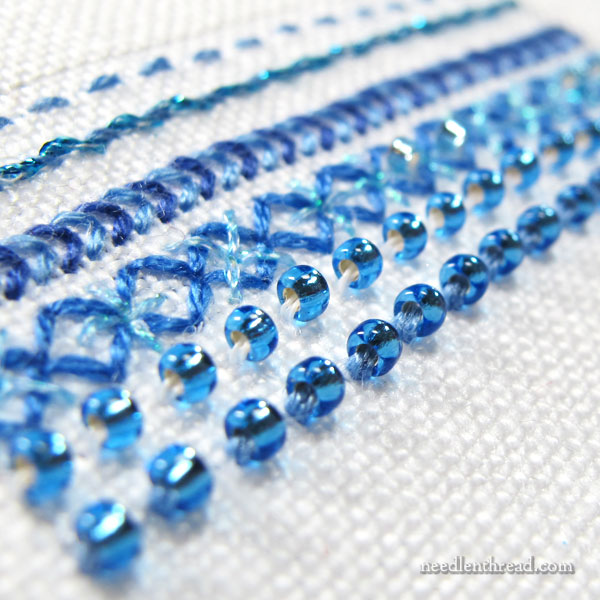
This is what I used extensively on my Snowflake designs, since most of the beads are isolated quite a distance from each other. In the close up photos, you can see that the fishing line does not show through the fabric at all, and it holds the beads very firmly in place.
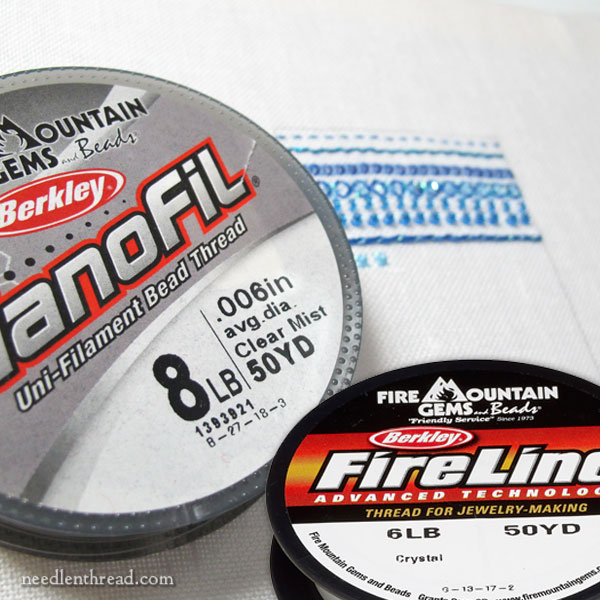
The fishing line I use is the stuff that’s sold for jewelry making with beads – either FireLine “crystal” (I like the 6lb test weight best for surface embroidery with beads) or NanoFil “mist” (I like the 8lb test weight in this line).
You can also use white silk thread to sew down beads on white fabric, but you don’t get the same “stiffness” in the fixation of the bead that you do with the fishing line. The fishing line really holds the bead firmly in place – so much so that it’s difficult to knock the bead around. It doesn’t flop over or turn in another direction very easily!
You can find both of these threads available through bead supply stores. They’re also available on Amazon, if you don’t have a favorite bead supply place. I’ve added them to my Amazon recommendations here, under Embroidery Tools & Accessories. A little goes a long way – you don’t need gargantuan amounts for embroidery with beads, so don’t go all out on hundreds of yards!
I hope that helps you out, if you’re keen to add beads here and there to your embroidery! I’ll be doing just that this weekend – and I’ll show you more results down the road!
This article contains an affiliate link to my Amazon Recommendations page, which means that Needle ‘n Thread receives a small commission for any purchases made through that link, at no extra expense to you. Thanks!
