One of my plans for Needle ‘n Thread in 2021 includes going back to basics in some respects, with more emphasis on embroidery tutorials. But not just stitches – stitches in action!
While it’s important for any embroiderer to know the mechanics of embroidery stitches and to develop at least a small, ready repertoire of them, it’s even better to know how to choose and use different stitches in designs, to add interest to our embroidery projects and to make stitches work for us.
To help with that, this year I will highlight small practice projects that demonstrate how to interpret design elements with different stitches.
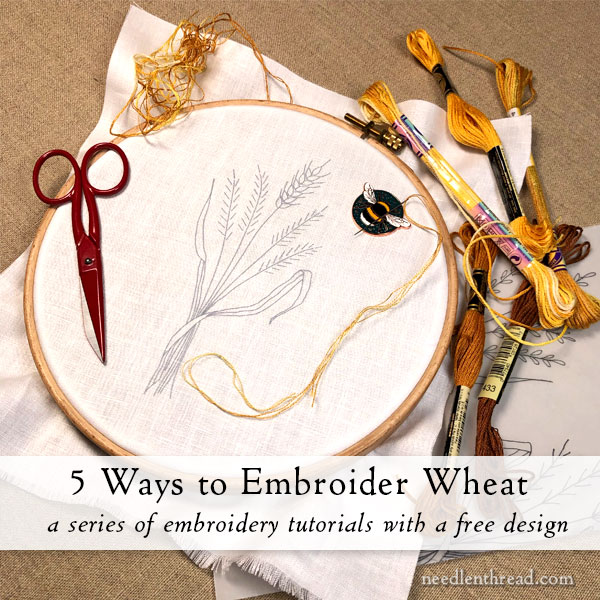
This first tutorial focuses on how to embroider wheat five different ways.
Why wheat? You’d be surprised how many people ask me “Do you have a simple, realistic design for wheat?” or “I have a wheat design, but I don’t know what stitches to use on it.” (Also, I’m from Kansas. We do wheat.)
To kick off to this short series of tutorials for five ways to embroider wheat, here is a simple, realistic design – it’s pretty! – and the materials I’m using, with some tips for getting started.
We’ve looked at one simple approach to embroidering wheat before. It’s this one, using the basic daisy stitch with a little extra manipulation.
I’ll be including this approach on the wheat design below, but with a little variation. There’s always a variation to explore, isn’t there?!
For the project as it unfolds on my end, the ground fabric is linen. It’s a closely woven, almost even weave that will support surface embroidery stitches well. I’m using white because it’s easier to photograph any instructional parts of the series on white fabric.
You can use any kind of fabric you want, and you can use any color. Don’t restrict yourself to what I’m using! Just make sure that your fabric has enough structure to support surface embroidery stitches. If it doesn’t – if it’s a looser or more open weave – you can always back your fabric with another piece of cloth like cotton muslin (“calico,” if you’re in the UK).
My fabric’s in a hoop. For this design, a 7″ – 8″ hoop is comfortable. Your fabric should be a minimum of 2″ all around your hoop, so you’ll want at least an 11″ – 12″ piece of fabric. If you don’t have a hoop that size, use what you have. You might have to move the hoop over different parts of the design as you embroider. That’s ok.
I’m using a #7 crewel needle for all the stitching.
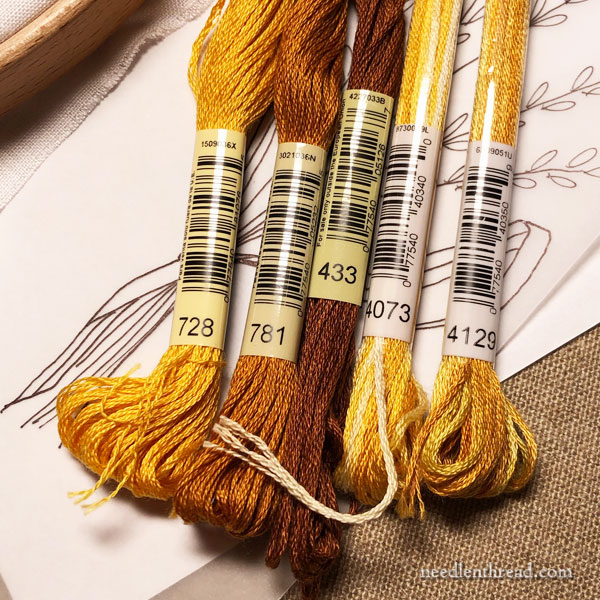
And I’m using DMC stranded cottons in a few wheat-ish colors, including a couple DMC Variations, which are overdyed. The color numbers I’m using are 433 (brown), 728 (golden yellow), 781 (light golden brown), 4073 (Variations) and 4129 (Variations).
I pulled that darker looking brown above (433) because I may want to accentuate some small edges or shadows on the leaves. It may not be necessary. We will see!
I pulled these from my stash. Feel free to substitute any wheat colors you have on hand. You can even use #12 perle cotton for most of the techniques we’re going to cover for the wheat itself, so go ahead and mix and match your thread colors and types if you like. It’s a practice piece! (That said, stranded cotton will work best for the leaves.)
Wheat Design Download
This is the design I’m using for this exploration:
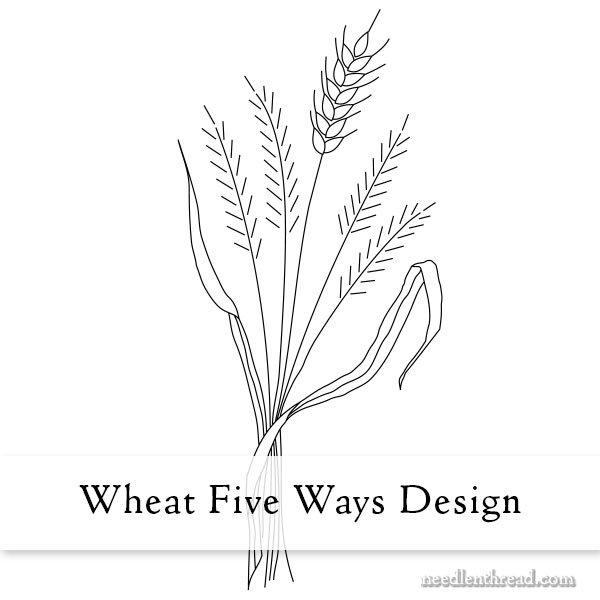
It prints at 5.5″ high. When you print it, please choose “actual size” or “100%” – or just don’t choose “auto fit” in your printer dialogue box.
Here’s a PDF of the design:
Wheat Bunch Embroidery Design (downloadable PDF)
To transfer your embroidery design, use any method of transfer that works best for you. We all have our favorites!
I’ve covered design transfer many, many times here on the blog, so if you’re looking for an approach to use, feel free to explore this link to articles on Needle ‘n Thread tagged “design transfer.”
This particular article covers a whole list of ways you can transfer embroidery designs, and the comment section below the article is filled with a great number of wonderful suggestions from the wider Needle ‘n Thread community!
Next time we visit this project, we’ll start stitching!
If you’re a Patron of Needle ‘n Thread on Patreon, you’ll find a downloadable PDF of Part 1 of this series posted today. As we work through these small tutorial series, I’ll be adding PDFs (like little e-books) to Patreon for you, so that you can collect the series in a printer-friendly layout as the series progresses.
