Do you know what an “ear worm” is? It’s a song or sometimes a phrase or saying that keeps running through your head. I think the term is usually used when it’s music that you can’t get out of your head.
I won’t mention any particular songs, because I wouldn’t want to do that to you!
But every time I’ve picked up my Sea to Stitch project from this book by Elisabetta Sforza, that little tongue-twister pops into my head: She sells seashells by the seashore. This morphs into She sews seashells, and then Seashows soshells and Sheshews sheshows… and on it goes, knocking about in my head in every possible configuration.
So far, I’m liking the seashells! There are a few little bits that I wish I had paid more attention to, perhaps adjusted a little, but overall, the letter is coming along pretty well, and I’m infatuated with the shells.
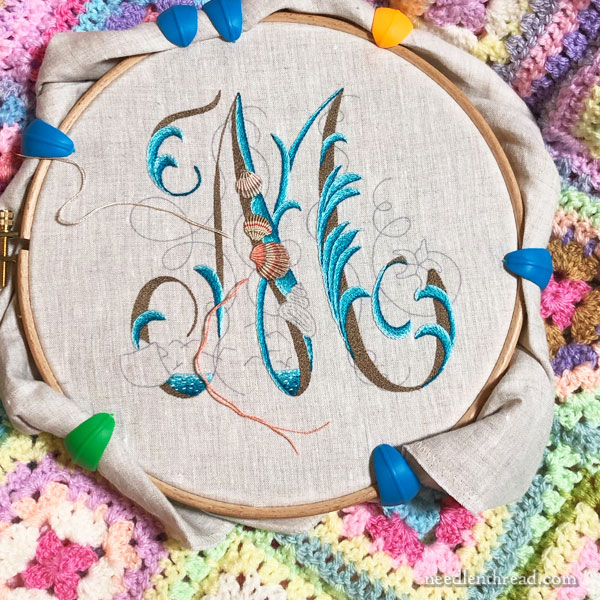
I’m sticking with very muted natural colors for the shells, with touches of light, medium, and darker coral. It’s a combination I really like when combined with certain watery colors!
I may have crammed too many ridges into the shells. I found out the hard way that the more ridges you cram in, the more difficult it is to work the embroidery without snagging the embroidery that’s already there.
This is definitely the place to be using a tapestry needle! A sharp-tipped needle, even if turned around and inserted eye-first while working the wrapped rib stitching (same technique used on a ribbed spider web stitch), can wreak havoc on surrounding embroidery.
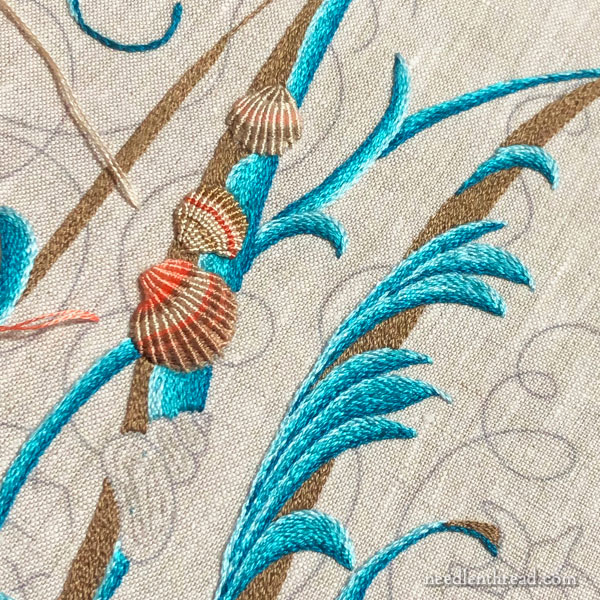
For the smaller topmost seashell and the larger lowest seashell, I’m using Soie d’Alger, which is a stranded silk – so, similar to using a stranded cotton.
For the middle shell, I used Soie Perlee, which is a fine perle silk (like a fine buttonhole silk).
I love the texture of the middle shell! And I love the extra sheen from the filament silk that’s used to make Soie Perlee.
But the Perlee doesn’t blend the same way as the stranded silk, so the stitches are very distinct from each other, and any warble in the stitching path is much more obvious. I’ll have to get in there with a blunt needle and do some nudging to smooth out the lines of stitches on that middle shell.
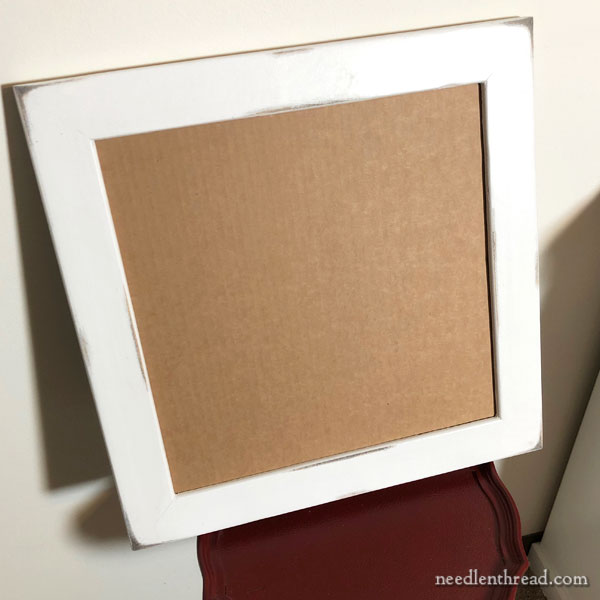
While it’s not quite time to talk about finishing methods on this piece – there’s still a bit of stitching to do! – this is the frame I’ll be using. It still needs some work.
The frame is made from barn wood. Think of it as the-seashore-meets-the-plains!
I plan to distress the frame further with some rough sand paper, to bring more of the weathered wood through the white paint. Then I’ll smooth it out with some finer sand paper, and I’ll add some really cute sea-themed hooks I found to the base of the frame, and a little accent at the top of the frame.
More on that part of the project later! I can’t wait to get to that point!
Coming Up!
But in the meantime, a few other projects have my attention.
For example, on Friday, I’ll have the second installment of Wheat Five Ways up for you. This is a small collection of tutorials that showcases five different ways you can embroider wheat, and it includes a free design to practice on. You can find Part 1 of Five Ways to Embroider Wheat here. Stay tuned for Part 2 on Friday!
The second design in this how-to series is already underway, too, but I’m not going to say what it is yet! You’ll just have to wait. So far, I’m loving it!
I’m still working on the heart instructions that I mentioned in this hodgepodge, I promise. I don’t know if it will be out by Valentine’s Day, but I’m certainly shooting for then, or slightly before. Keep your fingers crossed for me!
And finally, did I mention tea cups? I’ll tell you about my infatuation with them down the road a bit, when I share another little idea that’s … ahem …. brewing.
Have a wondrous Wednesday!
