Here in Kansas, the rapid onset of spring in the last week is forcing out the buds on flowers, trees and shrubs.
Yeeeehaw! That’s exciting!
To celebrate, I thought I’d share a little Stitch Fun tutorial with you, to show you a simple way to embroider a pretty little floral vine speckled with tiny buds.
This is one of the many combinations in my Stitch Sampler Alphabet (ebook coming soon!), and it’s one of my favorites. It’s quick to work, simple, and very adaptable – think crazy quilt seam treatments, borders, sampler bands, or a floral element in embroidered gardens and landscapes. The combination could also be reasonably adapted into crewel work for wide vines. There are lots and lots of possibilities!
Ready? Here it is – a Stitch Fun tutorial for a floral vine with tiny buds, using up and down buttonhole stitch.
In this tutorial, I’ll take you step by step through working the up and down buttonhole stitch on a slant. Before we start, though, if you’re not familiar with the stitch, you might want to watch my video tutorial for the up and down buttonhole stitch.
I’m using coton a broder #25 in this tutorial, stitching on Alba Maxima linen, using a #7 crewel needle.
If you want to see larger versions of any of the photos in the tutorial, just click on them.

Begin by bringing your needle and thread to the front of the fabric, just slightly off the design line.
Then, as if working a diagonal straight stitch, take the needle down into the fabric a good quarter inch or more away, as shown in the photo above. How long you make this stitch depends on how long you want your buds to protrude from the main “branch” of the vine.
With this particular thread (coton a broder #25) or with, for example, 2 strands of regular DMC, 1/4″ stitch here is a good stitch length.

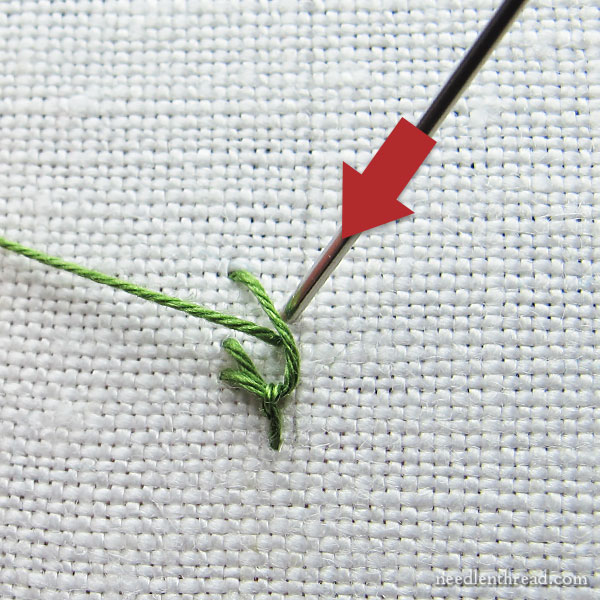
Before pulling your thread all the way through, bring the needle back to the front of the fabric, inside the loop formed by the working thread, and just above where you first emerged to begin the line.
You want to keep a diagonal slant on this stitch, so emerge close to your starting point.
Pull the thread through…

…and this will make the first slanted buttonhole stitch.
Then, take your needle to the back of the fabric, right next to where the thread just emerged. Don’t go down in the same hole, but right next to it, with a fabric thread or so in between, as shown in the photo above.

Before you pull the thread all the way through, bring the needle to the front of the fabric, inside the loop of the working thread (shown above), and above the tip of the first buttonhole stitch.
You want a little space here between the two stitches. Don’t come up right next to the first stitch.
How far you space these stitches at the tips is up to you – you can play with spacing to achieve different effects. I found that two or three fabric threads was a good distance.

Pull the thread through, and down away from the stitch, as shown in the photo above.
As you pull this stitch through, the thread will cinch around the two stitches, pulling them together at their base, but leaving them spread apart at their tips. This is what you want.

Now it’s time to move up the line for the next pair of stitches.
Take your needle down into the fabric above the tips of the first pair of stitches.

As you work the second pair, try to keep a slant similar to the first pair of stitches.
In the photo above, I’m bringing the needle up inside the loop of the working thread, close to the design line and closer to the base of the first pair of stitches, to maintain the slant on the stitches.
After pulling the thread through for the first buttonhole stitch in this pair, take the needle down into the fabric again, right next to where you just emerged, to begin the second buttonhole of the pair.

As you begin to pull the thread through, leave a loop on the front and take the needle up inside the loop again, slightly higher than the tip of the previous buttonhole…

…and, again, pull the thread through and away from the stitch, tightening it up around the neck of the two stitches.

Rinse, lather, repeat.
Just repeat the process all the way up your design line.
This does work well on gentle curves, too, so feel free to experiment with gently curving lines. It works ok on tighter curves if you only work one side of the vine. The inside of a tight curve gets a little too squished to look good, if you try to do both sides of the vine.

And then work the same process on the opposite side of your design line.
You can mirror the placement of the stitches, or you can off-set them, working the opposite side’s stitches between the first side’s stitches. Experiment!

Now it’s time to decorate the vine. You can create buds by working very simple straight stitches at the tips, between each pair of buttonhole stitches. In the version above, I also added French knots up the center.
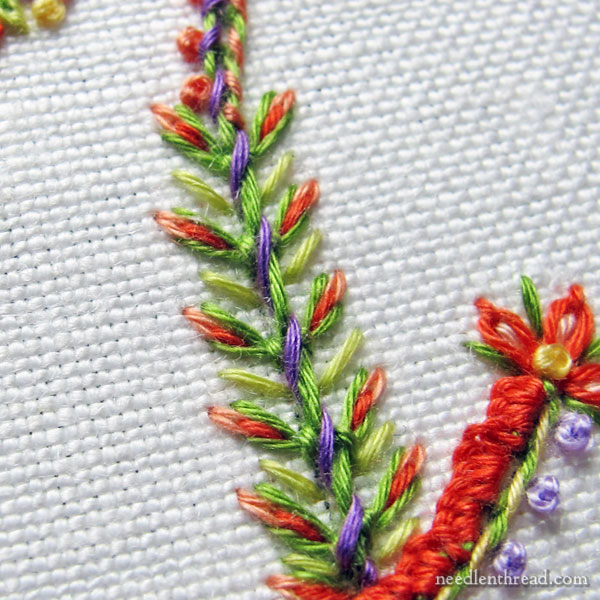
In the version above, I dressed up the buds a little bit. After working a lighter coral straight stitch at the very tip, between the two buttonhole stitches, I worked a darker coral stitch further into the space between the buttonholes, by splitting the light coral stitch.
Then, to fill out the vine a little bit, I worked light green straight stitches between each bud, and finally, I whipped up the center of the vine with a medium purple, to connect it, color-wise, with the other areas of stitching on the letter.
So, what do you think? Was that fun, or what?! I hope you give this little budding vine a try – and don’t hesitate to experiment with it!
Stitch Fun is a series of embroidery stitch tutorials on Needle ‘n Thread, where we explore embroidery stitches and stitch combinations just for the fun of it! You’ll find plenty more tutorials in the Stitch Fun Index, if you’re longing for some adventurous stitching!

