When I first saw Hazel Blomkamp’s Late Harvest, an embroidery project in her book Crewel Intentions (which I’ve reviewed here, if you want to see what’s inside it), I thought Wow! That would be the Perfect Fall Embroidery Project!
And then I ended up starting it at the end of winter this year.
Originally, I set up the project as a “carrot” – something I can work on solely for the fun of it, as a reward when I finish other things I need to do, or just when I want something to stitch for relaxation.
The last time I had a chance to work on it was in the hot throes of summer, during mid-July in Kansas. Not exactly the Vision of Stitching Bliss that I first pictured for this project, which I imagined indulging in on crisp autumn days.
This weekend, even though the temperature peaked around 90 (thanks a lot, Kansas), I took it out and worked on it a bit. Today, I’ll share some progress, make some comparisons, and share a happy discovery with you.
When we last visited this project, you might remember that I didn’t follow the instructions very well. The element in question at that time was the large leaf on the left in the photo above.
To summarize: I hadn’t read the instructions through first, and I assumed that the leaf was stitched in long & short stitch from the outside in (which is the direction I would normally stitch a leaf in long and short stitch) and then the beads were attached down the middle of the leaf.
In fact, in the instructions, it’s just the opposite: work the beaded spine of the leaf first, then work the long and short stitch filling from the inside next to the beads out to the edge of the leaf.
I was determined to follow the directions on the second leaf.
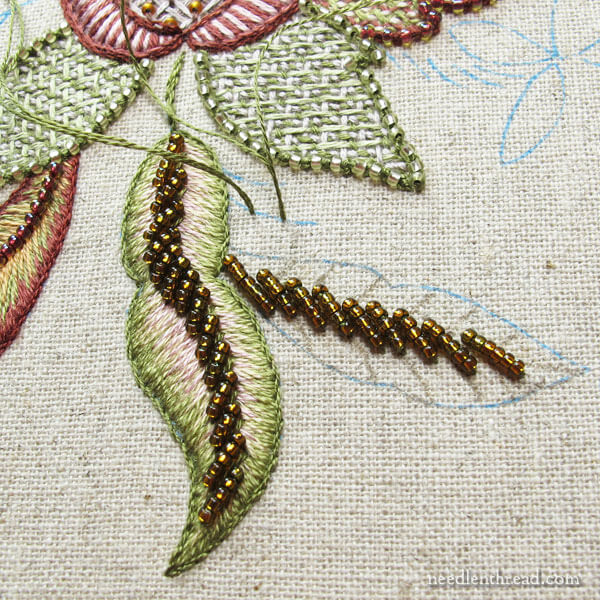
So, the first thing I did was work the spine with the beads.
Because I had the design lines to follow on this leaf (they were covered on the previous leaf), the spine came out much more even, and it was a lot easier to stitch the beads in place.
The spine on the left leaf is kind of wonky – but in the scheme of the whole piece, I’m not worried that it will look too bad. If it does, at the end, I might re-do it. But for now, I’m leaving it.
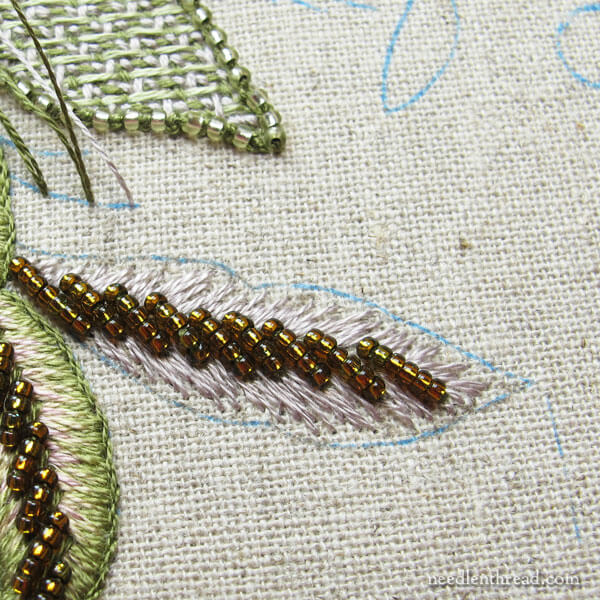
I began the long and short stitch next to the beads, and working out towards the outer edge of the leaf.
It felt Really Weird to work in this direction. It was like trying to stitch while looking in a mirror at the work surface.
I knew that three layers of colors had to fit in this space, too, so I was a little concerned that either the last layer would look stunted or the middle layer would totally disappear.
But, I forged on! I wanted to see if there was a major difference in the outcome…
Eventually, the second leaf was finished.
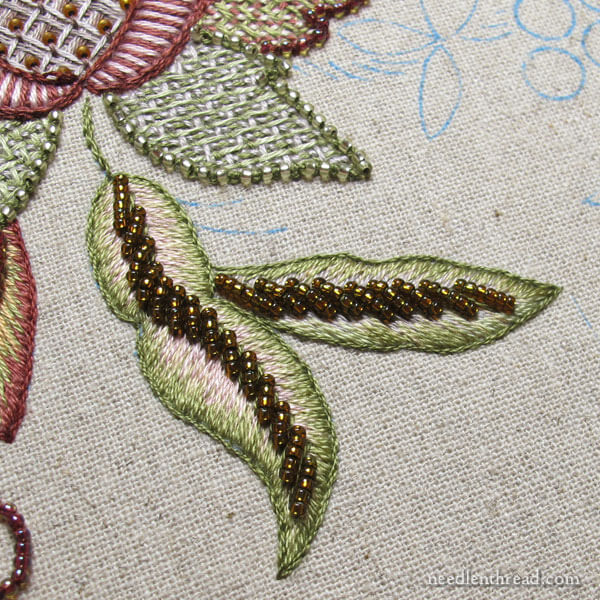
Each leaf is outlined with a stem stitch in a slightly darker shade of green. While this contributes to the crisp edge on the design, it also serves to clean up the edge, which is definitely a little messier when you’re stitching from inside the design to the outside edge.
On the first leaf (on the left), I split stitched around the leaf and then worked the long and short stitch over that split stitch line, and the edge came out quite sharp and clean, with a little lift to it.
On the second leaf (on the right), the edge is quite flat, and the ends of the stitches on the design line were slightly feathery looking.
The stem stitch outline was the leveler, and I think both leaves came out fine, as far as the long and short stitch goes. The second leaf (the right leaf) has a much better looking beaded spine. But the left leaf shows much more of the middle shading and color change on the leaf.
So, something learned! Either way has its advantages and they both work.
There’s a third leaf to work that’s just like these two, and I’ll work it according to Hazel’s instructions. It’s much easier to get that beaded spine right, when you can see the design lines.
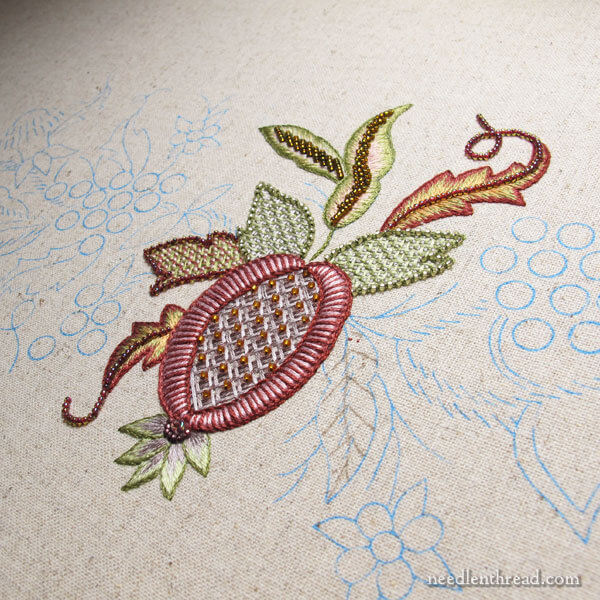
This is the very-little-progress that I’ve made on the whole project at this point.
Incidentally, the pomegranate in the center is elongated and not symmetrical. That’s the way it is in the design. It’s not meant to be round and perfectly balanced. The majority of the pomegranate, except for the lower tip (maybe the lower one-third) is covered with stumpwork leaves, so you don’t see most of it – just really the lower tip and some of the center.
I set this project up on stretcher bar frames. It’s a very wide project, but not deep.
I’m using my Needlework System 4 table stand to hold the frame while I stitch. The frame is tilted downwards at an angle, just over the edge of my work table.
So, when I’m facing the frame and working, it’s hanging downwards in front of me, and because of the width of the frame, it covers quite a bit of my work table.
If I need to get anything on the table, I have to reach underneath the frame or around it to fetch.
So, to remedy that, I use really strong tiny magnets to hold my scissors on the front of my fabric, since I reach for them often.
What I didn’t like was having to reach underneath the frame to pick up my little bead tray that I made using a gift card tin and a tacky bead mat.
Happily, the configuration of the tin and the tacky bead mat ended up being the perfect solution for this particular project, because…

…a couple very strong little magnets hold the bead tin in place on the front of the fabric, too.
So, the magnets hold the tin (with gusto – they’re very strong), and the tacky mat holds the beads, even though the whole frame is hanging at least a 45-degree angle. It’s very convenient!
I love it when things work out like that!
So, that’s my progress on Late Harvest. It isn’t much, but a little progress is always better than no progress at all.
I’m definitely planning to spend more time on this project during the cooler fall days (hopefully coming soon). It’s funny how just that little bit of stitching this weekend has sparked my obsession with it again. It’s such a fun kit!
You can find the kit for Late Harvest available at Hazel Blomkamp embroidery, if you’re interested in stitching it, too. Keep in mind that the currency is in South African Rand, and the kit ships from South Africa.
The kit doesn’t come with instructions – the instructions can be found in Crewel Intentions.

