So, you know all these counted cross stitch snowflake and folky designs I’ve been working on lately? The whole point of them was to give me something to do with my hands when I’m not really up to doing something super intense, like goldwork or silk shading or anything that requires me to sit at a frame for an extended period of time.
With these quick little cross stitch projects, worked on Christmas red pre-finished cotton table napkins, I can hold them right in a little hoop, in any chair I want to sit in, with minimal supplies at hand. They’re completely relaxing to work, thanks to the monotony of the stitching, and I can easily listen to a good book, hum along to some relaxing music, watch a movie, or even visit with friends, without worrying about making mistakes or having to concentrate too hard on the stitching part of things. They’re also extremely easy to tote places, for stitching on the go.
At the end of this article, I’ll link to all the previous articles on this subject, along with the free patterns. For now, though, I want to share with you a brain storm I had the other night and that I’ve tried out a little bit, but that needs a little more tweaking.
To start with, let’s compare two counted embroidery charts.
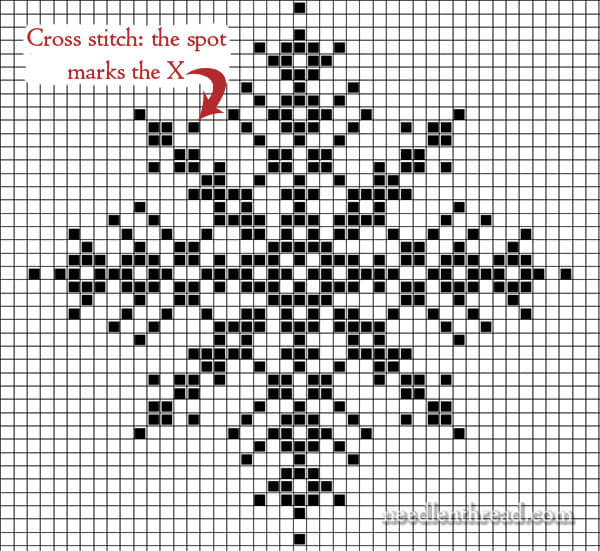
This is your typical counted cross stitch chart for a snowflake variation. It’s “ok” – I think the flake needs a little tweaking, but it’ll do fine for now.
With a counted cross stitch pattern like this, the filled block marks where you stitch an x. Simple concept!
Well, one night, while I was diligently stitching multitudinous x’s, I wondered about switching the stitch to French knots. Why knot? I thought.
But then, when I thought about the pattern, and I thought about the way I was getting the grid onto plain-weave fabric (I used this method, employing printed Sticky Solvy), I realized that the method would make it somewhat difficult to produce really straight lines with French knots.
So, pondering, I came up with a slightly different chart. It looks like this:

I figure, if stitching French knots, if the knot is stitched on the intersection of the printed grid, then it would be much easier to make sure the knots were aligned nice and straight.
And so, I set about testing the theory.
I printed a 14 count grid on Sticky Solvy (see the links below for a printable 14 count grid) and then, using a water soluble pen, I marked the French knot snowflake pattern above onto the grid, so I don’t have to refer to the pattern. I just marked a plain little dot on each intersection, just like the pattern indicates.
Then, using coton a broder #25 in bright white (B2500) and a size 7 milliner needle, I set about stitching some French knots.
I didn’t get very far…

Nope! Not very far at all.
I stopped because the concept needs some troubleshooting.
In my mind, the problem is the Sticky Solvy. Yes, I know – blame it on the materials instead of the stitcher! It sounds like a copout or a flimsy excuse!
I’m not saying this can’t be done on the Sticky Solvy. But it’s not easily done on the Sticky Solvy.
One thing I’ve noticed about Sticky Solvy is that, the smaller the embroidery needle you use, the easier the stuff is to work on. With the larger milliner needle, it picked up a bit more Sticky than usual. And you really can’t work French knots successfully if your needle is gummy.
So, one option is to try a smaller needle with the French knots.
But you know what else I don’t like? Because French knots don’t give you good coverage – small French knots spaced apart like this are a little airier than cross stitch – you can’t really see the effect of the knots on the fabric, because the interfacing is in the way.

And, of course, to turn the spotlight on the stitcher, too, my French knots are not really consistent in size, which I think they should be, when working a pattern like this.
Ok, yes, I’m going to blame that on the Solvy, too. I know! Shame on me! But really, it’s harder to work French knots – and lots of ’em – through this type of interfacing, and keep them really consistent.
So, while I was pondering this whole thing, I came up with another idea, and it has to do with getting the design or the grid onto the plain weave fabric in a way that makes sense and that would allow for stitching lots of consistent French knots, keeping them aligned well.
I’m going to tweak that idea, and I’ll show it to you down the road, when I test it. I’m afraid it adds another step or two the project set-up, which is something I wanted to avoid with these particular projects, but if any of you are keen on the French knot approach, I think it’s worth exploring. So, more on that, once I figure it out to my satisfaction!
More Information and Stitching Patterns
In the meantime, here are the links to all the articles on these snowflake and folksy designs, worked in counted cross stitch on plain weave fabric, in case you’d like to explore some similar stitchery:
Folky Flakes for Holiday Stitching – in which I peruse some methods for working counted cross stitch on plain weave fabric, and supply you with a free design for pretty snowflakes stitched on a corner.
Counted Work on Plain Weave Fabric – in which I discuss another method of getting a grid onto plain weave fabric (using Sticky Solvy), and supply you with a printable 14-count grid to download.
A Second Folky Flake – free pattern
Deer & Tree Folk Christmas Stitching Pattern – free pattern, plus the finished piece, un-ironed!
Other Updates!
A big hearty THANK YOU to all of you for your ongoing support, for all the friendly and encouraging emails, cards, and messages I’ve received from you while I’m in a little bit of a transition here, from what I thought was normal, to a (temporary) new normal.
I’m not quite able to reply to everyone personally – oh, I wish I could! But be assured, I’ve read your notes, they’ve been awfully encouraging and helpful, and I appreciate them more than you know!
If you’re new to Needle ‘n Thread and you’re curious, you can read about my latest adventures in my Thanksgiving letter.
While I promise not to make this website a personal one with constant updates, at the same time, many people have begged me to update everyone now and then. So, in the future, I’ll do the same thing I did on Thanksgiving and link to a letter, so that those who want to know how things are going can read it, and those who would rather not get involved, don’t need to. That’s the only fair way I can think of striking a balance.
In the meantime, I’m plugging along well. I started chemo this week. I’m sticking to my motto: Don’t let what you can’t do prevent you from doing what you can. It’s a good motto for any aspect of life, and it works exceptionally well here!
I hope you have a wonderful weekend, wherever you are, and I’ll see you around next week!

