Of all the different embroidered elements on Late Harvest, the grapes were the Wow Factor that really sucked me into this project!
Made from bunches of flat back topaz crystals attached to the surface of the project with a clever combination of detached buttonhole cinched with a whip stitch, the grapes add a massive amount of sparkle and texture to the project.
Lately – and I admit it freely! – I’m a sucker for bling, and these grapes definitely feed my growing penchant for adding a bit of blingy brightness to my embroidery projects.
So, needless to say, I was super eager to get on with the grapes. Alas, it wasn’t smooth going at first! Initially, in fact, it was pretty hard going – most of which has to do with the leaf that I showed you last week and the fact that I switched up the recommended order of work.
I’ll explain…
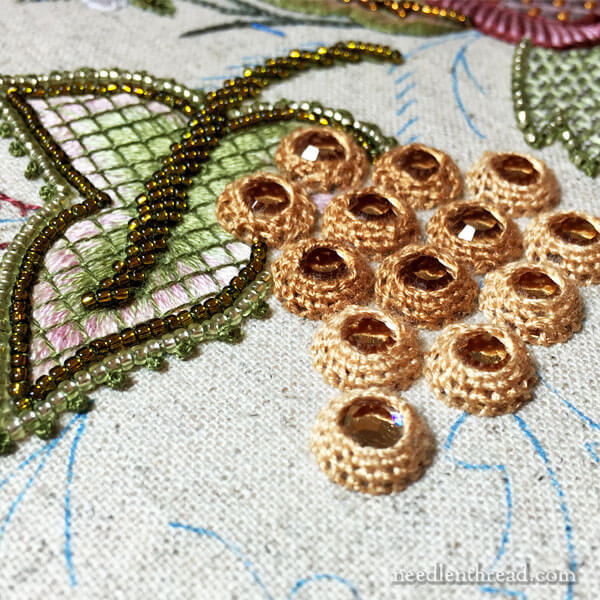
Here’s the first bunch of grapes on Late Harvest, embroidered into place.
To embroider the flat back crystals onto the fabric, the crystal is first attached to the fabric by criss-crossing a sewing thread over the crystal. The sewing thread is removed after the embroidery stitches are worked around the edge and up the sides of the crystal.
A foundation of backstitch is worked around the outer edge of the crystal, using two strands of floss. This foundation is the attaching point for each crystal. If I turned my work over now and snipped away the backstitch, the crystal and it’s little casing of detached buttonhole stitch would fall right off.
Into the backstitch foundation, three rows of detached buttonhole stitch are worked, and the last row is whipped with a simple whip stitch that’s pulled tight to cinch the buttonhole nice and snuggly around the crystal.
Now, working that first row of detached buttonhole into the backstitch foundation is not a big deal, if you’re attaching an isolated crystal that has nothing embroidered around it. In fact, it’s pretty simple!
But remember when I showed you the embroidery on the elaborate leaf in the photo above? I mentioned that there would be a couple problem spots when the grapes came into play when adding the grapes.
And it’s true – there were. With the leaf finished, it was more-than-fiddly to get the grapes overlapping the leaf onto the fabric! I had to work around the fine stitching on the leaf, wiggling the needle in and out of the backstitch foundations without snagging the long and short stitch on the leaf, and around the beads, which made it really hard to get a good angle on the needle.

With the first five grapes that overlapped the leaf area, I did my best not to murmur curses and blasts under my breath the whole time!
My frustration lessened considerably when I squelched my eagerness just to get the grapes on, and told myself to take my time and work through each one slowly and carefully.
And oh! It was worth it! Once the grapes were on, I was immensely satisfied with the brilliance of the sparkling crystals. No matter what light they were under – direct sunlight, the artificial light of my LED magnifier, or the daylight brightness of my stitching lamp – the crystals danced, gleamed, sparkled. I was mesmerized!
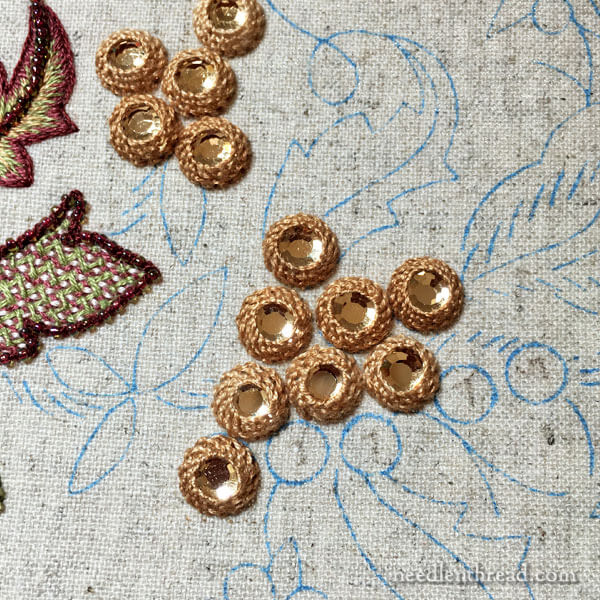
And so, thinking forward to future parts of the project, I did what any Reasonable Person Besotted with Sparkle would do. I decided to embroider all the grapes on the whole project.
My reasoning: it is Much Easier to embroider elements like this when there’s nothing else around them. Sure, when it comes to stitching the elements surrounding them (like the long & short stitch leaves that protrude here and there from the grape bunches), they might interfere slightly.
But it’s much easier to stitch long & short stitch and bead outlines around the grapes than it is to stitch the grapes around long & short stitch and bead outlines!
Lesson learned…and lots of luscious grapes are now firmly affixed.
When working the isolated grape bunches on the rest of the project – isolated, because I haven’t stitched any of the elements around them yet – I started in the center of the bunches and worked out from there. I found it was much easier to begin in the middle and work outwards (kind of like lighting candles on a birthday cake – you’re less likely to get burned if you start in the middle!).
Incidentally, on average, each grape took 16-17 minutes to work, and there are 38 grapes on the whole project. So that’s about 10.75 hours’ worth of grape-attaching.
Further Explorations
Fascinated with this method of attaching the crystals to the fabric, I decided to explore further.
I squizzed through some old goldwork and shisha embroidery books in my library to see if I could find similar methods of attaching objects to fabric. In a shisha book from the 60’s or 70’s, I found pretty much the same approach – it’s a kind of reversed shisha without the normal criss-cross foundation over the object – only the foundation around the disk is chain stitch instead of backstitch.
I’m going to try it and see how it works on other flat back objects – cabochons and the like. It’s a wonderful technique, and I’m betting that any detached needle lace filling could achieve similar results, while varying the decorative look of the embroidery. All kinds of ideas are churning in my head!
So that’s where I am with Late Harvest – and still totally in love with the grapes! I wish there were more to attach! I’d stitch them anywhere!
I hope you had a terrific weekend and were able to get in some quality time with your needle and thread!
I’ll be back on Wednesday, when I announce the winner of the Talliaferro crewel embroidery guide give-away (there’s still time to sign up!) and share some other updates with you.

