Last week, we chatted a bit about voided monograms, and I showed you a super-simple, colorful approach to stitching one up.
To reiterate, you can apply this whole “voided” embroidery approach to any bold, clear design – it isn’t just for monograms!
I’m using monograms because I like them, and because they work up into nice little gifts to give for birthdays, Christmas, and the like. I either frame them or insert them into the top of a decorative box to make a special little gift. Occasionally, I use them for the cover of a needlebook or even a journal cover, depending on the recipient.
Today, I’ll show you the beginnings of another approach to a voided monogram. This one is a little more complex. There’s a lot more stitching variety in today’s approachand much more scope for the imagination!
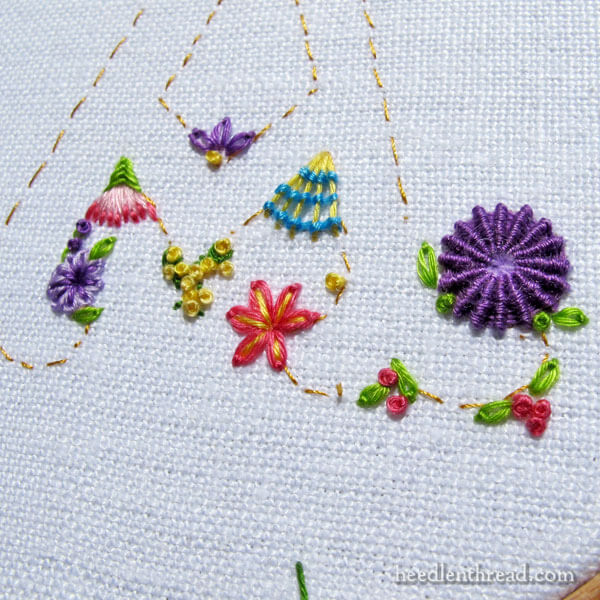
With this particular monogram, I’m filling in the background around the letter A with all kinds of floral, leafy, and vine elements.
For this project, I’m using Alba Maxima linen (available at fine needlework shops – I order mine from Hedgehog Handworks), white cotton muslin as a backing, floche for the embroidery (also from Hedgehog, where it’s put up in smaller bundles so it’s more affordable), and, for needles, a #7 crewel needle, a #26 tapestry needle, and a #5 milliner needle.
This is free-style stitching. There’s no definite plan. But I’ll explain how I’m going about it, in case you want to try it, too.
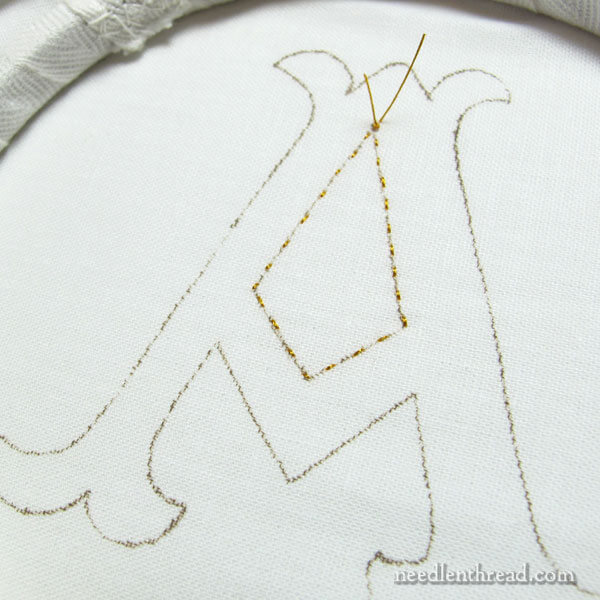
With this approach, it’s important that there’s no visible design line on the front of the fabric.
So instead of tracing the letter on the front of the fabric, I traced the letter onto the back of the backing fabric that’s behind the white linen that I’m using as a ground fabric. (We talked previously about using a backing fabric or lining behind embroidery ground fabric here.)
After tracing the letter on the back of the cotton backing fabric, I hooped up both fabrics.
In the photo above, that’s the back of my embroidery hoop, with the letter drawn onto the cotton, which is behind the linen.
Then, with a sewing thread – in this case, gold colored – I worked small running stitches very neatly along the design line.
To do this, I used the “stab” method of stitching (as opposed to the “sewing” method, which involves scooping the fabric), and made sure that my needle always entered the fabric perpendicular to it. This helps achieve an accurate running stitch on the front of the ground fabric.
I made sure that my running stitches always terminated at any corner or intersection of the design, so that I can easily see where that corner or intersection meets.

Once the running stitch outline was finished (working from the back of the hoop), this is what ended up on the front of the hoop. Exactly what I wanted, though admittedly, not absolutely perfect. It’s close enough, though!
So, now I have the design line perfectly visible on the linen. As I embroider, I’ll remove little bits of the running stitches. And in the end, there will be no chance of any design line being visible.
Time for the embroidery!
Again, we’re talking completely free-style here – whatever comes to mind as I go. The only plan I have is that I won’t cross over the design lines into the voided A area.
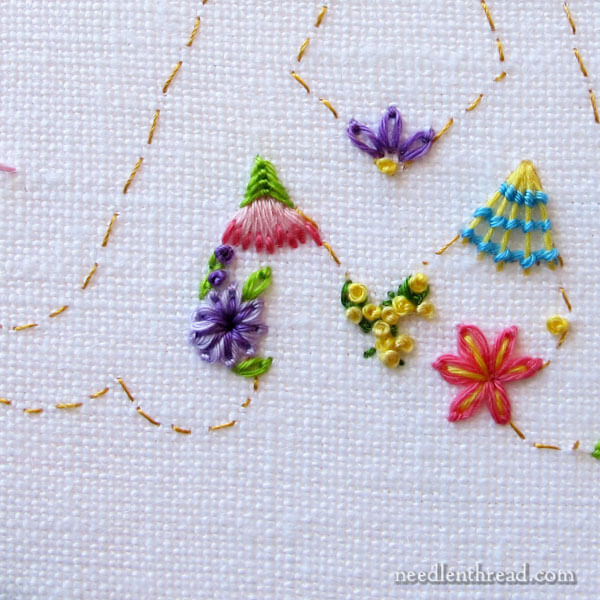
I began by embroidering in the tighter angles of the letter, concentrating on corners and points in the letter, to fill in around the A as much as possible, especially in the areas that require a little more manipulating to make things work well.
In the photo above, I’ve used a lot of daisy stitch, some fly stitch, straight stitch, split stitch, French knots, and ribbed spider web.
For colors, I selected a broad spectrum of colors from my cotton floche drawer, because it’s a great thread to work with. I made sure the colors look ok together, but I didn’t worry too much about a perfect color selection. I just picked colors I like!
The whole point of this particular letter is that it will all be a bit of a mish-mash of a colorful, floral background.
Here, you can see some more ribbed spider web (the purple flower), French knots and daisy stitches.
Notice that I situated the round purple thing so that it fits in the “scoop” of the foot on the A. It’s a good little scoop in the design for cradling a round thing.

Up in the point inside the A, I stitched a bunch of closely worked French knots accented with daisy stitches. There are a couple tiny green straight stitches in there, too, just along the design line on the right, but they’re not very clear in the photo above.
You can click on any of those photos, by the way, to see a larger version, if you want to examine them more closely.
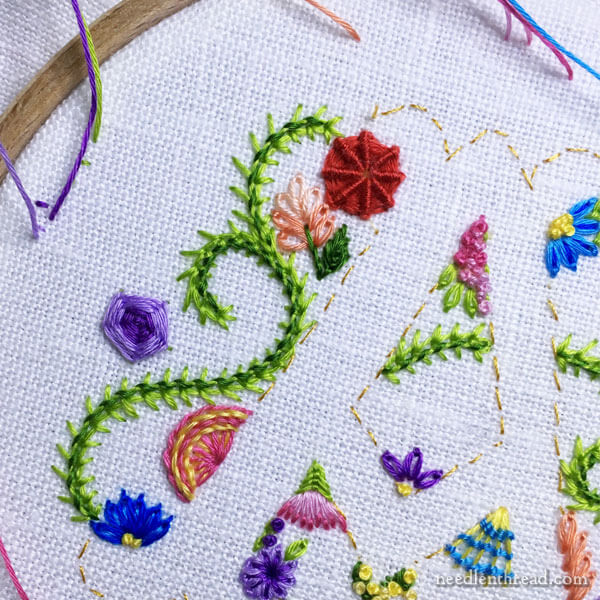
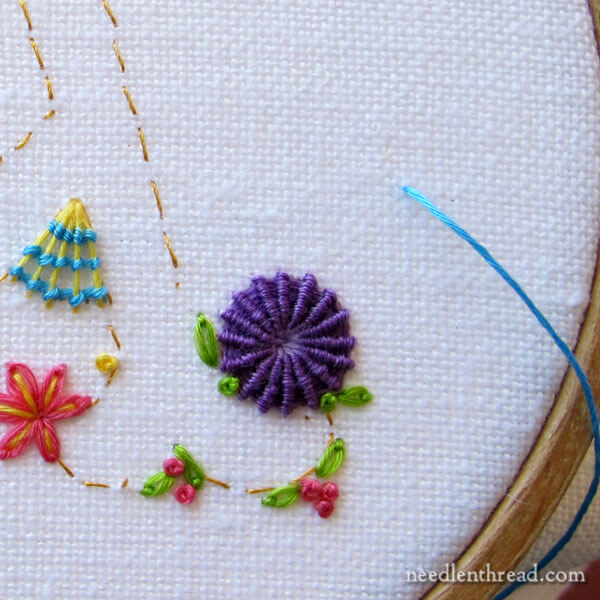
With a few elements in place, I started adding some random scrolly, vine-ish lines, using wheatear stitch in a bright green, with one side of the stitch whipped in a darker green.
If you’ve worked through any of the letters in my Stitch Sampler Alphabet, you might recognize this approach, as I used variations of it quite often in those floral letters. It’s a fun way to create a vine, and it opens up possibilities for further embellishment with little French knots and floral accents.
If you’re uncertain of your stitching path when adding vines and the like, you can always pencil them in lightly and stitch over the pencil lines. Or you can just wing it!
You’ll find a buttonhole wheel added to the left side of the letter there (in the pink and yellow). I stem-stitched over the spokes of the buttonhole wheel, using the same method as stitching a raised stem stitch.
You’ll also find a woven wheel in the two shades of purple to the left of the vine.
All of the elements are a little isolated right now, but I’ll be filling in around them with other greenery, seed stitching, French knots and the like, to create a fairly solidly embroidered piece.
This voided monogram is a terrific exercise in free-style embroidery – that is, embroidering without a set pattern, as you go. It’s a lot of fun and it can be a very exciting approach to stitching!
The monogram design I’m using belongs to the Plain Bold Letters from Favorite Monograms.
You’ll find all the stitch instructions for the various stitches I’m using available here on Needle ‘n Thread, under How-To Videos or listed in the Stitch Fun! tutorial series. I’ve linked directly to individual stitch tutorials in the article above.
More soon!
Enjoy your Monday!

