After a long weekend of stitching off and on, my voided floral-themed A monogram is just about finished!
Let me warn you right now – this type of embroidery is addicting. Once you get into a piece like this, it’s a bit like getting hooked into a Really Good Book. It’s hard to put down!
For those of you just joining in, you can see the beginnings of this project here. That’s where you’ll find information on fabric, on transfer method, and on most of the stitches used up to that point.
Today, we’ll chat a little bit more about the stitches I’ve used, and a bit about the approach I use to filling the whole background up.
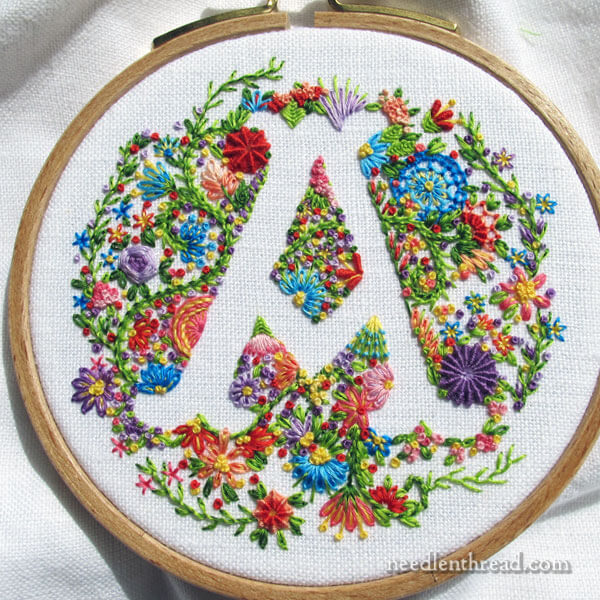
After embroidering on this piece off and on during the week, this is where things stood by Sunday. Compared to last week’s photos, it looks like a lot of progress. In fact, you might almost be tempted to say it would be a good place to stop.
After all, there is such a thing as going overboard, right?!
Squint to Balance Things Out!
But if you squint at the photo above, you’ll understand why I didn’t consider it finished.
Never underestimate the power of squinting when you’re examining a project!
With a good squint, you’ll see that the right side of the piece is a lot “lighter” in filling than the left side. You’ll see that the base lacks the same concentration of stitching. And you’ll probably notice that the top of the A is a little lost – it doesn’t stand out as well as it should, because there’s not as much stitching over the top of the A.
Part of the reason for the lack of stitching at the top is the way the letter fits in the hoop.
Remember, this is a 2.5″ tall letter, inside a 4″ hoop. It doesn’t leave a whole lot of room around the letter, before the hoop begins to interfere with stitching.
If you want to remedy this in your own version, it’s easily done: just use a larger hoop! If you decide to fill the hoop completely with stitching, this will definitely increase your stitching time, the amount of thread you use, and – of course – your stitching pleasure!
But you could also situate your letter in the middle of a circle (or a square, or whatever shape you want!) and transfer that outline to the front of your fabric as well (using the transfer method we talked about in last week’s article on this project).
With the whole thing mounted in a larger hoop with a defined outline, you have more control over how much stitching will fit around the extremities of the letter.
All that being said, there’s still room there to fill in with more stitching – all around the letter, actually – so I kept on going!
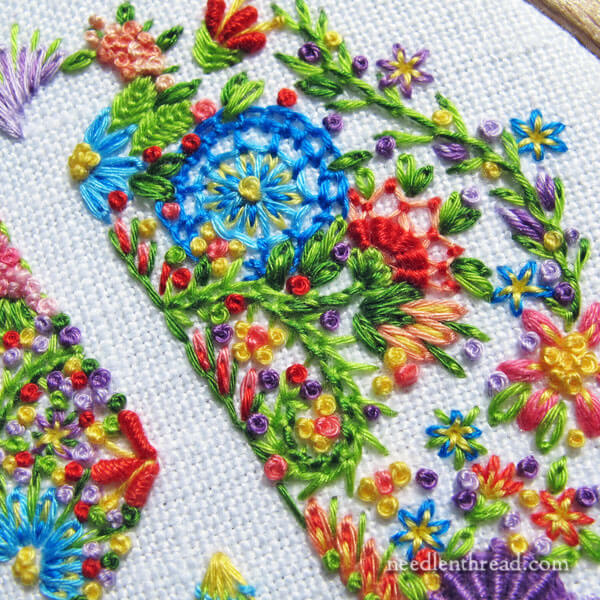
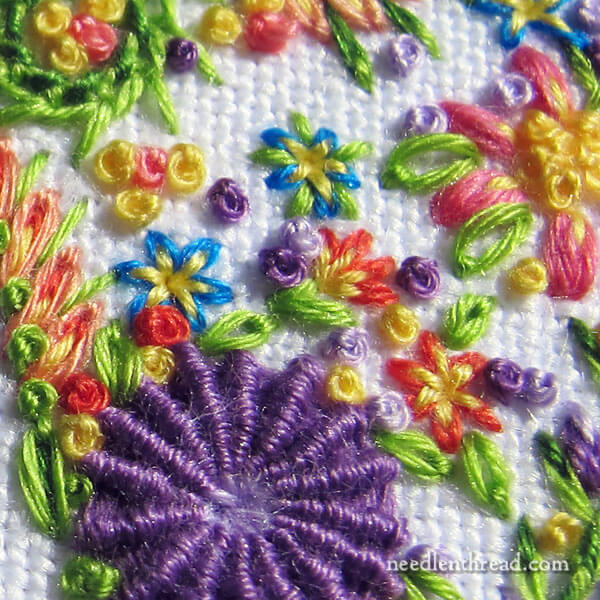
Here’s a bit of a close up on the right side of the letter.
The stitches predominantly used here are daisy stitch (detached chain), French knots, and straight stitch. It can’t get much easier!
In addition to those, I’ve used buttonhole wheels (for the blue wheel), a daisy stitch and ribbed spider web combo (the red and coral flower just to the lower right of the blue wheel), granitos (the larger bright pink flower on the lower right), and a few bullion knots (the small three-petaled red flower at the top of the photo).
For greenery, I’ve used feather stitch (the vine on the far right of the photo), a whipped wheatear stitch (the heavy spiked vine in the middle of the photo), some fly stitch (down the right edge of the letter, in dark green), and some fly stitch leaves.
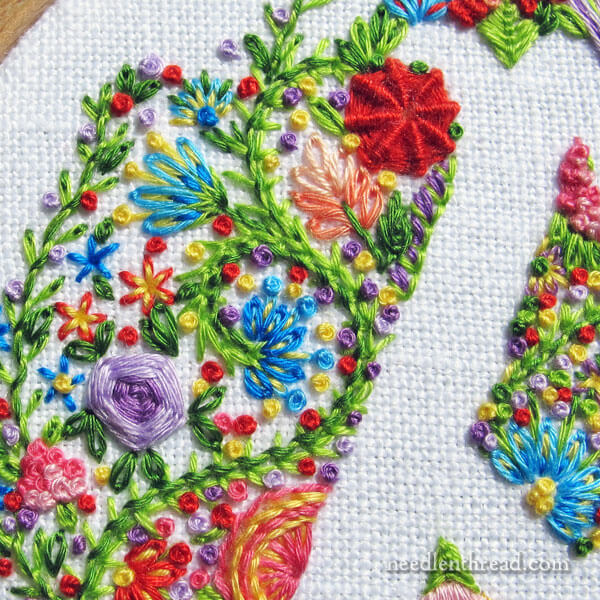
And here’s the left side of the letter. (Don’t forget, you can click on the photos for larger versions!)
On this side of the letter, aside from detached chain, French knots, straight stitches and split stitches, you’ll find a woven wheel (in two tones of purple), a ribbed spider web circle (the large red circle at the top of the photo), and a buttonhole wheel, in pink, with some layers whipped over in yellow (at the center base of the photo). The vines are the same as the ones on the right side of the letter, mentioned above.
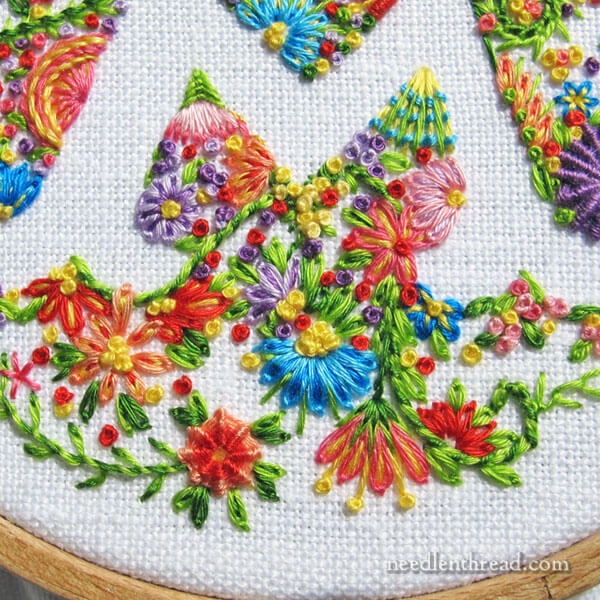
At the base of the letter, it’s more of the same!
Configuring the shapes of the floral elements adds variety, as does filling daisy stitches with straight stitches in contrasting colors. You can even split those straight stitches with yet another color, to add a little variety.
And then there’s the whole question of filling in spaces, so that you get a nicely covered ground.
With this particularly monogram, I’m shooting for a really well-filled ground. So in the photo above, there’s still a lot of white space that I want to cover.
Besides using daisy stitch for scattered green leaves everywhere all over this piece, and French knots for a bit of color and texture, the little flowers in the photo above are really great for filling spaces.
These are just tiny flowers made up of straight stitches, worked into a center point. With some of them, I’ve split the straight stitches with yellow, to add an extra layer of color.
These tiny flowers are no more than a quarter of an inch in diameter. Each little straight stitch is about 1/8″ long, or, in some cases, smaller, depending on where I need to fit the flower.
These little flowers make a terrific filling between larger flowers, and they help add a little variety to the French knots that be-speckle the whole piece.
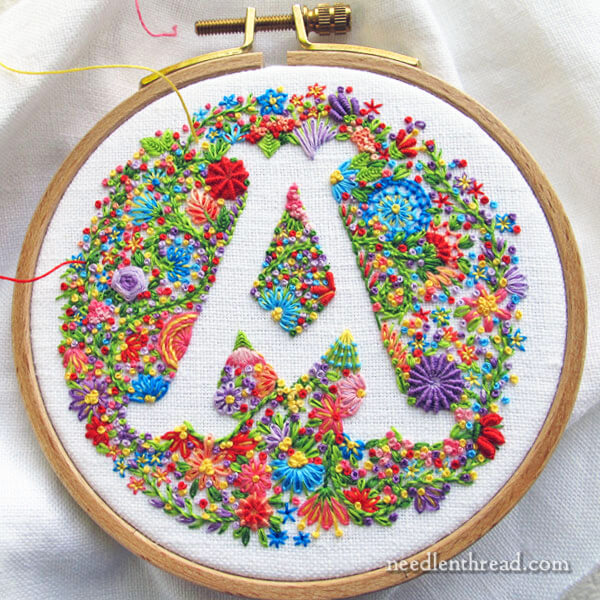
Aha. Here you go! Things are filling up!
In a sense, it’s almost just a … beautiful mess?
There’s still some work to do at the base of the letter, on the right side and up to the top, and then just around the edges all around, where the hoop pretty defines the edge.
If you like the idea of completely free-form stitching – doing whatever you want, wherever you want – you may very well enjoy working one of these voided monograms! They’re a lot of fun!
And they’re very forgiving projects, too. If you make a mistake (and I’ve made plenty in that mess above), no one will ever find it… including yourself when you go back to look for it.
Resources
You can find the alphabet used for this letter here, in Favorite Monograms. There are several other alphabets in that book that would work well for voided letters like this – the Modern Roman alphabet, the Open Script alphabet, and the Shadow Work alphabet.
If you like the idea of the floral theme, but you don’t want to work a voided monogram like this (which takes a lot of time), you might enjoy Stitch Sampler Alphabet. The monograms in this series work up pretty quickly and still give you the pleasure of working with many types of stitches in one small project.
The Voided Approach
Remember, the voided approach isn’t just for monograms! Anything that will work up in a clear silhouette would be fantastic for voided embroidery like this!
I hope you try it!
Nest time we visit the piece, I’ll show you it completely stitched and we’ll chat about what you can do with it when it’s finished.

