On Monday, I shared the beginnings of Tulip Festival, a Hand Embroidered Kaleidoscope. We looked at the project set-up and embroidering the first center layers of the design.
Today, I’ll take you through the next several layers on the embroidered kaleidoscope, discussing embroidery stitches and colors. I’ll also talk a bit about thread substitutions, and share some tips!
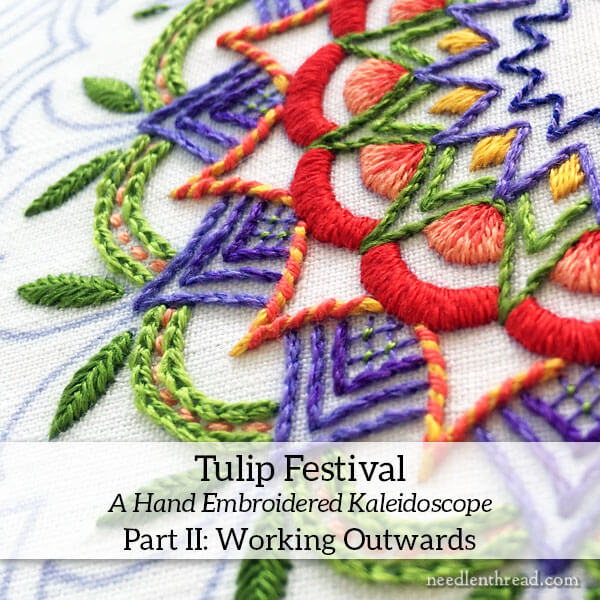
We left off on Monday at the wide layer of red satin stitched scallops. I mentioned that you could stop at that point in the design, and have a nice little medallion that would make a pretty ornament. Well, there are several places on this design that make a good stopping point, if you’re keen to stitch something smaller than the original pattern. You’ll see that as we go along!
We’re going to work through the next seven layers of the design in this guide. Well – it looks like seven layers on the original design, but when they’re all stitched in color groups, it works out to about three.
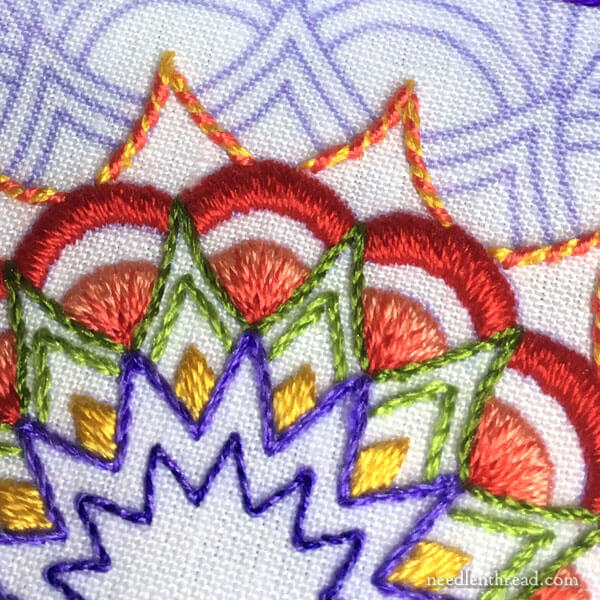
Just beyond the satin stitched scallops is a layer of points in gold and coral.
This layer is whipped backstitch, using three strands of yellow-gold (2525) Soie d’Alger, whipped with two strands of coral (924). If you want more yellow to show through, use one strand of coral.
First, you’ll want to work the backstitch foundation on each pointed element around the layer. Use a #7 crewel needle (or larger) when stitching with three strands in the needle.
When moving from one point element to the next, you don’t need to end your thread. Just turn your work over and run the thread under the back of the satin stitched scallops to the beginning of the next point element.
To come to a sharp point with backstitch, the concept is the same as when working to a sharp point or corner with stem stitch, as explained in this tutorial.
Even though you can embroider a good distance with the same thread in this design, I suggest keeping your thread lengths no longer than 16-18″, and changing threads as soon as the thread begins to look worn. If it starts looking dull or a little fuzzy, that’s a good time to start a new thread!
Once you’ve finished the backstitch, switch to a #24 tapestry needle and thread up two strands of the coral, to whip the backstitch.
Tutorials that will help with this layer:
Backstitch video tutorial
Whipped backstitch video tutorial
Stitching to a point or sharp corner with stem stitch (just apply the concept to backstitch)
Stripping floss – you’ll want to separate the stranded silk the same way you should separate stranded cotton before stitching with it
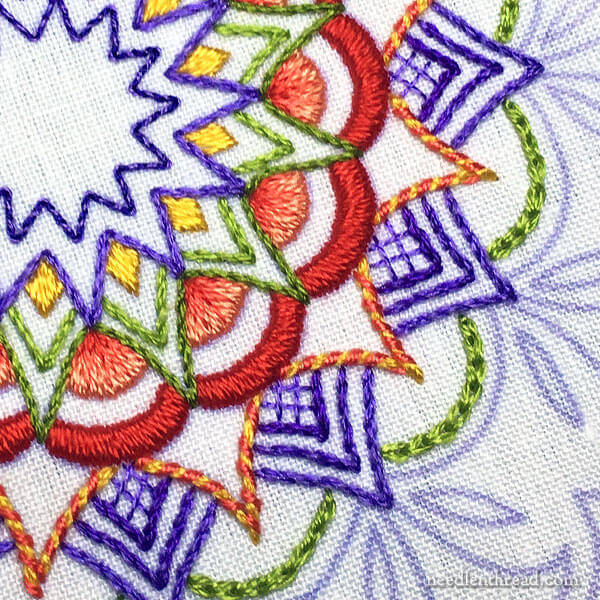
The next layer is actually a group of three layers – the three blue pointed elements.
Working from inside to out, you’ll see an area filled with a couched lattice filling, edged with a stem stitch line. The next two lines out (also in blue) are also stem stitch.
To gradually increase these layers in thickness, I added more strands of floss. Notice, too, that they are different shades of blue. They aren’t, however, three shades of blue, so let’s look at how that was done.
First, worked the lattice using one strand of the lightest blue (1334) couched at the intersections with one strand of the lightest green (2124).
Then, work a stem stitch outline along the outer edge of the lattice area, on the design line, using one strand of the medium blue (1335).
Work the next outer layer of stem stitch with two strands of Soie d’Alger – one 1334 and one 1335 in the needle together.
Work the final layer of blue in three strands of the lightest blue (1334).
Tutorials that will help with this section:
For lattice filling, check out this video on lattice stitches. You can also check out these tutorials on couched lattice fillings: Doodling with Lattice Fillings and More Lattice Fillings.
For stem stitch, watch this stem stitch video and read about how to turn sharp corners or come to a point with stem stitch. You can also read up on stem stitch shading techniques in the article linked to above, about corners with stem stitch.
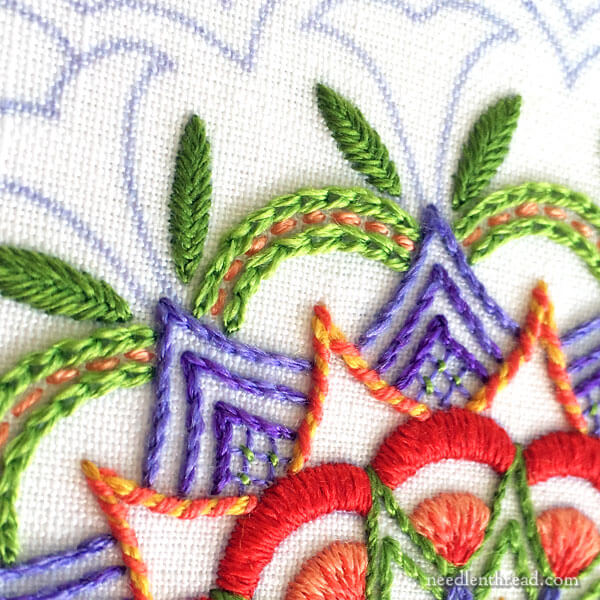
The next layer out on the kaleidoscope is made up of two lines of chain stitch scallops worked with two strands of Soie d’Alger in light green (2124).
Between the two strands is a running stitch line in medium-light coral (923).
Tutorials that will help with this layer:
Check out this video for chain stitch.
This video for running stitch will help you master this simple stitch.
And you should definitely make sure you’ve stripped (separated) your floss before working both stitches, to give the stitches their best chance for a nice, full coverage.
This is another place in the design where you could come to a screeching halt and call it finished, and it would look great! But… let’s forge on!
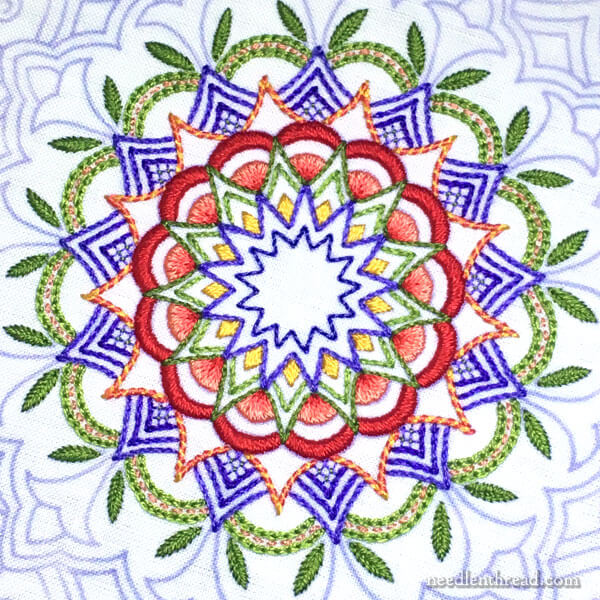
While you’ve got your green silk out, thread up two strands of Soie d’Alger in dark green (2126) – or medium if you prefer – and work the leaves in fishbone stitch.
You can find a video for fishbone stitch right here. It’s a classic leaf filling stitch, very easy as it’s comprised only of overlapping straight stitches, and it looks great on leafy shapes!
And that brings us to a good stopping point!
Next time, we’ll tackle the long and short stitch tulips… and a couple more layers!
Thread Substitutions
You can substitute cotton for the silks I used in this design. One strand of Soie d’Alger, in weight (or thickness), equals about 1.5 strands of DMC cotton. The silk has a much nicer “spread” to it, thanks to its soft twist, so it actually covers better than the cotton, and it works tremendously well for the upcoming long and short stitch shading on the tulips, which is one reason I preferred to use silk on this project.
That said, you can use cotton. If you want to keep the color scheme (more or less – it won’t be exact), you can try using a Soie d’Alger to DMC conversion chart to select colors. I’d suggest checking out this ever-developing list on Hands Across the Sea Samplers.
Tulip Festival Kaleidoscope Pattern
If you want to stitch along with this series, you can find the pattern for Tulip Festival in my e-book Favorite Kaleidoscopes, here.
Other Articles in this Series
Other articles in this series so far include:
Tulip Festival, Part I: Set Up, Materials, and Beginning to Stitch – this is where we talk about fabric, threads, colors, embroidery design transfer, and tackle the first seven layers in the center of the design.
I will eventually group all these articles in this short series into an index so that you can easily find it when you’re ready to stitch up your Tulip Festival kaleidoscope.
If you have any questions, feel free to ask them below!
