For those of you eager to stitch your own embroidered kaleidoscope, whether you’re using designs from Favorite Kaleidoscopes which I launched last week or using your own drawings, I’m going to share the whole process of Tulips Festival – an embroidered kaleidoscope – with you in short series of articles here on Needle ‘n Thread.
Even if you might not be into stitching these types of blossoming, repetitive designs, that’s ok! I’m hoping you’ll still find a little inspiration and plenty of tips for your own projects, no matter what they may be!
So, today, the first part of Tulip Festival – Getting Started! We’ll talk about the fabric and threads I used in my interpretation of the project, how I set the project up, and we’ll cover the first inner circles of stitches used on the design.

Tulip Festival is a rather exciting kaleidoscope to embroider, because of the way it blossoms outward in layers and layers of design and color.
For my interpretation, I used linen as the ground fabric and silk to embroider the design. I swear – I really do! – that the pleasure I had in stitching this particular project came not just from the excitement of seeing the thing unfold in color and stitches, but also in the whole feel of stitching on Really Good fabric, with Really Good threads!
That said, if linen and silk aren’t your thing, no worries! You can substitute fabric, threads, colors. I thoroughly encourage you to experiment, to work with what gives you pleasure, to play with fibers, colors, threads, fabrics – that’s the fun of these designs!
Materials & Tools
My interpretation involved the following materials and tools. You’ll find resources at the end of the article if you’re looking for the same materials.
Fabric
I used linen cambric by Legacy linen, which is a very fine, sheer linen. I backed it with a good quality white cotton muslin. Why cambric? Two reasons: I wanted a high count, fine linen. And at first, I planned to trace the design, which is always easier on a sheerer fabric. But then I decided not to trace the design. I already had the linen cut, so I went with it anyway.
Because the linen was so sheer and light, it was Absolutely Essential to back it with cotton muslin. I use Southern Belle cotton muslin, but any good quality white cotton muslin will do.
Legacy Linen’s Alba Maxima could easily be substituted and wouldn’t require a backing fabric.
Threads
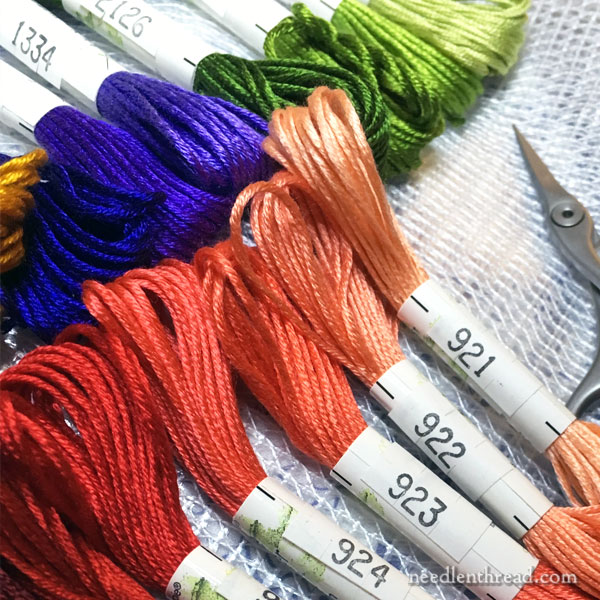
The whole project is embroidered with Soie d’Alger stranded silk. There ain’t nuthin’ like it!
These are the colors I used:
Greens (light to dark): 2124, 2125, 2126
Blues (light to dark): 1334, 1335, 1336
Coral Reds (light to dark): 922, 923, 924, 925, 926
Yellow-gold: 2525
Tools
Hoop: 8.5″ round (the pattern is 7.5″ round, so you might choose a larger hoop if you like a little more space around your design). The inner ring of my hoop is bound with twill tape. You can find a tutorial for binding a hoop here.
A floor stand that will hold a hoop, or a sit-on hoop stand like this one, if you want to have both hands free to stitch.
Scissors: small and sharp!
Needles: #7 and #9 crewel (embroidery) and #24 and #26 tapestry
Transfer Pen – I used Sublime Stitching’s fine tipped iron-on transfer pen, which I reviewed here. I used the blue. These things are good!! You should definitely have at least one in your arsenal!
Setting Up
If you plan to wash your piece after finishing it, and you’re using linen or cotton, you should pre-shrink your ground fabric. With linen, I usually soak it in hot and cold water repeatedly (three times back and forth), ending with hot water that I let it sit in until the water is cool. Then I roll it in a towel, and, if I’m not going to get to ironing it that day, I pop it in the freezer. That way, when I iron it, it’s still damp, and it irons beautifully using the linen setting on the iron.
If I’m using a cotton backing, I do them both at the same time.
If you don’t plan to wash the project, I suppose you can skip pre-shrinking your ground fabric.
I cut the linen and backing fabric to about 14″ square. You can get away with about 12.5 / 13″ square and it will work fine in a 8.5″ hoop. However, if you want plenty of room for finishing, then I’d go larger rather than smaller.
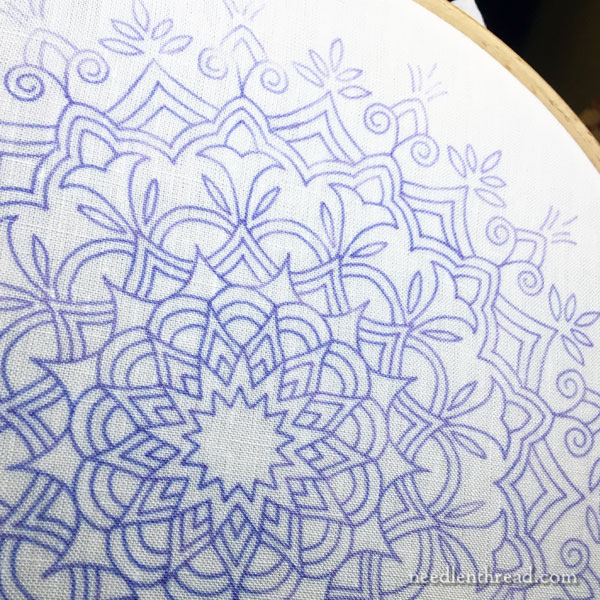
Once the linen is ironed and completely dry, I transferred the design using the instructions for transferring with the iron-on transfer pen.
I hooped it up, and I was ready to go!
I gathered all my silk threads, my scissors and needles, situated myself under a good light, and got started!
I worked from the inside of the design outwards, so that my hands weren’t passing over previously stitched layers too frequently.
First Layers
These are the first seven layers of the design:
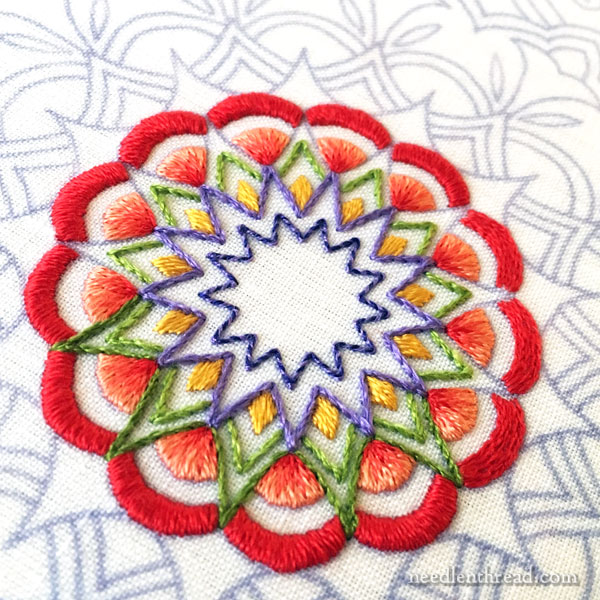
Technically, they could stand on their own as a pretty little round design, couldn’t they? Maybe a Christmas ornament?
In the photo below, I’ve numbered the layers in order of stitching and then listed the stitches used, the colors of thread, and the numbers of strands, with links to tutorials or tips for the particular stitches.
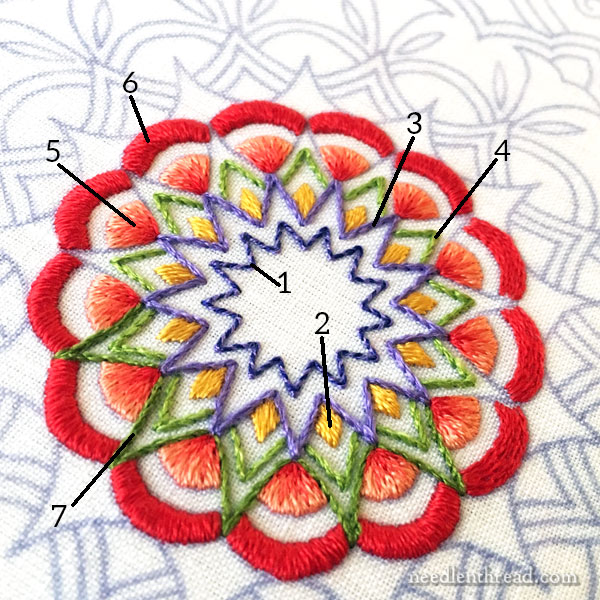
1. Whipped backstitch: backstitch foundation in two strands of 1336, whipped with one strand of 1334. You can find a video tutorial for whipped backstitch here.
2. Padded satin stitch: one strand of bright gold 2525 for split stitch foundation and horizontal padding stitches; one strand for top layer of satin stitch. You can find all kinds of tips and tutorials for satin stitch listed in this article. This particular tutorial on satin stitching to a sharp point is exactly the technique I used for this element.
3. Stem stitch in two strands of 1335 (medium blue). You’ll find a stem stitch video tutorial here. This tutorial on stem stitching on sharp corners will also come in handy.
4. Stem stitch in two strands of 2124 (light green)
5. Long & short stitch in one strand each of 922, 924, and 925, from light on the outer to darkest on the inner part of the design. A split stitch line was worked in 922 in one strand along the design line, and the long and short stitch worked over it. You’ll find video tutorials for long & short stitch here. This particular tutorial on shading at an angle with long and short stitch will come in handy.
6. Padded satin stitch in 926. I used one strand to split stitch along the design lines. I worked close rows of stem stitch between the two design lines for padding using one strand of floss. I satin stitched over the padding and split stitch outline in one strand, working perpendicular to the padding.
7. Stem stitch using two strands of 2126 (darkest green).
Tulip Festival Pattern
Tulip Festival is one of the many kaleidoscope embroidery patterns included in my e-book Favorite Kaleidoscopes, which is available here for download from my shop.
Today is the last day of the launch discount, so you can still pick it up for 15% off!
Resources
You can find all the same materials I used to stitch Tulip Festival – hoop, linen, threads – from Needle in a Haystack online.
Next…
We’ll cover the rest of Tulip Festival in a couple more chunks, and then I’ll gather all the articles together in one index for you to find it easily when you’re ready to stitch!
If you have any questions, feel free to ask them below!
