Happy Friday!
Today, we start the actual stitching on Party in Provence! Yay! For those just joining in, this is the embroidered kaleidoscope project we discussed week before last, when we talked about the materials and supplies needed to embroider the design.
If you plan to embroider Party in Provence and you’re not ready to start yet, no worries! The articles will be available on Needle ‘n Thread when you’re ready, and they’ll be indexed under Tips & Techniques in the main menu, where you’ll find other step-by-step embroidery projects and tutorials that have been previously covered on Needle ‘n Thread.
In this installment, we’re going to launch into the first stitched layer around the kaleidoscope, which actually might not be the layer you expect! I’ll tell you why I started with this particular layer, explain how I stitched it and what threads I used, link you to pertinent tutorials for techniques, cover some tips to help you stitch the round successfully, and even show you a failed experiment on this layer of the design and talk about why the attempt didn’t work for me. At the end of the article, I’ll mention some supply information, for those looking for supplies for Party in Provence.
Even if you’re not working Provence, I hope you find the tips and musings in these follow-along articles helpful for your own embroidery projects!
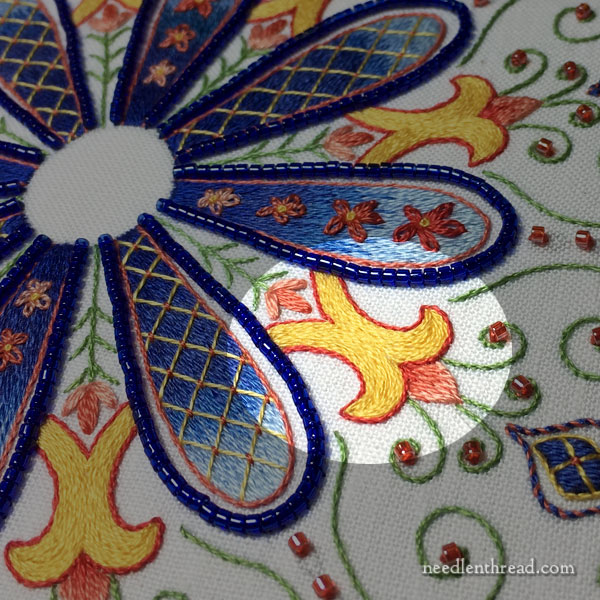
In the photo above, the highlighted element is what we’re going to address first on the design.
You might very legitimately ask Why? Why not just start with the large petals in the very center?
When you look at the design (which can be found in my e-book Favorite Kaleidoscopes), you’ll notice that the large central petals seem to overlap this little yellow fleur-de-lis element. This element, in the scheme of the design, seems to pop out from behind the larger blue petals.
Since the stitching of the petals overlaps just the edge of the yellow element, I wanted to make sure that I had that element stitched before working a petal on top of the edge of the yellow elements.
Now, it isn’t entirely necessary to work the whole round of yellow fleur-de-lis elements before tackling any of the petals. But you want to work the yellow element on each side of any particular blue petal before you stitch that blue petal, so that you don’t have to worry about working the edges of the fleur-de-lis underneath an already-stitched area.

In order to stitch the fleur-de-lis element, though, you have to take it apart. The central little bump on the fleur de lis is a different color, and if you consider the design as a whole, the yellow of the fleur de lis overlaps this little central bump.
So we’re going to start there, with the central bump on the fleur de lis.
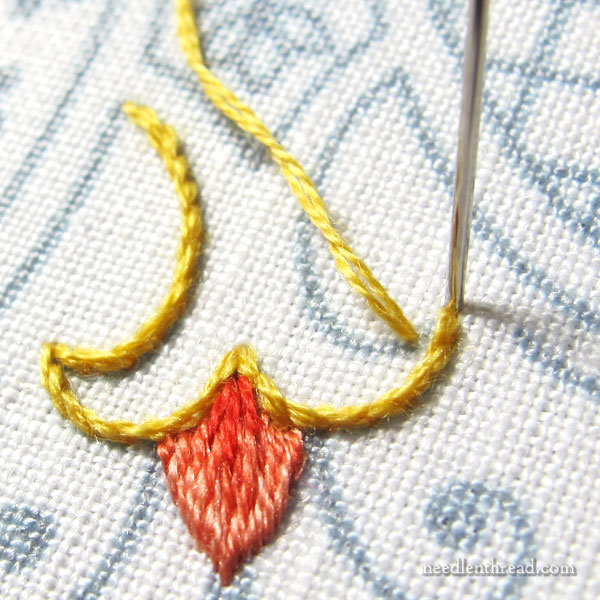
This little element is embroidered with one strand of floss in the following DMC colors: 353 (the light shade on the edge), 351 (the medium shade) and a couple tiny stitches of 349 (red).
You’ll start stitching this element by working a split stitch line in 353 over the line of the peak, but not on the line shared by the yellow.
Then, work the first layer of long and short stitch over the split stitch line in 353, filling more than half the shape with the first layer. Finish filling the shape with long and short stitch in 351. Then work about three more long and short stitches in 349 on top of the second layer, right in the center of the petal shape.
Long & Short Stitch Tutorials
You can find tutorials for long and short stitch shading here, and specifically, the video tutorials for long and short stitch are located here.
With this particular element, the size is quite small, so just keep your stitches vertical and straight when filling across the element. It won’t take many stitches!
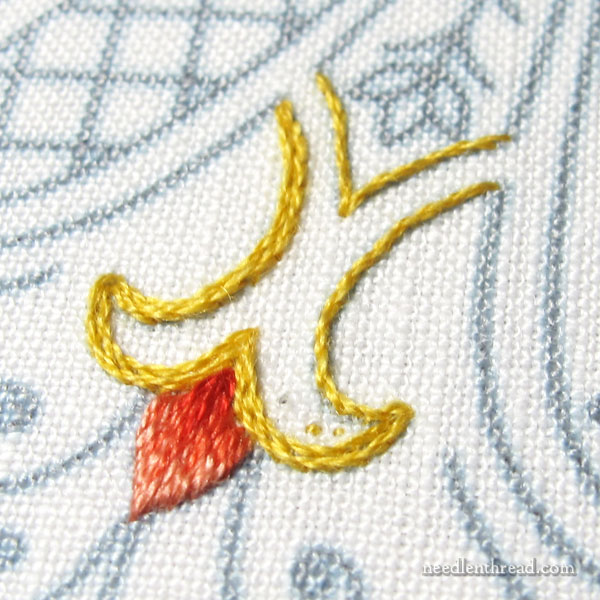
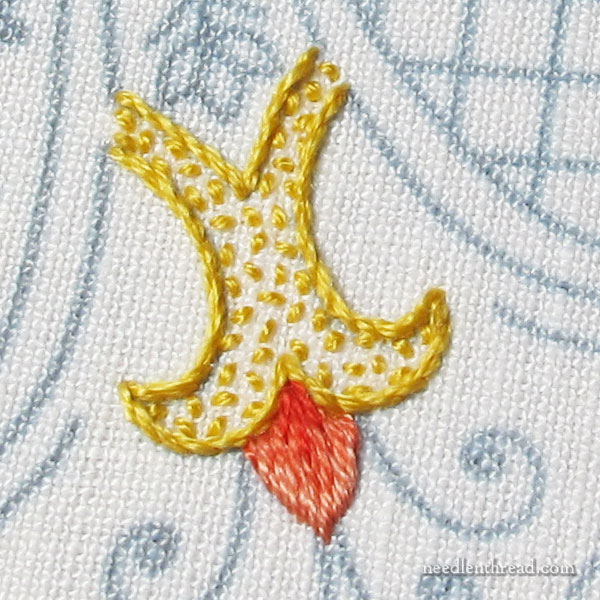
In the photo below, you can see a good shot of the element with the three red stitches in the center.
The yellow part of the fleur de lis shape is stitched with two strands of yellow (743), using stem stitch as a filling.
Start on the outline of the design element, and cover it with stem stitch. When you reach the sharp tips of the element, start a new line of stem stitch (as shown in the photo above), bringing the first stitch of the new line up a stitch length away from the corner, and back to meet the previous line at the corner. Treat each segment of the shape, in other words, as its own little line.
You can find a thorough photo tutorial on how to stitch sharp stem stitch corners here.
You can find a video tutorial for stem stitch here.
To fill the shape, continue working from the perimeter towards the center.
As you approach the center, the areas to fill will become progressively smaller until the two sides meet in the middle.
You don’t want to crowd the filling super-tight, but you don’t want it loose enough that you can see the ground fabric.
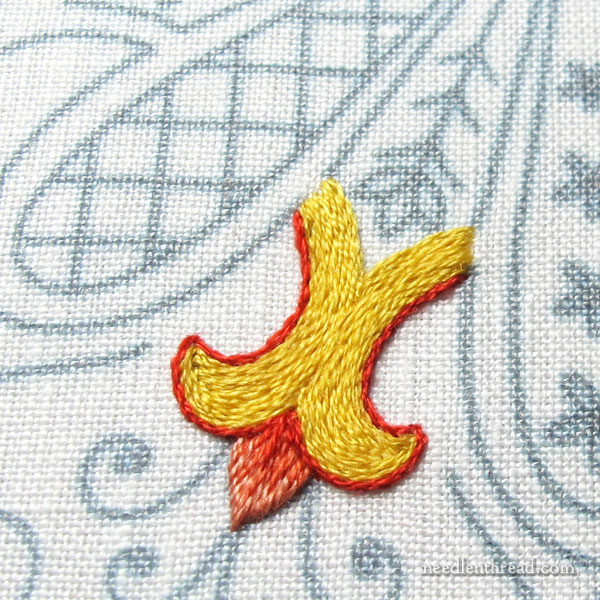
In the photo above, you can see the general “movement” of the stem stitch filling and how the two sides of filling eventually meet in the middle. When the two sides meet as you fill, just move to the areas that aren’t filled, and continue to stitch your stem stitch lines. In some very small areas, you might only fit one straight stitch in to cover the final bit of fabric.
When you’ve finished filling the fleur de lis with the yellow stem stitch, outline the whole yellow part of the shape with one strand of 349, using stem stitch worked very close to the yellow shape.
What Didn’t Work and Why
When I started working out this design, I knew I wanted this fleur de lis element to be bright yellow. But I didn’t know if I wanted it entirely filled.
I played a bit with the idea of texture, too – maybe I wanted some of the elements a little more textured than others?
So I tried a combination of seed stitch and stem stitch on the element:
As soon as I stitched that, I knew it wasn’t what I wanted! First of all, it didn’t pop with the notion of Sunshine! It seemed insipid. An obvious reason for this is because it isn’t outlined with the red (which always makes yellow explode). I really wanted this ring on the kaleidoscope to look like a burst of sunshine, so I knew the seed stitch wasn’t going to do it.
There’s also the problem with the texture here. Sunshine isn’t bumpy! And I realized that the texture of the seed stitch would clash with the texture of the beads around the large blue petals – it would be too much. So the choice was a long and short stitch filling or stem stitch filling.
I went with stem stitch because it worked for what I wanted. It provided a relatively smooth burst of sunshine! And, using two strands, it worked up fairly quickly.
However, if I were doing this project again, I would probably fill the yellow part of the fleur de lis with long and short stitch filling, using one strand of floss. It would be slightly smoother and it wouldn’t have quite the same “movement” to it, because it wouldn’t split down the middle where the two sides of stem stitch filling run into each other.
So, that’s up to you! If you’re comfortable with long and short stitch, you might prefer to try long and short stitch to fill this yellow element. It’s a little trickier on the two sides of the shape coming towards the center, but once you work through those, working down the center of the shape would be a breeze.
If you’re relatively new to embroidery and you haven’t done much long and short stitch filling, you’ll probably find the stem stitch filling easier.
On Supplies
I’ve heard from many who are looking for Alba Maxima linen, as Needle in a Haystack is out. They are, however, taking orders for their next shipment coming in next month, I believe.
In the meantime, though, you might find the fabric still available at other shops online. Threadneedle Street in Issaquah, Washington, might have it. And A Stitching Shop in Denver, Colorado might have it. If you really want to use Alba Maxima, you might check either of those, and if you don’t see it listed on their websites, you could always give them a call.
But you don’t have to use Alba Maxima! You can use any good linen with a nice full weave. The French Needle carries this Graziano linen that’s nice to work on and would work great for this project.
And you might have your own favorite high count linens by other manufacturers that you like to work on. That’s fine! You can substitute!
On thread colors: I listed 743 as the yellow that I used in this project. In fact, I used 725. I made a note of the switch in my little project notebook, but forgot to change it on my original thread list! It won’t make that much of a difference in the finished kaleidoscope, as both shades of yellow are quite similar. But if you want to be very very accurate in replication, then you might switch to 725.
Questions & Discussion
If you have any questions or you want to discuss the project with me or other stitchers, feel free to use the comment form below.
If you want to send me photos of your progress to ask questions or get feedback, you can email me at mary (at) needlenthread (dot) com, but for follow-along projects like this, the best way to interact about the project is in the comments below.
I hope you have a terrific weekend! I’m working on my embroidered mittens this weekend. What are you working on?
