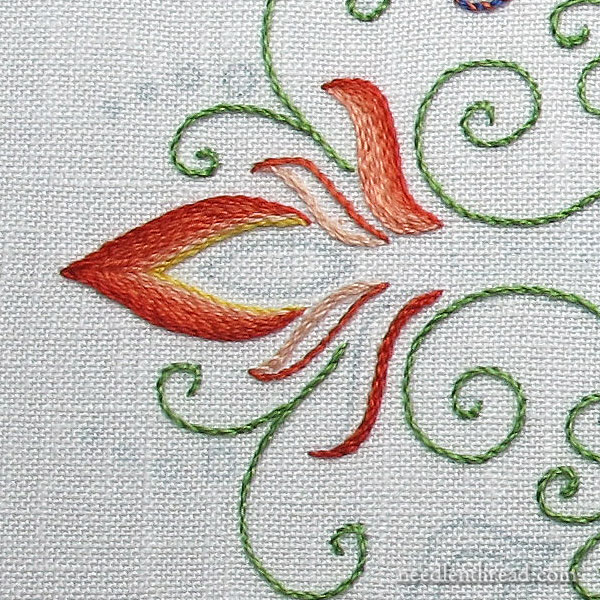
The last time we visited Party in Provence, this embroidered kaleidoscope that I’m covering in a step-by-step series, we concentrated on stitching all the little green swirls on the kaleidoscope.
The swirls are the structure that tie the outer elements on the design to the bold central pattern. Once they’re done, it’s time to add more color to the outside edge of the kaleidoscope.
So, today, we’re going to concentrate on adding the main components of the outside edge – they’re the fiery bits that add flare to the outer part of the design.
There’s a reason I chose the color scheme I did for this outer edge, and we’ll talk about that below, too!

The part of the design we’re looking at here are these bursts of yellow, corals, and reds on the outside of the kaleidoscope. When this gradation of color from red to coral to a little touch of yellow comes together, the overall impression when you step back to look at the kaleidoscope, finished, is a somewhat orangey burst on the outer edge.
I wanted the idea of sunshine to permeate this design, and so the bursts of fiery color on the outside edge are supposed to be a kind of radiation of that inside band of bright yellow. I don’t know if it worked out that way, but that was the idea behind the color choices!
There are only two embroidery stitches at work here – the stem stitch (which you should be an expert at by now!) and the fishbone stitch.
You can find a video tutorial for the stem stitch here and a video tutorial for the fishbone stitch here.
Another article that might come in handy when working this section is this one on Stem Stitch Filling Tips.
Order of Work
It doesn’t really matter if you work the center upright leaf-shaped element first, or the surrounding swashes. I think it’s easier to do the surrounding parts first, and then the leaf, but that’s up to you!
We’ll look at the leaf first and get it out of the way, since it’s the least complicated part of this area.
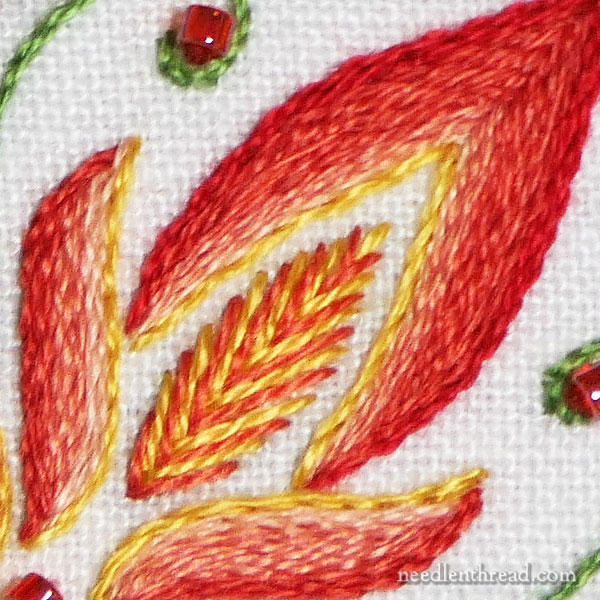
For the fishbone stitch leaf, thread up two needles.
In the first needle, thread up one strand of yellow (725) and in the second needle, thread up one strand of dark coral (350).
Begin the fishbone stitch at the top point of the leaf with a central straight stitch in yellow, and then, working down the leaf shape in the normal progress of fishbone stitch, alternate between the yellow and coral until the shape is filled.
Stem Stitch Filling
The stem stitch filled elements surrounding the leaf shape are filled in a certain pattern of color, detailed in the diagram below:
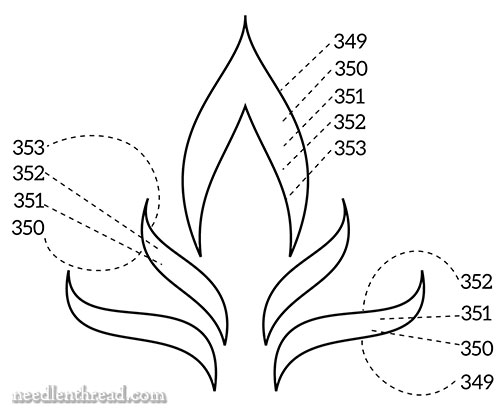
Starting with the lower side swash, it is shaded from the base upwards starting at the darkest red (349), but not all the way to the lightest coral.
The second side swash up is shaded from the base in the darkest coral (350) up to the lightest coral.
This helps create the dark-to-light rising of color in that area.
There’s a small line of yellow stitched at the top of each side swash, too, and inside the base of the top shape, but this tiny yellow line should be stitched after finishing all the other filling.
Starting out the outside design lines of each element, work a row of stem stitch in the color indicated in the diagram above. This defines your boundaries and the shape.
In the darkest shade at the base of each swash, work two lines of the darkest shade. At the top of the swash, you’ll have at least two lines of the lightest shade.
In the middle, as you fill, you might have one, two, or three lines of the different shades of coral. It really depends on your stitch tension and how close you stitch your stem stitch lines.
What you’re shooting for is that gradation of shades upwards.
For the topper on the whole design element – the shape that fits around the leaf – you’re doing the same thing: work the outer line of the element in stem stitch in red (349) and the inside line of the element in the lightest coral (353). Then, working in rows to fill the shape, change from shade to shade to produce that gradual change of color.
On the topper, I worked more of the dark shades than the light shades, as you can see in the close-up photos in this article. The lightest shade of coral – 353 – on the inside of the topper is only one stem stitch line.
When you’re finished with the red and corals, take one strand of yellow, and stem stitch just along the edge of the inside of the topper and the top of each side swash.
The yellow brings that whole element to fiery life!

Looking for More?
If you want to see this project develop from the beginning, you’ll find all the articles for Party in Provence listed in the Embroidered Kaleidoscope Projects index here on Needle ‘n Thread.
The design for Party in Provence and the other kaleidoscopes detailed in step-by-stem instructions here on the website can be found in my pattern e-book, Favorite Kaleidoscopes, where you’ll find over 30 designs for fun embroidered kaleidoscopes.
If you’re following along with this project and you have any questions or comments – or even if you’re not following along! – feel free to join in the conversation below!
