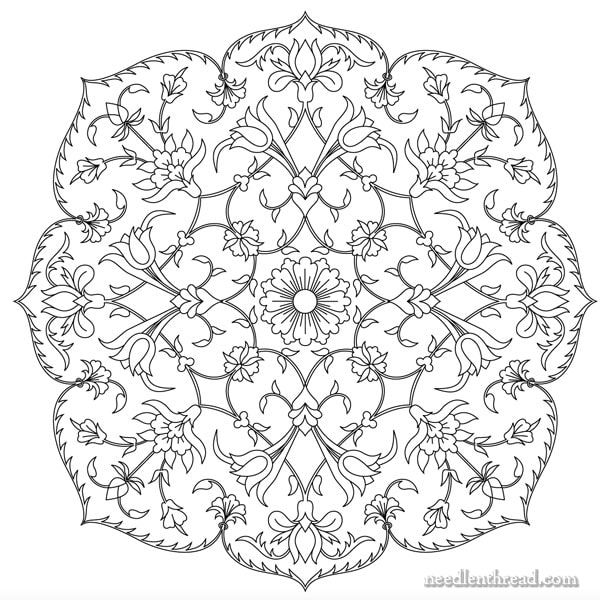
Today, a rather exuberant hand embroidery design for you!
This is no small embroidery pattern. If you were to undertake it as a project, I think it could occupy you for quite a while! But it depends, really, on how it’s worked.
I have some ideas on how Tulips & Blooms can be interpreted in embroidery, from simple to complex projects, and I’ll share those with you below. I’ll also talk about the pattern itself, its origins, how I’ve changed it up a bit, and then, if you want to chime in with some stitching ideas, that would be great, too!

I’ve mentioned it before, and I’ll probably say it again, but I’m pretty bad at naming embroidery projects and designs! But when I look at this particular patter, I see tulips and blooms, so that’s what I called it.
The pattern itself originated as a Therese de Dillmont design from one of the public domain DMC books. But, not satisfied with Dillmont’s original design – or with its presentation in the original book – I decided to change the design up a bit.
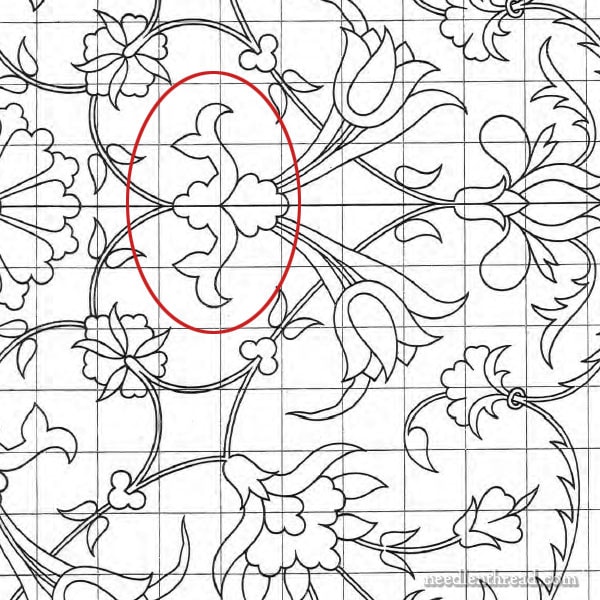
In the original book, the design is presented on a gridded background, to make enlarging it by hand-drawing it easier and to make it easier to repeat the design when transferring it. Only part of the design is presented in the original book.
Strangely enough, though, when you settle down to really study the design and work out the repeats, the version in the book is slightly off. This doesn’t really matter if you are re-drawing a design completely by hand in order to transfer it. But if you were tracing the design, using the gridded lines as a guide, it would be problematic.
So my first purpose when I tackled this particular design – which I like very much – was to straighten the whole thing out and present it as a complete design, without repeats.
Then, my second purpose was to make the elements more sensibly sitchable.
Making the Elements More Stitchable
In the original there are several elements that I considered odd in shape or situation, and several that I think would translate better into stitches, with some modifications.

So, this area on the old design – well….it’s kind of just odd. And how would you interpret it into stitches? Just a filled area? Perhaps a shaded, filled area?
In any case, I think it would come out as an odd shape on the overall piece, and, if filled, because of the size of the element, I think it would draw the eye to something that looks rather like bulging biceps.
So I changed that element entirely, working the bicep thing into another curved branch with leaves, and segmenting the element above it.
Some of the floral elements, I adjusted a little bit and added vein lines to them to give a sense of direction or to just break up the open area. A couple elements I adapted into more obvious florals, rather than just shapes.
Once I had my drawing complete, I scanned it, traced it as a vector and got everything pretty much situated for the whole design. You can read about my process of turning a drawing into a downloadable design here.

Of course, there’s the problem of printing, when offering free downloads. Most people are printing on standard paper sizes when printing from home. But this creates a very fine, very detailed pattern that’s only about 7×7″. That’s a lot going on in 7×7″! If you’re working with very fine threads, it would work – and it would be very pretty!
But I could see this design more appropriately stitched much larger – in fact, 13.5″ x 13.5″ would make a nice size for a cushion design.
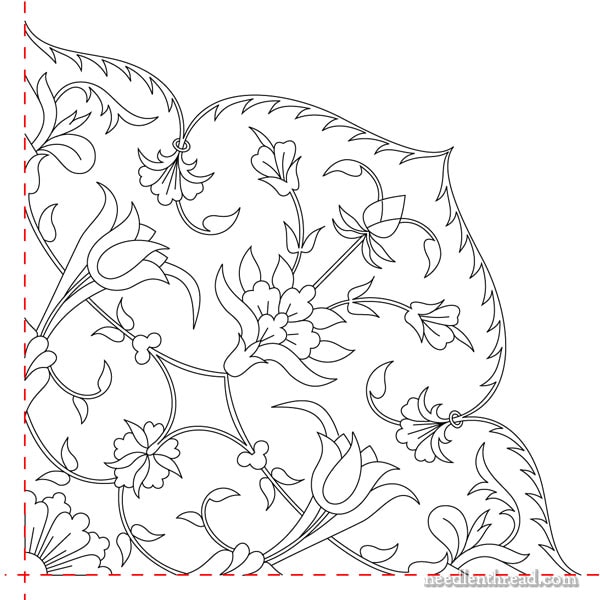
So, I split the pattern into a quarter, so that, if you want to transfer the design at a large size right from home, you simply have to transfer the quarter repeat four times.
It would be vastly easier, though, to print the smaller size and then stop by a copy service and have them enlarge and print the whole design to 13.5″ on larger paper, and then to work from there.
Interpretations
If you went all-out on a large cushion size with this design, it would work up much faster in crewel wool than it would, for example, in cotton or silk. So the design, enlarged, is definitely “crewel ready.”
That said, if you wanted to go very elaborate with colors, fillings, and what, working the design in cotton or silk, you can do that, too!
But if you want something that’s simpler and quick, I think the whole piece would work up very nicely in a monochromatic approach, just stitching the design lines. I could see it, as well, in a white-on-white or ecru-on-white with different textured line stitches worked over the outlines.
So, while the design seems complex, the complexity of the embroidery and the amount of time it would take to stitch really depend on how you want to interpret the design.
If you want to go all-out-elaborate in multiple fillings with cotton or silk, there’s that option. If you want to take a moderate approach with a larger cushion design, it would work up well with crewel wool. And, for a quicker but elegant design, stitching just the lines in a monochromatic scheme or white or ecru on white would get you to a finish faster than the first two options.
Tulip & Blooms Design Downloads
Whatever your approach, I hope you enjoy the design! Here are the PDF printables that you can download and print from your own computer:
Tulips & Blooms – full design (approximately 7″ x 7″)
Tulips & Blooms – quarter design (when duplicated, will make approximately a 13.5″ x 13.5″ design)
Hope you enjoy it!
Looking for More?
You can find more free hand embroidery designs to download and stitch right here under Patterns on Needle ‘n Thread.
If you’re looking for stitch-along projects, check out the first section on my Tips and Techniques Index here.
And if you’re looking for full step-by-step project instructions for various types of embroidery projects, you can find several project e-books available for download in my shop.
If you’re looking for downloadable versions of the public domain Therese de Dillmont books, you can find a while slew of them available for free through Antique Pattern Library. Careful, though! Browsing through there is like falling into the abyss! You won’t come up for air for ages.
Enjoy!