I’ve started playing with some miniature pieces of embroidery to use in jewelry bases.
If you’ve been following along on Needle ‘n Thread for a while, this probably won’t surprise you too much, because I love little embroidery projects – and when it comes to embroidering for jewelry bases, well… that’s pretty little!
The fun thing about these little embroidery projects is that they take very little time to work up, if you’re not making anything too complicated. I’m not even talking about a weekend project – I’m talking about a morning or afternoon project!
It all depends, though, on how complex you make the embroidery.
I went with pretty simple. I still need to get some aspects of the whole process ironed out. I’ll tell you what went well, what didn’t, what I will change for the next time, and I’ll share resources and some free patterns with you, so you can stitch up your own little autumn embroidery bits, too!
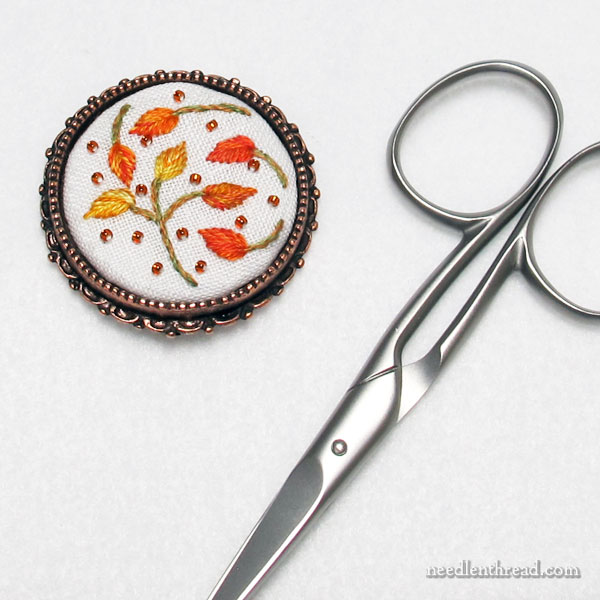
My first attempt was the brooch / pendant above. This comes from the new collection of jewelry finishing kits from Nunn Design.
The kits are not embroidery kits – they are kits for finishing embroidery into jewelry.
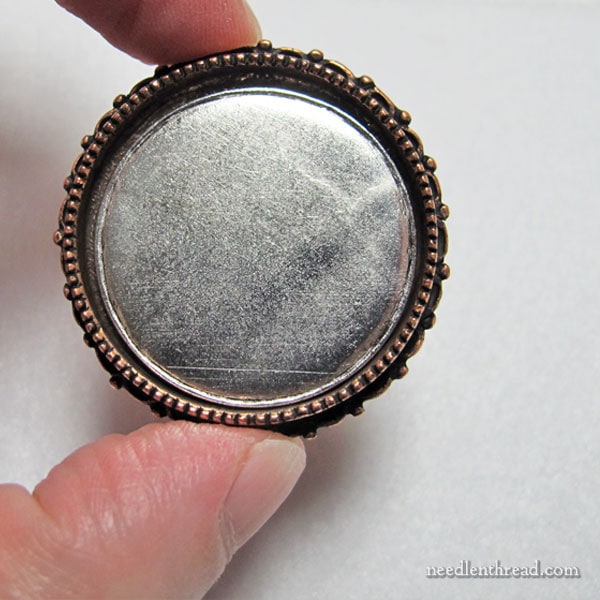
The kits come with the bezel (or setting), the insert that you mount the embroidery on, and instructions on how to set up and finish your little project into a piece of jewelry.
In the photo above, the silver middle is the insert. You remove that little round piece (which is finished so that the edges are smooth) and you mount your embroidery over that.
This silver disk, in fact, gave me a little trouble due to the materials I used for my stitching – I’ll tell you about that below!
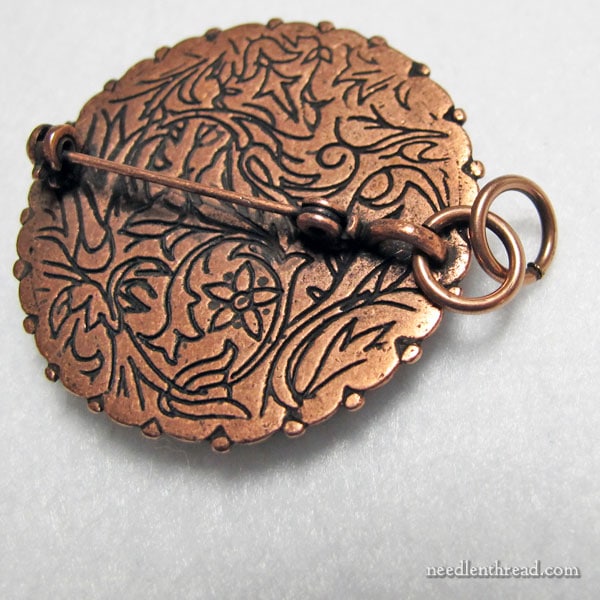
The back of this particular brooch / pendant setting is finished so that it can be either a brooch or a pendant. I prefer it as a brooch. The brooch hardware on the back keeps the pendant, if on a chain, from resting flat on the person wearing it. It kind of tilts to one side or the other if it’s resting on the wearer’s chest. So I think these work best as brooches.
The rings there, by the way, tuck to the back so they aren’t visible when worn as a brooch.
I was thinking, in fact, of finding a copper leaf charm and using the pendant rings to add a little dangling charm to the outside of the brooch. Why not add a little extra bling if you can, right?
The new collection from Nunn Designs launched this week, and it has some interesting things in it. In fact, the model embroideries that they use to display the jewelry settings are gorgeous – if you have a chance to visit the website just to take a look at the embroidery, do!
What I especially like, though, is the idea of the hardware for finishing the pieces into small ornaments. This approach to little embroidery mounted in pretty settings for ornaments actually captures my interest more than the jewelry aspect.
But I also like the idea that you can create a little seasonal piece of embroidery, mount it in a pretty brooch base, and pin it onto a coat lapel, for example. It’s a fun way to “season” things up!
What Went Right, What Went Wrong
Whenever I first start playing around with some kind of new-to-me stitchy idea, I generally plow headlong into experimenting without necessarily thinking the whole thing through!
And this can be problematic, because I will, inevitably, make mistakes that I could have avoided, had I bothered to think for a minute or two.
This is the sanguine side of me. I get a wild hair to try something, and I jump right in, eager to see the quickest results …which will then tell me if I want to pursue the whole thing any further.
I don’t really recommend this approach. On the bright side, it allows me to make mistakes for you, so that you can avoid them!
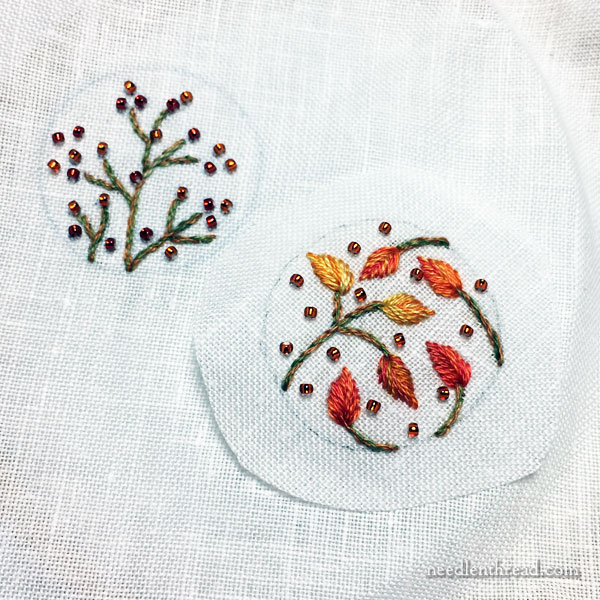
I began by doodling up some little twiggy and leafy things that smack of autumn.
I traced these onto fabric.
My first mistake was my fabric choice. I grabbed whatever I had close at hand, which happened to be a small scrap of shadow work linen. This linen is really too sheer for this type of finishing, unless you put another fabric behind it. The silver insert of the jewelry kit shows through if you use a fabric that’s too sheer.
With the first leafy embroidery, I stuck a piece of non-woven interfacing behind it when I mounted it over the silver disk. This whole process was a pain in the… neck, so the upshot: best to choose fabric that isn’t quite so sheer!
Additionally, I found the linen a little stiff for the finishing method. It was hard to get a really smooth edge around the insert. In the future, if I use a different linen for the same process, I’ll probably experiment with other approaches to finishing.
My second mistake was including the outline of the circle in the design.
Don’t trace the circle or “frame” around the embroidery! If you’re not stitching over that circle as part of your embroidery design, you’ll just have to remove the lines somehow from your fabric. And that’s another big pain in the… neck.

For the leafy piece, I based the design on Octoberfest!, so if you already have that e-book and you’ve worked the project or plan to work it, you probably have all the threads and beads on hand to make this little brooch. The instructions are the same instructions for Octoberfest. And the design is included in the free printable below.
I like this little leafy piece, but here’s another thing I did wrong!
I didn’t have any clear nylon beading thread on hand, and I didn’t want to use colored thread behind the lightweight linen, so I used a white sewing thread to sew the beads on.
Looking at the pendant directly on, it’s not so noticeable, but looking at it from the side, I don’t really like seeing the white thread used to attach the beads.
The fix: if you’re using beads, either invest in nylon beading thread that’s clear and practically invisible but is a pain in the (neck) to work with; or use a color that corresponds with the beads, as long as your ground fabric is either colored or heavy enough not to show the thread passing between the beads.
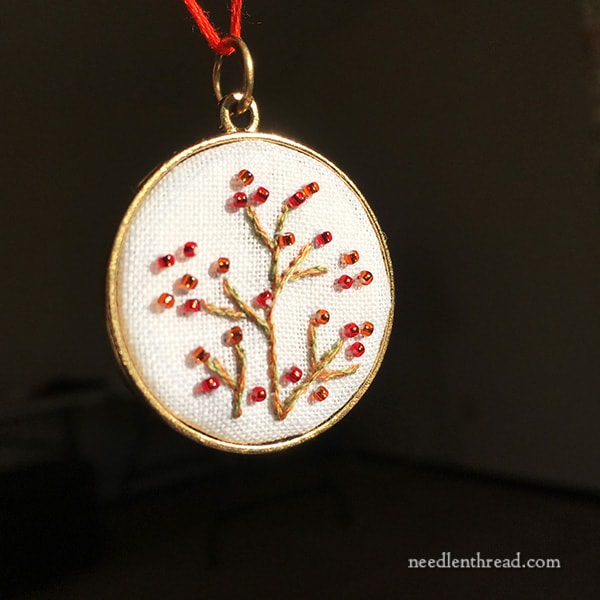
This is one of the plain bezels from Nunn Design. Their bezels (which are made in the US) are all plated with either copper (the first one I showed you), 24k gold (this one), or .999 silver, so, material-wise, they’re very sturdy and they’re nicer materials than the cheaper bezels from made-in-China markets.
One of things I really like about their settings, though, is that the “tray” that takes the insert is deep – much deeper than most bezel trays, which are normally 1mm deep. These are at least 3mm deep, which works great when you’re mounting something like embroidery – it covers the edge of the mount well.
So, this little twiggy bit above is simple – just some stem stitch and some 15/0 seed beads. Again, next time around, I’ll pick different ground fabric and I’ll use different thread for attaching the beads. But I like the simplicity of the twigs, and I like the sparkle of the beads!
In fact, after experimenting a bit, I like the whole process, and I plan to pursue a few more ideas in this whole vein. I’m not going into full scale jewelry production or anything – I just have a few notions for Christmas gifts and perhaps for ornaments. We shall see what develops!
Free Patterns Printable
If you want to toy with some quick little embroidery for fall to mount in jewelry settings, here is a printable with three twiggy and leafy designs that fit into a 32mm round bezel.
When you print the designs, choose “no scaling” or “100%” in your print dialogue box, to get the correct size.
Three Autumn Embroidery Bits for Jewelry (PDF)
I strongly suggest that you do not transfer the dashed line “frame” around each design.
The whole set up and finishing instructions for making into jewelry or ornaments using bezels like the ones above are explained in the jewelry kits from Nunn Design, and they also have a link to a video tutorial on their kits page for the embroidered jewelry items.
Resources
You can find the bezels that I used for these samples here through Nunn Design. Look under their “embroidery kits,” which include the bezels, the insert, and instructions for setting up and finishing into jewelry.
You can find Octoberfest! here, if you’re looking for something a little larger to stitch for autumn.
You can find the specialty thread pack that I used for the samples above here at Akonye Kena, the distributor for House of Embroidery threads in the US. They have recently ordered new thread packs for Octoberfest!, so if if you order now, you’ll receive the thread pack when the new shipment comes in. The thread packs are still available at a discounted price ($12) for Needle ‘n Thread readers.
This article may contain affiliate links, which means that Needle ‘n Thread gets a small kickback for any purchases made through those links, at no additional cost to you. Thanks! Every little bit counts!
