I know we’re getting a wee bit close to Christmas, but if you have it in you to stitch something Christmassy over the next week or so, perhaps this project will tickle your fancy!
Remember last week when I showed you the holly & evergreen design that I had altered and started stitching?
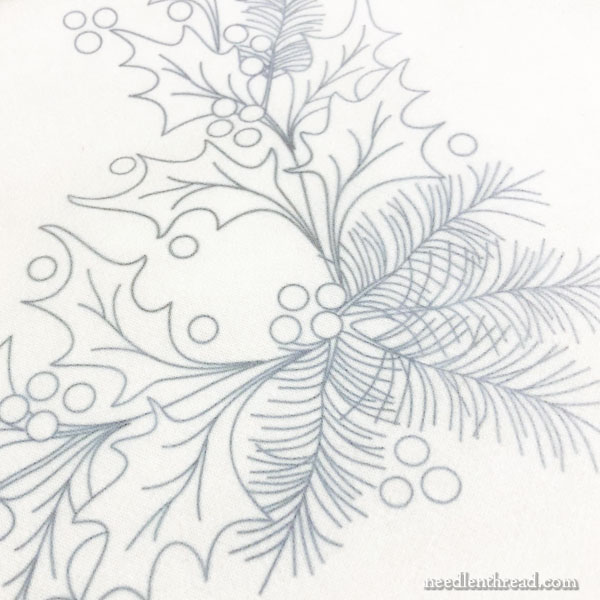
By way of an early Christmas gift for you, today I’m going to share a few tips with you on how I stitched the design, along with a thread and stitch list. I’ll give you three versions of the design – the full version, a light version, and an ultra-light version.
I’ve also added a little something in my shop for those who don’t like transferring designs and who want to launch into stitching without the hassle of transferring.
And finally, at the end of today’s article, I’ll announce the winners of Monday’s Book Bundles from A Stitcher’s Christmas!
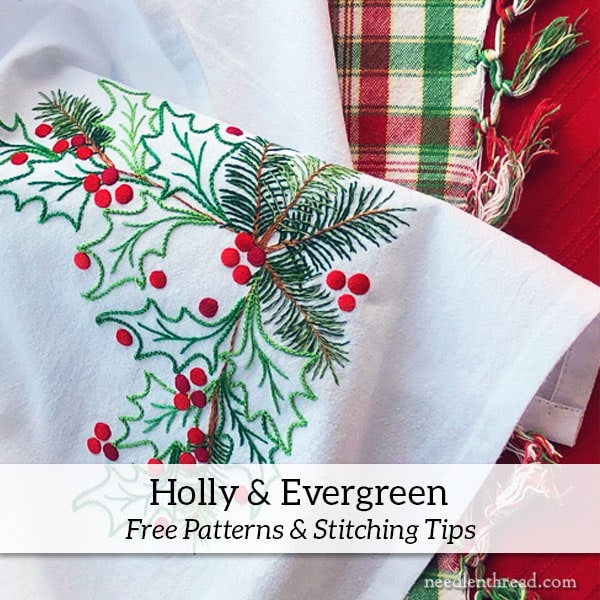
I’ve stitched this holly & evergreen decorative corner onto a flour sack towel, using only four very simple stitches. This keeps the whole project uncomplicated and relaxing. The results are not only Christmas-colorful, but they are just a little textured, to give some extra interest to the whole design!
The project is suitable for beginners and beyond.
Supplies
Here’s a list of supplies you’ll need to stitch these designs.
You’ll need a hoop. I used a 6″ wooden hoop with the inner ring bound. You can find a tutorial for binding the inner ring of a wooden hoop here. Binding the inner ring helps protect your fabric and it also helps maintain good tension while you’re stitching.
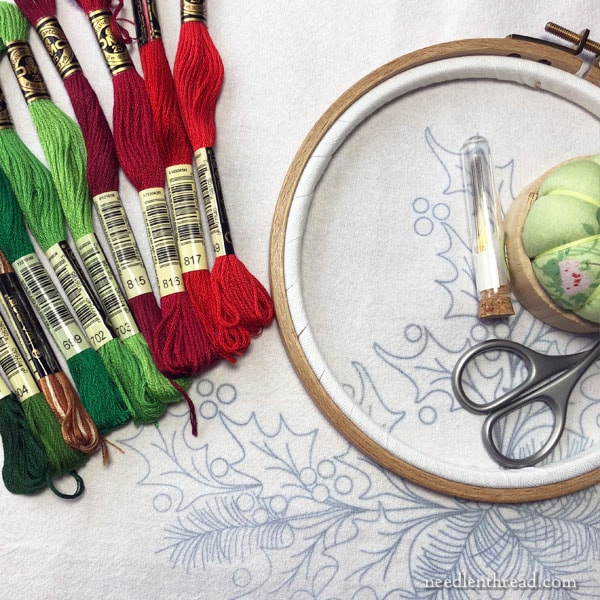
You’ll need needles. I used a #7 crewel for all the stitching.
And you’ll need a sharp pair of scissors.
You’ll also need whatever items you find necessary for your favorite method of design transfer. I’ve covered design transfer here on Needle ‘n Thread a gazillion times, so I won’t go into detail here. Briefly, you can trace your design with a pencil using a light box or a sunny window; you can use Sublime Stitching’s fine-tipped iron-on transfer pens; or you can use whatever your pet transfer method is.
I have a limited number of sets of three flour sack towels with the designs already transferred – one of each version – available in my shop, for those interested in purchasing three good-quality flour sack towels with the designs ready to stitch. (More details below…)
Threads
Flour sack towels are meant to be laundered, so the threads you choose for this project should hold up to the wash! As a precaution, you might check your threads for colorfastness, to make sure they don’t lose any dye when laundered.
For threads, I went through my collection of DMC floss and pulled a variety of reds and greens that worked together. I didn’t use all the threads I pulled, and I ended up adding one extra green.

If you’re pulling threads from stash, you’ll want greens that work as evergreens (look for deep greens that might have a touch of blue in them or that might be a little olive, even) and you’ll want brighter, true green-greens that will work for the holly.
I chose a range of reds from a very dark berry-red (815) to a bright, Christmas red in 349. I ended up dropping the 815.
And then I ended up adding a dusty light silver-green (3053) to help out with the evergreens.
So, these are the DMC colors I ended up finally using:
105 (variegated brown for twiggy stems)
890, 904, 3053 (evergreen greenery)
699, 702, 703 (holly greens)
816, 817, 349 (red berries)
Stitches & Order of Work
The stitches are all very simple, and you’ll find instructions for all of them here on Needle ‘n Thread. I’ll link directly to them.
I’ll also include a few little tips, for stitching each type of element.
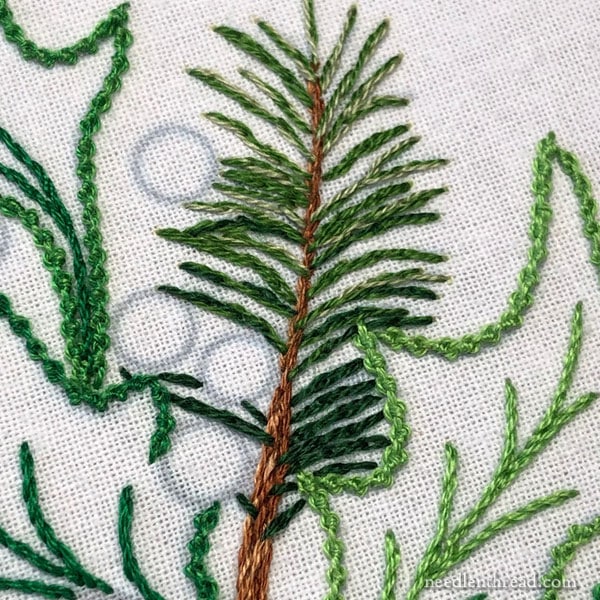
Stems
The brown stems are worked in stem stitch rows, close together and tapering into just one line where the stems are fine.
I cut the variegated brown thread in a length that included both light to dark brown. Then I stripped the floss, removing two strands, and I put those two strands head-to-toe. That is, I reversed the direction of one strand, so that both a light and a dark end went into the needle together.
Here’s a tutorial for stem stitch.
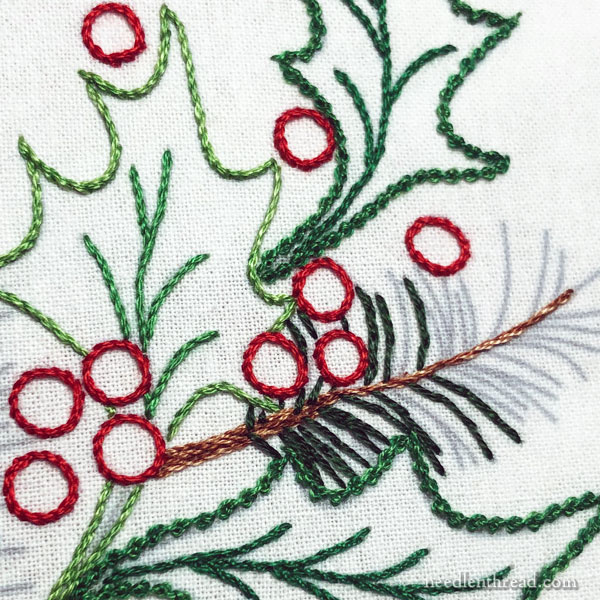
Holly
Even though the evergreen is often behind the holly, it is easier to work the holly before the evergreen because the holly is worked in Palestrina stitch. Otherwise, the evergreens get in the way of the Palestrina stitch.
You can find a tutorial for Palestrina stitch here.
To work the Palestrina stitch up to the sharp tips on the leaves, follow these instructions for working stem stitch to a sharp corner. It’s the same concept.
For the veins in the holly leaves, I used stem stitch in the darkest color of green used for that particular leaf. (See color blending below.)
Simplify It: If you want to simplify the stitching in order to work the towel more quickly, the holly leaves can be outlined in stem stitch or your favorite line stitch (backstitch, whipped backstitch – lots of possibilities!)
Evergreen
The evergreen greenery is all stitched in long split stitches. For the longer evergreen needles, you might fit three split stitches on one needle, but for many, you might only fit two split stitches.
You can find a tutorial for split stitch here.
Don’t worry about whether or not you’re coming up between to the two threads when you split your stitch, or whether you’re splitting just one of the threads! Either way will work fine.
Occasionally overlap the stem of the evergreen sprig with the needles, to give a more realistic look to the sprig.
Holly Berries
The holly berries are padded satin stitch dots.
To see how I embroidered my padded satin stitch dots, you can read these two tutorials, in the order given below:
Satin Stitch Padding – this tutorial will talk about how to build up the padding for the dots.
Padded Satin Stitch Dots – this tutorial will show you how to work the satin stitch over the padding.
I used two strands of floss when I worked the satin stitch. Normally, I would only use one strand for satin stitch, but this type of embroidery is a little more relaxed, and it takes a heck-of-a-lot longer to stitch satin stitch with one strand! Just make sure your thread isn’t twisting when you’re working the satin stitch, or the dots won’t be as smooth as they could be.
Simplify It: If you want to go for a lighter look – and a much quicker approach to stitching! – you can just outline the berries in red, using stem stitch or any other favorite line stitch.
You’ll find a tutorial for working stem stitch in circles with an invisible join here.
Color Blending
To keep the colors from being too flat, and to give me a better range of shades, I often mixed two colors in my needle.
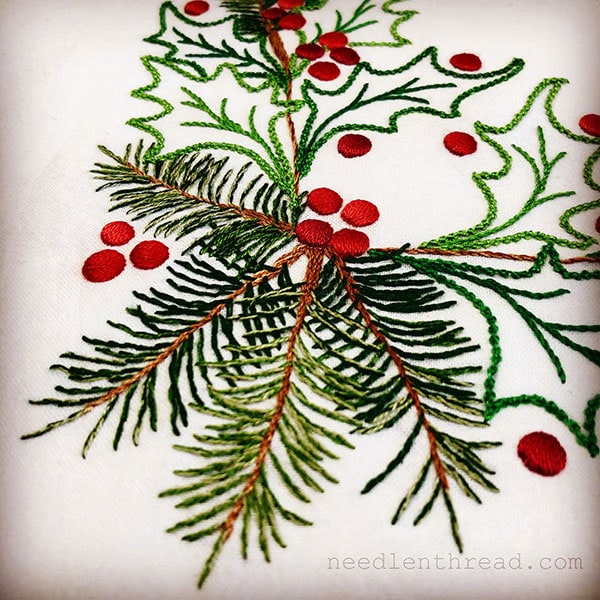
On the evergreen, for example, I used three shades of green. Let’s call them, from dark to light, A, B, and C.
At the base of an evergreen sprig, I used two strands of A. As I worked up the evergreen sprig, I combined one strand of A and one of B in the needle. Then, still working towards the tip, I switched to two strands of B, and finally, where I wanted things really light, I combined one strand of B and one of C in the needle.
Where evergreen sprigs overlap each other, I worked the back sprigs first, in darker colors. Then I worked the foreground sprigs on top of those (stitching right over the previous evergreen needles) using lighter colors.
For the holly, I combined threads in the same way, so that I would have a wider spectrum of shades of green. Play with your favorite combinations for the shades you want to achieve! Or, if you want to keep it simple, just use two strands of a single shade.
I stitched the berries in three different colors of red, using two strands of the same color in the needle at once.
Free Patterns
Here are the PDFs for the free Holly & Evergreen patterns. Choose “actual size” in your printer dialog box to ensure the right size. You can re-size to suit your needs, if you wish!
Holly & Evergreen – Full Corner Version
Holly & Evergreen – Light Version – Large Single Sprig
Holly & Evergreen – Small Sprig
Towels with Pre-Transferred Designs Available
Right here in the shop on Needle ‘n Thread, you will find a very limited number of sets of three flour sack towels with one of each of the designs above already transferred on them, ready to stitch.
The designs are crisp and clear. The impressions will launder out, fading significantly the first time the towel is laundered, and then usually completely with the second laundering. Flour sack towels are meant to be laundered, so make certain you’ve chosen threads that can be washed.
The flour sack towels are bright white, soft cotton, approximately 27″ x 27″, hemmed on all four sides, with an inset corner twill loop for hanging.
These are very good quality towels (the best I’ve found lately), but keep in mind, they are flour sack towels. They aren’t fine linen. They’re soft cotton and they do have occasional characteristic flaws.
You can find the 3-towel set available here in my shop.
Currently, I am only shipping them to US addresses (international shipping is simply too prohibitive – it’s more than the cost of the set). They will ship priority mail, flat rate, and they will go in the mail on Monday, arriving in 2-3 days anywhere in the continental US. Alaska and Hawaii will take longer.
Stitcher’s Christmas Book Bundle Winners
The winners of the four beautiful needlework bundles from Search Press are Jane Corroll, Kathie D, Barbara Seavey, and Karen from Minnesota! Congratulations, ladies! I’ll contact you via email for your mailing information.
